Constructing a Curved Pedestal Base
Advice on how to construct a complex curved pedestal. February 17, 2011
Question
Does anyone have any thoughts on how best to construct the image below? Should I use bending ply or solid?
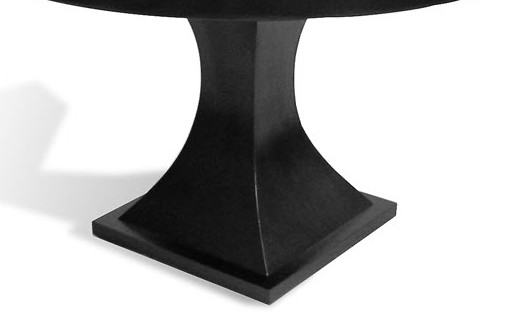
Click here for higher quality, full size image
Forum Responses
(Architectural Woodworking Forum)
From contributor O:
It�s hard to tell what the top is made out of, but with the base it would be just about impossible to make any kind of plywood look good on the corners. All four sides are flat so it would be easy to veneer them.
I would use either vertical framework cut to the shape of the exterior curves or use something like a 4x4 in the center with square pieces of plywood starting big at the bottom and getting smaller in the center and then bigger at the top again, clad your framework with rubber ply or regular ply with sawcuts on the back side.
Once it is glued and fastened I would spend time doing lots of sanding to make sure the shape is just how you want it and then veneer it. Not sure if I explained it clearly but have done similar stuff before this way. Another option would be to get it done with a solid piece and either carve by hand or get someone with a machine to do it.
From the original questioner:
The base needs to be veneered in rift oak. I�m thinking a few layers of 3/8 bending ply for each side in a vacuum bag over a form. How to join them is the next hurdle. Maybe some interior framework that would be strong enough to handle the pressure of a vacuum bag and then two ply the outer veneer when the base is assembled? Is there any other way?
From contributor Z:
First, how big is it?
From contributor A:
I would build the part out of bending ply and veneer it afterwards. It will take two runs veneering opposing faces. I would make disposable bags that are real loose so you don't crush the edges. This is a challenging project to do really well. I hope you are compensated for the risk. You will have to spend a ton of time getting the surfaces dead fair or the light will highlight the defects in the clearcoat. I would buy a gallon of "bondo" at NAPA. 3M makes a very good inexpensive product.
From contributor O:
I have made that exact base and it is harder than you think. The top was 48''X60'', so the base needed to be strong and have some weight. I used plywood ribs cut to shape using a template and pattern bit. The corners will be a solid stack, mitered to form a corner. Fasten to a plywood top and bottom. Skin it with multiple layers of 1/8'' bending ply, either a vac bag or staples and glue. Sand, bondo then sand and bondo, until it's right.
From contributor T:
This doesn't look that difficult to me. I would use kerfed 3/4" MDF for the sides, and overlap the corners on two sides- then skin with 1/8" MDF to cover the kerfs on the ends, and flush trim with a router. This would be bent onto a vertical plywood "T" underneath to give the right curve. I would have laid out the patterns for the "T" on the computer, and cut them on the CNC. The sides could also be laid out, and flattened to give a pattern to pre-cut the curves in the corners. All this would be allowing for the corner overlaps, and the skin. The veneering would be done with hot glue and a veneer hammer, so it would not need to be bagged.
From contributor Y:
We have a similar product. We build a frame work and skin with 2 layers of 1/4" bender. Pain in the ass however you build it we are lucky we have a CNC and a good solid works draftsman we get pretty good components.