Question
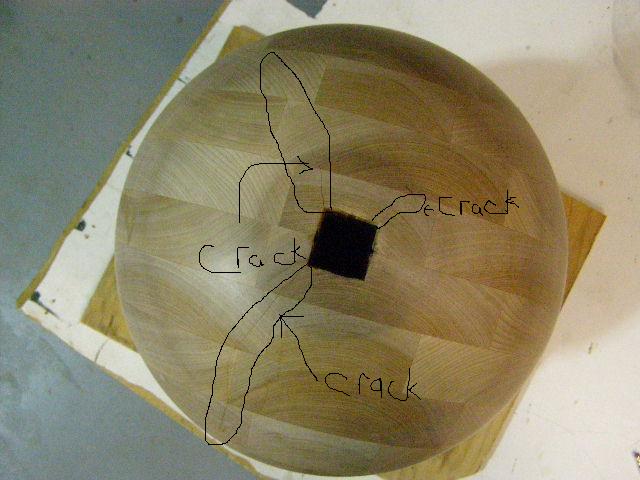
I recently made a large (20.125"x22") birch turning for a local woodworking business. They're fairly large and produce a lot of architectural wood products, so I assumed they had a temperature and humidity controlled shop. They didn't. They unpacked the turning and set it in a hot, dry room, where it cracked within 24 hours. What would be the best way to fix this piece? They're fine with a little bit of putty showing. I was thinking I'd just let the part set in our shop for a few days to reabsorb moisture from the air and then use a syringe to fill in the cracks with glue, then putty over the top.
Forum Responses
(Architectural Woodworking Forum)
From Professor Gene Wengert, Sawing and Drying Forum technical advisor:
Your shop should be about the same dryness the customer will have. If your shop is wetter, the cracks will reopen. In fact, the cracks will reopen any time the wood is exposed to low RH conditions. Bottom line, for most exposures, is to avoid repair if the ambient RH is much of 32% RH. For larger cracks, a spline is possibly best, if the appearance is okay. Minimize putty, as it will squeeze out when the humidity goes up, and may not go back in when the RH drops again. (Most exposures will be around 30% RH in the wintertime and 50% RH in the summertime.) A finish will slow the change, but no finish prevents the annual changes.
Note that heat makes moisture move faster, but does not contribute to checking, as wood does not shrink or swell with changes in temperature. Wood only moves with changes in moisture content and MC changes only with RH.
The splines will compress if the piece gains moisture and swells. Do not make the splines too tight.
If you had turned out the inside, or even constructed it where there was some hollow, this would allow the loss of MC to allow some deformation, rather than the surface splitting due to the lag time from the middle being behind the surface in lost MC.
I am finding CA glue to be useful for dealing with small checks in some parts. It is thin enough for capillary action to carry it all of the way to the ends of small checks. It also seems to have pretty good bridging capacity, and when it is sanded down after totally filling a split, it just looks like a dark line in the wood. Of course that works better in dark woods than in light woods like this.
However, I like to pack sanding dust into the check if it is a light wood, which helps to blend. If you want to try this, I would start by applying it in the bottom corner as it is shown in your photo, until it starts to run out of the bottom of the crack. You can wipe it off down there, but then quickly start trying to smash the sanding dust powder into the widest crack while it is still wet.
Then start wetting it again from above in the corner, then spray the accelerator along the line with filler, to keep it in. This causes it to kick fast enough to self dam, so you can totally fill the split. If you see a gap, rotate it up, then fill, and spray accelerator instantly to keep it from running out.
At this point, you can start sanding and scraping any overflow with pretty fine paper on a pad. You will quickly be able to see your final results, and I will assure that it will be more stable than putty or most other filler.
I have turned a lot of large hollow green wood spherical vessels, which I managed to dry without checks, or used this to deal with some that did. This seems to work best for me and has not come back to bite me. If you plan to start over, I would suggest that you try another glue-up method.
Sometimes you can split the post on a crack and then re-glue it together using band or strap clamps. After that you can put it back on the lathe for re-sanding. Sometimes a wax putty stick is the best solution for solid woodwork that refuses to stop moving. This is a simple fix after the finish is applied.
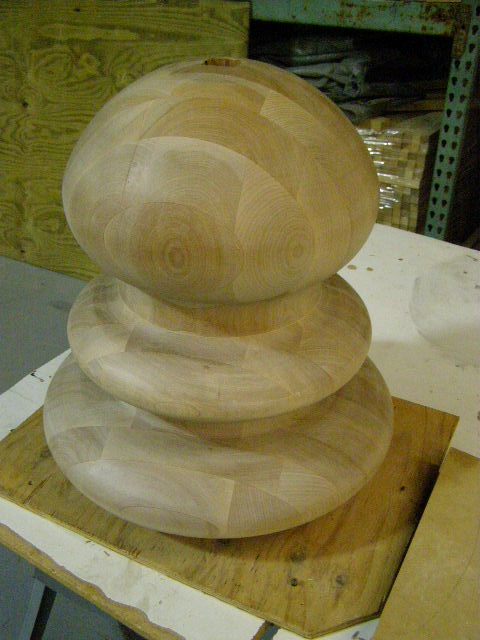
I guess you should just fix it the best you can and send it back. You can always replace it if you have to, but not until you've tried the putty (that's why they make that stuff). As a general rule, hollow architectural wood turnings like columns and lamp posts require an interior and exterior sealer prior to shipping. The best glue-up methods for large diameter turnings are typically stave or box construction. (I prefer the hollow box if possible, which has only four pieces to worry about.)
I am really curious as to why the cracking is in the center. I would expect it more at the outside diameter. I'll guess that since the segment construction was okay, it is going to get a dark or opaque finish, so I'd just use CA and some cleanup, and move on.
Even if you explain, in writing, and customer understands and agrees, then it cracks, you still are faced with either making it right (even though you get paid, how will you do it?) or walking away - either "solution" makes for a less than happy customer.
Large column bases (Ionic, Doric, etc) are typically flat segmented and brick laid and turned. Breaks at the flats allow for some differential movement after turning and in service. Turing hollow is also a good strategy, as noted above. Just as wide mitered parts (think picture frames 8" wide) are made of 2-3-4 pieces of molding stacked on rabbets, the same needs to be done with large turnings.
Presuming they want something that looks raw, you might be able to use a hardening oil. Linseed oil would likely darken too much. Tung oil, though not as bad, may also darken more than tolerable. Thinned walnut oil may work. Then there are also satin based waterborne finishes you could try. After curing, you could knock off any remaining shine. Of course, you should experiment on some scrap to test results.
But on your bowl, you made some major mistakes in how you glued the wooden sections together. You caused tension, which will cause cracking. I learned 10 years ago from an old wood turner in Norway that he keeps the finished wooden bowls for 3 or 4 weeks in a mixed pile of sort of moisturized sawdust and hay. It prevents fast drying and gives the bowl time to dry smoothly. And if you follow the old fashioned gluing rituals of tension-free wood gluing and give time to the bowl to get rid of tension smoothly, you will never have cracks!
You can't solve the problem with putty - the cracks will always move. Dip the bowl into a bucket of water for 15 minutes once you are finished with wood turning, then let it rest in your haystack and after 3 weeks, sand it. That's what the Norwegians have done for hundreds of years, and it works just great without failure.
In most homes and offices in the USA, the interior environment varies from 6% EMC (30% RH) in the wintertime to 9% EMC (50% RH) in the summertime. (The dry SW USA including Denver and the moist coastal regions do sometimes vary from these values.) For these conditions, as shrinkage is more of a problem than swelling, the wood should be no higher than 7.0% MC, and 6.5% MC is even better. Unfortunately, wood that you buy is often "6 to 8% MC," which means sometimes 9%, and the core may be even wetter. Therefore, a moisture meter costing $200 or more is essential to get a reliable estimate of the wood's MC before you use it. If it is too wet, store it at 25% RH (in a plastic walled room with a home dehumidifier). In any case, store any wood you buy and the wood you are working on (especially over the weekend) at 32% RH.