Today's
Sponsors:


Mereen-Johnson Machine Company

Merritt Woodwork

MFG in Honduras

Micro Fence

Microvellum

Middle Valley Lumber

Mikron Woodworking Machinery

Mill Outlet

Minimax

Mirror Reflections

MLS Machinery USA, Inc.

MLS Machinery

Modern Woodworking Magazine

Moldingknives.com

Monarch Machinery

Morbidelli

Moulder Services

Moulder Techniques

Mountainside Wood Products

Multicam, Inc.

NAP Gladu

Nebraska Tool

NEMI

New England Kiln Drying Association

NexGen

Hoffmann Machine Company

Holz Her U.S. Inc.

Howard S. Twichell Co.

Hvalsoe Sawmill Ltd.

ICA North America

Icy Straits Lumber

IDM

Impact Search and Placement

Indiana Hardwoods

Industrial Air Solutions

Integra Precision Grinding and Manufacturing

InTrading

Invicta Woodworking Machines

IpeDepot.com

irsauctions.com

Italpresse

J & G Machinery

J and J Barn Wood

J&P Machines

J. Gibson McIlvain Company

Jiffytops

JIT Hardware Supplies, Inc.

JMHsoftware.com

John G. Weber Co.

Joos USA Inc.

KCD Software

Kerber Farms and Mill

Keystone Wood Specialties

Keytrix Data Systems

Kiln-direct.com

Kleiberit Adhesives USA, Inc.

Kreg Tool Company

Kremlin

Lacy Cypress Inc.

Langelier Lumber Ltd.

Leadermac USA

Lewis Lumber Products

Lignomat

Logosol

Lumber Resources

Lumber Smith

M.L. Campbell

MACHINEKING.com

Macoser, Inc.

Mahros

Maine Timber Works

Maine Woods Company

Mann and Parker Lumber Co.

Martin Lumber

MARTIN Woodworking Machines Corp.

Mastercam - CNC Software

Matthews Mill

Maya Positioning Equipment


Dealing With Pinholes, Cracks, Voids , & Bark Patches In Veneer       Tips &techniques for reparing veneer June 23, 2005

Reprinted with permission from www.joewoodworker.com.

Even the best of some veneer species can contain holes and other "issues" that may need attention before or after vacuum pressing. Here's a brief list of methods to tackle these problems.
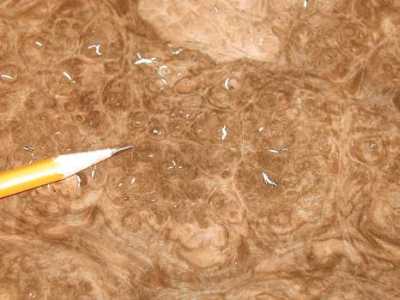
Pinholes
Veneer glue will typically fill in this type of defect. This can be a small problem on lighter colored woods like maple but the good news is that most of these lighter colored woods don't develop these type of holes in the first place. On darker wood species, the veneer glue fills the holes and no further work is needed. Also, you can find extra dark veneer glue at VeneerSupplies.com which is perfect for small holes in walnut. If the veneer has holes larger than a pinhole but less than 1/16" in diameter, you can apply patches of no-hole veneer tape to the face to prevent the veneer glue from saturating the hole and spreading on the face side.
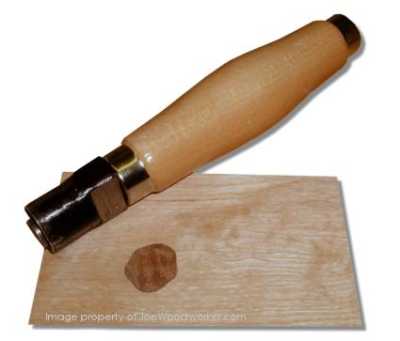
Voids (Large Holes)
The easiest way to repair large holes is with a veneer patcher. The tool is first used to punch out the void in the veneer. Then it's aligned with the grain of a replacement veneer (preferably an off-cut from the same sheet) and a patch is punched out. Set the patch into the punched hole in the good veneer sheet and apply a small piece of veneer tape to hold it in place while being pressed. These are excellent for use with all wood species and make virtually invisible patches on burl veneers. The problem is that the only good veneer patching tools are hand made in Germany and are no longer being produced. The gentleman who makes them has retired. I still have a few on hand, though.

Cracks & Splits
Most splits can be pulled back together with veneer tape and the joint will appear seamless. This is possible because the veneer glue causes the veneer to expand while its curing.

Bark Patches
Sometimes patches of bark in burl veneers can add a nice character to the piece. You could use a veneer patcher to remove it but if you would like to keep the bark patch, just veneer the piece as usual. After the veneer glue has cured, you can dab in some thin cyanoacrylic glue (super glue) to the bark which will give it some rigidity prior to sanding. Keep in mind that this can affect the veneer's ability to take a stain.

For A Glass Smooth Finish
After pressing the veneer, any remaining blemishes can be filled in with a stainable wood putty. But my favorite method is to use epoxy which works exceptionally well if you don't plan to stain the finished project. The key is to use 5 minute "quick set" epoxy and add just a bit more of the hardener. Allow several hours for it to fully harden and then scrape or sand it off. Be careful that you don't sand through the veneer face. If the sand gums up with epoxy, wait longer for it to completely cure.

Reprinted with permission from www.joewoodworker.com.


Would you like to add information to this article?
Interested in writing or submitting an article?
Have a question about this article?


Have you reviewed the related Knowledge Base areas below?
  • KnowledgeBase: Knowledge Base

  • KnowledgeBase: Adhesives, Gluing and Laminating

  • KnowledgeBase: Veneer

  • KnowledgeBase: Veneer: Techniques


    Would you like to add information to this article? ... Click Here

    If you have a question regarding a Knowledge Base article, your best chance at uncovering an answer is to search the entire Knowledge Base for related articles or to post your question at the appropriate WOODWEB Forum. Before posting your message, be sure to
    review our Forum Guidelines.

    Questions entered in the Knowledge Base Article comment form will not generate responses! A list of WOODWEB Forums can be found at WOODWEB's Site Map.

    When you post your question at the Forum, be sure to include references to the Knowledge Base article that inspired your question. The more information you provide with your question, the better your chances are of receiving responses.

    Return to beginning of article.


    Refer a Friend || Read This Important Information || Site Map || Privacy Policy || Site User Agreement

    Letters, questions or comments? E-Mail us and let us know what you think. Be sure to review our Frequently Asked Questions page.

    Contact us to discuss advertising or to report problems with this site.

    To report a problem, send an e-mail to our Webmaster

    Copyright © 1996-2009 - WOODWEB ® Inc.
    All rights reserved. No part of this publication may be reproduced in any manner without permission of the Editor.
    Review WOODWEB's Copyright Policy.

    The editors, writers, and staff at WOODWEB try to promote safe practices. What is safe for one woodworker under certain conditions may not be safe for others in different circumstances. Readers should undertake the use of materials and methods discussed at WOODWEB after considerate evaluation, and at their own risk.

    WOODWEB, Inc.
    RR4 Box 265A
    Montrose, PA 18801

    Contact WOODWEB


  •   Home » Knowledge Base » Knowledge Base Article