Distressing Oak to Create Deep Grain Texture
Outstanding examples and explanation of how to create a deep, worn-in grain texture using wire-brush wheels. January 19, 2012
Question
Any ideas on how to produce a raked surface on white oak? It is a striated grooved texture that is more commonly seen on softer woods that have hard and soft areas in the grain.
Forum Responses
(Furniture Making Forum)
From contributor G:
Ways of imitating the natural differences in weathering of the softer summer wood and the later winter hard grain:
1. Sandblasting.
2. Waterblasting with a high pressure washer. No chemical, soaps or material - just the high pressure water.
3. Wire brush and a lot of elbow grease.
4. There are some companies that produce electric hand planers that can be equipped with a wobbly texture blade that imitates hand hewn lumber. Possibly they have a head, or one can be made for such a machine that would give you the look. (Try Mafell.)
5. There is a paint stripper which is a drill attachment. It consists of numerous, about three-inch-long metal wires attached by loops in the ends of the wire to pins in the hub. When the drill is run, the 1/16th inch (about) wires are slapped against the surface to remove the old failing paint film. Such a tool may, on unfinished wood, leave the sort of random striations you are looking for.
Rent a high pressure washer for an afternoon and try #2 first.
From contributor K:
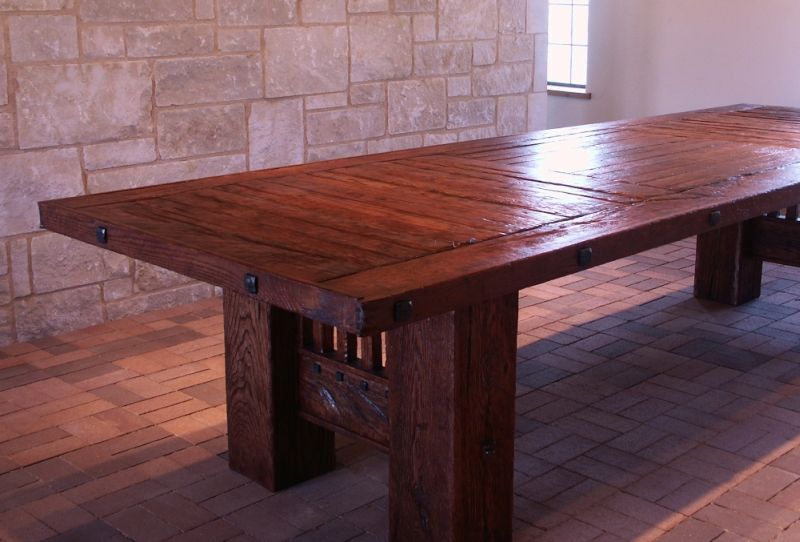
This table is white oak that was wire brushed. I start with a stiff twisted wire cup brush then work my way to a cup that is not twisted and finish off with a soft cup brush. This is pretty extreme distressing. You don't have to be so aggressive.
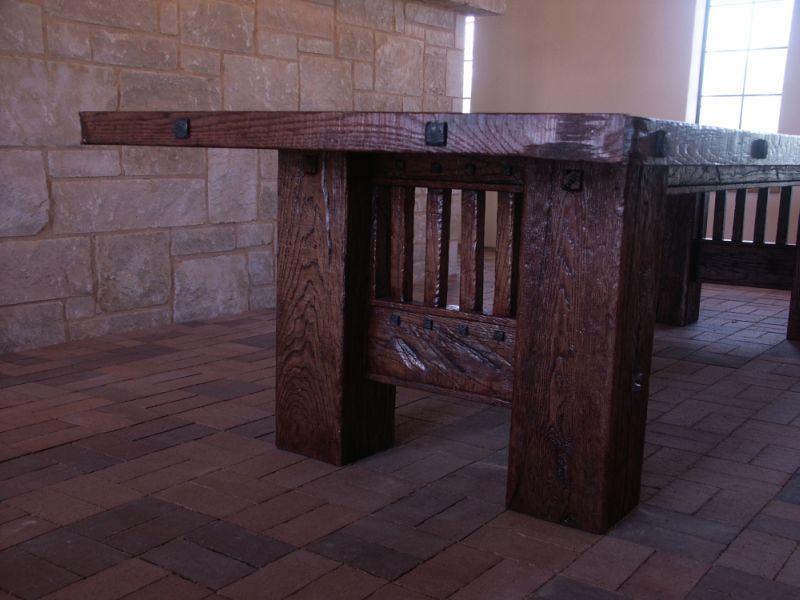
Click here for higher quality, full size image
The wire brushes are in angle grinders. An 8 inch to start, then down to a 4 inch
Click here for higher quality, full size image
From contributor M:
Thanks. Beautiful massive table!
From contributor R:
We use the Makita brush machine with the 80 grit nylox brush for timber framing. We've done it with steel and brass brushes on angle grinders and sandblasting as well. Sandblasting is very messy and dangerous.
From the original questioner:
The brush machine looks like the answer. Thanks.
From contributor K:
I would like to know what you think of this tool if you get one. From the video it doesn't look to be much faster than what I do with the angle grinders (still a lot of work) and the brushes seem terribly expensive.
One more thing to think about. The Makita works great on large flat surfaces, but on some of my work, like this footboard, I have to assemble the panels and then do most of the distressing to tie it all together. I am not sure how the brush sander would get into all the small corners.
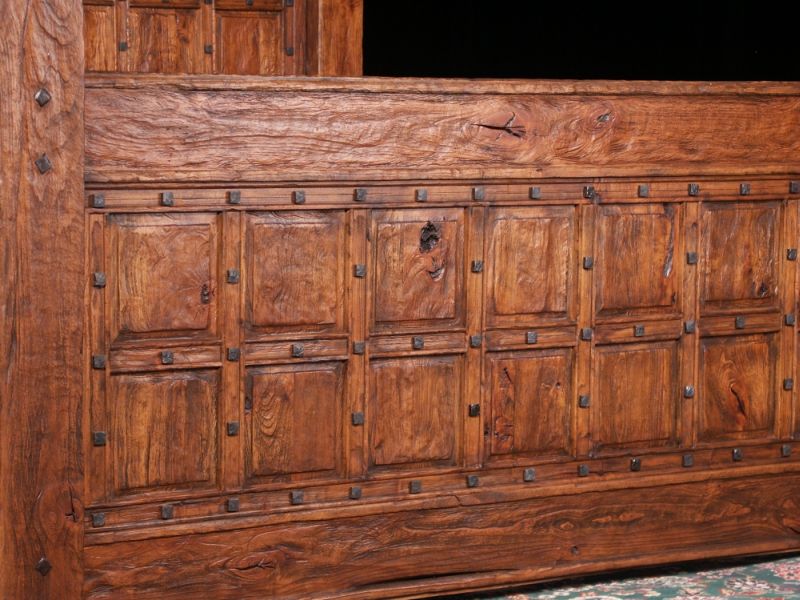
Click here for higher quality, full size image
From contributor G:
Are those iron nail heads or the ends or Greene and Greene like pegs? (The footboard looks great!)
I also note that an angle grinder turning a 1/2 inch wide wire brush wheel would be able to put a lot more horsepower per square inch to the wood than the wide Makita. (So it covers more area, but the cut will be lighter and the total time spent would be about the same as the angle grinder.) If the Makita was able to put the same power to the square inch, it would be uncontrollable... The traction would either shoot the board off one way or the machine would run off the other. However, for large flat areas it does look interesting.
From contributor K:
There are tapered walnut pegs in the legs joining the rails, but the others are just square head bolts for decoration (heads cut off, heated in a forge, hammered then dropped into wax for patina).
I think the Makita would have been a time saver on the large table top above but with the roller brushes costing $190 each, I hope they last a long time. I went through several steel cup brushes on these projects.
From contributor C:
Stunning footboard! So, I 'm wondering, if you pressure wash the wood after everything is assembled, how long does one have to wait for the wood to dry?
From contributor K:
Thanks. I think using a pressure washer for any of this process on any wood is a big mistake.
From contributor C:
My intuition says the same. You didn't mention how you achieved the raked finish on the footboard. Also with cup brushes on a grinder?
From contributor K:
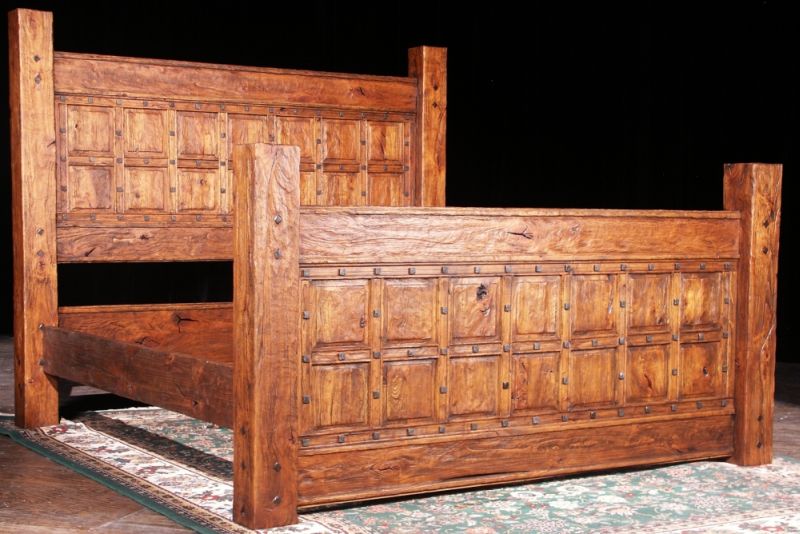
Yes, the bed texture was created with different cup brushes on angle grinders. I also used a coarse rasp, a finish chain and added worm holes. The finish was a multi-step process using different colors to highlight the texture of the wood. My customer wanted the bed to look as if it were built from corral fence boards that were weathered by years of wind and sand.
Click here for higher quality, full size image
From the original questioner:
Thanks to all. I ended up getting a 1 1/2" wide face 8" diameter .020 wire wheel with a 2" bore at Graingers, bushing it to 1" and mounting on my G&P flap/drum sander machine. My project lent itself to raking the parts individually prior to assembly. The brush was quite aggressive and produced a deep rake fairly quickly even on new KD FC white oak. It did, however, pull up a lot of fuzzies that I haven't figured out how to get rid of yet.
From contributor K:
I use the soft (brass) cup brush on a 4 1/2" grinder working on a diagonal across the grain for the fuzzies. I also finish things off with sanding sponges.
From contributor K:
I forgot to mention that humidity probably has a lot to do with the fuzzies also. They won't be as bad in winter.
From contributor I:
I have to say at first I wanted to complain about the whole distressed aesthetic, but that bed is beautiful.
From contributor K:
Thanks. This distressing is a bit exaggerated but was perfect for the bedroom it was placed in. I will be building an armoire for this room soon from Spanish cedar. It will be rustic but not so wind-worn.
From contributor N:
I've been reading this thread with some interest as here in Alabama the distressed wood look is popular. I've been experimenting with a few processes on yellow pine and oak. I've had pretty good results with the wire brush, but don't like the scratches the wire leaves in the soft, scooped out areas. A friend recommended the synthetic abrasive wheels that 3M makes. Anyone else tried using these?
From contributor K:
I tried the synthetic abrasive on the white oak and it didn't work well. I didn't try it on the alder. Make sure you finish off with the soft brass brush, holding it flat to the surface as in polishing, and run diagonally across your grain. It will take out the finer scratches. Move quickly.