Reprinted with permission from Custom Woodworking Business.
A fine 'factory finish' can help custom woodworkers achieve a uniform appearance when using dissimilar species or building multiple pieces.
By Mac Simmons
Every piece of manufactured furniture that is produced must be consistent not only in the woodworking, but also in the final finish. The challenge to creating a "factory finish" is that the majority of woods used in production furniture, kitchen cabinets and architectural woodwork are different species and will vary in the grain definition, patterns, appearance and color. So a factory finish must be capable of making all of the dissimilar woods look as close to or exactly the same.
The principal key to doing this in the finishing process is to start with a colored toner. A toner is a color coat that is made up of dyes, pigments or a combination of both colorants. Toners may be transparent, translucent or opaque, depending on the type of finish a factory selects for its furniture.
The toner's objective is to blend and make all the different species' colors appear uniform. Once all the woods have the same matching color-toned background and other steps in the standard finishing schedule are done exactly the same, at the end of the finishing process, every piece of furniture will have the same finished appearance.
Also part of the "factory finish" challenge is that many large furniture manufacturers have plants in different locations across the country. If each plant uses the same colored toners, stains, glazes, shading stains and clear coatings, when the suites of furniture are all put together, they will look the same in color and in finish.
Custom woodworkers who offer limited production furniture or cabinetry may benefit from learning the basics of creating a factory finish. So I have put together some examples of typical factory finishes to give you an idea of the key steps involved.
A Warm Walnut Finish
For this example, I used a yellow-colored toner. I started with a panel of Lauan plywood and transformed it with a warm walnut-colored factory finish.
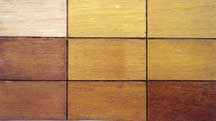
I started, as you always should, with clean, well-sanded and dust-free woods. The first panel shows the raw wood after sanding. In the second panel, I have applied a yellow-colored toner, which I intentionally made translucent. I did this because there are some color variations in the wood. I did not want the color toner to block out the natural wood, but to just give it a uniform color. After this step, I could create a walnut factory finish.
The third panel shows the application of two clear coats over the toner, which protects it. After the application, I allowed the coating to dry thoroughly.
In the fourth panel, I have wiped over the clear coat with a burnt umber pigmented stain. I did not wipe this pigment off, and I allowed it to dry.
In the fifth panel, I sanded the stain off the surface of the wood, which left only the stain inside the grains. This is similar to the process of using paste wood filler. But this technique is easier and faster if you only want to emphasize the grains. The clear coats protected the yellow toner when I sanded off the burnt umber-colored stain.
The sixth panel shows how I applied another clear coat to protect the brown-colored grains. In the seventh, I wanted to add a little more color and character to the finish. I applied a burnt umber glaze and then completely brushed it out to leave some additional color in the finish. The eighth panel shows another clear coat over the brown glaze, which also brings out the color.
In the final panel, I added even more color to the final finish by making several passes with a brown dye shading stain. This gave the final finish some additional transparent color. Then I applied a final few clear coats to complete the finish.
A Fine Fruitwood Finish
To create a fruitwood factory finish, which is a classic color for all styles of furniture, I again selected Lauan plywood for my sample. I chose it because I wanted to show how a factory finish can enhance even a low-grade wood.
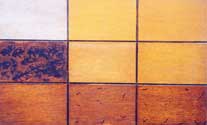
In this example, panel one again shows the beginning of the process, with the wood sanded smooth and all dust particles removed.
In panel two, I start by applying an orange-colored, pigmented translucent toner. Again, this step makes the color of all different pieces of woods in the project look uniform. In panel three, I have applied several clear coats to seal the toner and then allowed it to dry.
Panel four shows how I used a Van Dyke brown paste wood filler to fill in and add color to the open grains. In the next panel, I have scraped the wood filler off the surface and sanded the wood smooth. As with the walnut finish example, the clear coats I used after applying the toner protected it when I sanded off the excess wood filler. In the sixth panel, I have applied another clear coat to seal in the paste wood filler and allowed it to dry.
In panel seven, I applied a Van Dyke brown glaze and brushed it out to add a little more color. I added some distressing markings and flyspecking, shown in the eighth panel, to add some aging to the finish. Panel nine shows the sample after the application of several clear coats. I allowed each coat to dry and sanded every second coat. I then allowed the coatings to completely dry.
As you look at the photos of these two examples, pay special attention � they both were done with pigmented colorants, and in the final finish you can still see the wood. If these same schedules are followed, a number of pieces can be done and always look the same.
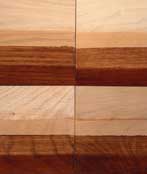
Factory finishes can be repeated on many different woods, even when they are done at different times and places, and look the same. The photos of four different woods, shown below, show oak, spalted maple, ash and cherry. These woods have different colors and dissimilar grain patterns, markings and other characteristics. Yet after the final "factory finish" application, each blends in with the others.
In addition to walnut and fruitwood, other finishes can be created by changing the colored toners, stains, glazes and shading stains. But as with any new finish you attempt, always make complete start-to-finish samples, with clear coats, before finishing an actual piece.
Reprinted with permission from Custom Woodworking Business.