Filling Big Cracks in Walnut Veneer
Guidance concerning the art of crack filling for a Walnut veneer table top. April 20, 2011
Question
We have made 3/16" thick walnut veneers, bookmatched, for a custom table top. The veneers have a sizable crack/split through the knots. I need a high quality way of patching these cracks that will not be so obvious and will take on the stain and luster of the final finish. Your suggestions are appreciated.
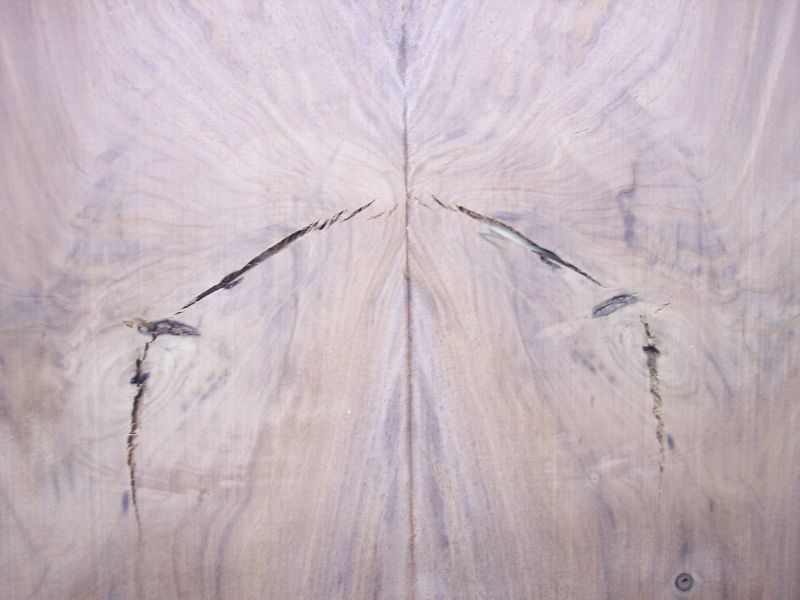
Click here for higher quality, full size image
Forum Responses
(Furniture Making Forum)
From contributor J:
Nice looking walnut. My usual filler is West System epoxy, but usually in solid stock. It dries clear and when finished you can see down into the void. It's kind of a cool effect. How does this work in your case? I would think you could put some brown dye on the substrate below the cracks before pressing. On another note, how wide are your flitches? 3/16" is pushing it on the thickness for veneer to act like veneer and not solid wood.
From contributor P:
Or just mix some walnut dust in with the epoxy - the color will be a good match with the wood.
From contributor J:
Using epoxy is certainly an option. Clear works well if voids are small. Larger voids and the inherent bubbles deeper in it will show. Also, most tend to have some cloudiness in the mix the thicker it is. Mixing in sawdust/sanding fill works if voids are small. The larger the void, the more the monolithic, characterless nature of the fill will be obvious. The eye is a critical piece to consider. It's funny that people notice when you try to match a color and miss by a couple shades (typically the case when you try to match an epoxy fill). You may be better served to use black or very dark contrasting brown/black tinting for the epoxy. It's funny that the eye doesn't always pick out big contrast as a flaw or error. If you try to color match, plan on doing some other texturing tricks to the surface so it is not homogeneous and to fool the eye.
From contributor R:
Have you considered Behlen's burn in sticks? Use them after you have stained and sealed the surface so as to get a better color match. I have used them on cabinets that were damaged during shipping or on the jobsite and you can get a good match or blend. Try it on a scrap first, as those are pretty large checks in the veneer.
From contributor W:
You are not going to hide those cracks. Visually, they are dark, so fill with a dark, nearly black, epoxy. Give the customer the story to tell about how wood dries and cracks like these are a natural process. The fill will give you a good smooth surface when done.
From contributor R:
I use epoxy and coffee grounds. Works great on small and large knots.
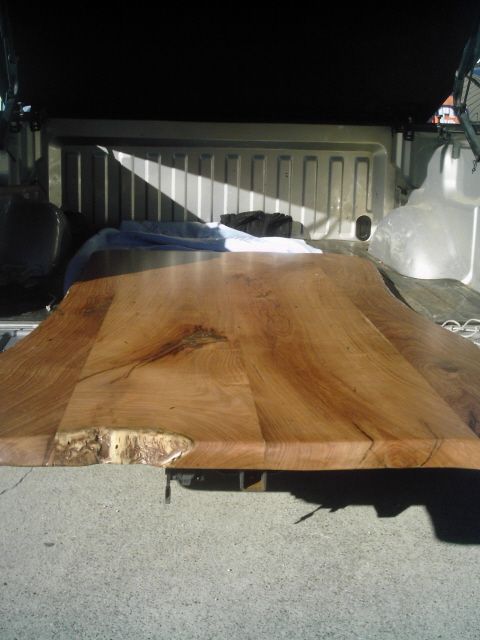
Click here for higher quality, full size image
From contributor D:
For cracks like that, I like to use epoxy with a little bit of burnt umber PTC tint, and maybe a tiny bit of lamp black PTC. That will give you a dark, reddish brown fill that blends in well with the surrounding area. Cracks that deep will probably require two applications. To avoid bubbles, warm your epoxy bottles in hot water before mixing. That will make your epoxy less viscous, and it'll flow into the cracks better. I like 5 minute epoxy because you can do multiple applications in 1 day. Let it dry overnight before you sand it.
From contributor E:
There's definitely some artistry required in making a natural looking fill. I have a lot of practice, building custom doors for a living, many of which are knotty "character grade" alder. In my doors, though, the fill is not flat, but just enough to make cracks and knots weather tight. In fact many doors get further distressing treatment depending on what the customer wants. I take great care with each knot or crack.
Using five minute 50/50 epoxy, I make equal size puddles on a scrap board and small piles of different colored sawdust, and with a putty knife mix up separate little puddles of different shades of epoxy slurry, kind of like a painter does, and dollop different shades in here and there, and with a toothpick sized splinter swirl the colors together slightly in the grain direction of the surrounding wood. In my case, a natural texture is desired so I sprinkle dry sawdust on top of the wet slurry. After it cures, I hit it all with a wire wheel and abrasive impregnated nylon brushes chucked in a hand drill.
So far, after several hundred alder doors out there, no one has mentioned they look filled, and the only ones who know did the filling.
From contributor K:
2-part epoxy would be a good approach. Be sure to use something like System Three brand. The kind that you often see in the double syringe is too viscous to flow properly.
You want a slow-drying epoxy to give time for a good flow-out. After mixing the epoxy, stir in pigmented powders, walnut or Van Dyke brown probably. Use a disposable syringe to apply the epoxy. These stain powders are available through
Rockler or Woodworker's Supply and many of the refinishing products suppliers.
Using duct tape or similar on the backside of the veneer, tape over the cracked areas. You also want to apply tape on the face side, along the edges of the cracks. This is to keep the epoxy from spilling over. If there is spillage, use vinegar as a cleaner, while the epoxy is still wet.
The process does not have to be done all at once. Don't try to make one large batch of epoxy - it could wind up curing in the mix cup before you get it all applied. I typically use 2 oz. calibrated dose cups.
Once the epoxy has cured, you can remove the tape and shave/plane off any high spots. Then sand. Be sure to handle the veneer sheet carefully - don't let it bend - and give it a lot of support as you move it around.