Question
Our current path for installing inset cabinet doors is to trim them on the Altendorf then edge sand to fit. This is a tough way to do anything and I want to streamline this part. I have an idea about how to automate this process but would to hear some opinions, good or bad about the idea. Our doors are processed right now with Leitz insert tooling cutterheads. This tooling produces an amazingly smooth profile after miles and miles of cutting. The stick shaper is a $1000 import with a tractor feed powerfeed. There's a whole lot more material being removed during the during the sticking process than during and edge trim. Sticking removes the ogee shape and cuts a 1/2 inch groove. Trimming takes at best about 1/8.
My plan is to produce a radial arm shaper and use alternate shear tooling with about a five inch diameter cutterhead. The cutting direction would be a climb cut. End grain would be processed first. End grain might also be relieved a click before the actual trimming is accomplished. The shaper itself is mounted to a metal platform and actuated on a linear bearing much like a vertical panel saw. The stroking would either hydraulic or pneumatic.
What I am interested in receiving input on is what the final quality of cut might be. In my mind, this essentially is just a great big router but with better tooling and, because of tooling diameter, more of a scraping than cutting action. I am trying to get as close to no edge sanding as possible.
Can anybody point out errors in my logic from a tooling perspective? How is this different than a CNC machine with respect to tooling marks etc? Recognize that this is not something I personally am going to produce. I happen to be located across the street from a company that engineers and sells linear motion systems. They are the people who will engineer and produce the actual sliding mechanisms and hold down logic.

Forum Responses
(Cabinetmaking Forum)
From contributor L:
I don't know about the rest of it but climb cutting end grain produces a less than ideal finish. Try it first on your shaper with a feed, take a light cut!
What got me interested in this was the observation that my insert tooling for the sticking process produced mirror like finishes that never needed to be touched with sandpaper. This was not the case when I did my profiling with carbide.
The reason for this crispness has to do with several things, the biggest being the metallurgy of insert tooling. Brazed tooling requires a certain amount of porosity in order to be able to fuse it to steel. You have to have some crevices to produce a membrane between the steel tool blank and the carbide tip. This porosity is invisible to the naked eye but exists throughout the rest of the carbide tip, including the portion that actually does the scraping on the wood. Similar to the way a pothole deteriorates very quickly on a highway, these small potholes dull the carbide very quickly. Just like a shaving razor goes bad quickly, so too does a carbide cutting tool.
Insert tooling, however, is put together with a different alloy that ends up with much less porosity. This is why the tools need to be clamped into position rather than fused into position. The consequence is a much cleaner, sharper cutting action. My hypothesis is that if the insert tool technology does such a good job on the profiling, it might do a similar good job on the trimming.
If this turns out to be the case then I can unlock this task from the kind of skill that edgesanding requires. Of all the specific tasks in my shop I think that edgesanding is the most nuanced. If I can turn this operation into something that requires just a decision rather than intuition then more people will be successful at it. You are possibly right that this won't work. I think, however, that it will be worth the couple of hours it takes to load a linear guide onto a shaper and test the concept.
Maintaining ideal chip load is also a consideration, so it must be mechanically controlled or have an excellent operator. The most consistent movement is hydraulic, also the most expensive. Pneumatics have the springiness that can be a problem with varying load but by using a massive enough assembly and large enough cylinders with exhaust one-way restrictors it would most likely work for this application. I don't see a lot of variable resistance here.
The mass has two functions: to offset the variable loading that may occur due to hard/soft areas of the wood and the second is to absorb vibration energy. Your 1" plate steel should do the mass thing fine. The moving plate plus a couple of clamp cylinders should work well for keeping everything rigidly held. What is the stroke required? If necessary can it be designed to stroke from either direction so you can have both conventional and climb?
Will you use foot pedal cycle start and relay logic or a PLC? With a PLC you could program in a short entry, shift the work back (pneumatically) and move the cutting assembly to the opposite end and run a climb cut. Complicates the design but covers all. The amount of back shifting depends on the maximum cut depth allowed. If this machine is designed to also profile the outside of doors a larger back shift should be built in. If I take your drawing correctly you intend to use ball bushings for guidance - probably fine but I kind of lean towards the THK type. Easier to locate and attach and very solid. Your drawing implies the load is carried only at the end supports of the rails.
If I can produce a sand free solution that can be produced by inexperienced people then it will be worth the pain. My primary contribution to the concept will be definition of the problem to be solved and funding to make it happen. This is not a particular time sink. As so far as cost goes it's just another of a million line items.
If that's the case then I can see where this idea may be worth further investigation. Do you already have the tooling? I may even do an experiment on my shaper for the heck of it. I wonder how a 3" insert head (I happen to have handy) would cut compared to the larger head you�re describing? I've never tried it on end grain before.
We do the same type thing running the outside rebate cut on our euro sash only they are deep cuts with large diameter 160 to 180 Z3 insert heads. The finish cut only requires a wipe of sanding on the end grain. We could probably go to the finish room without any sanding but just a habit we have. These windows are a little like inset cabinets; the sash final size has to be plus or minus .5mm in relation to the frame. Through software and precision setups we build all windows and doors to exact size right out of the frame press. You don�t want to be trimming these after assembly. The sash get 1mm removed from all sides at the shaper or profiler after assembly. Profilers and single end tenoners that have jump cope climb cutting additional heads eliminate the need for backup chip breakers when doing these types outside cuts or profiling.
Onsrud used to make a lineal profiler that would do the same thing you want and probably better than anything home built. They are big though. Unique machines and the other brand mentioned look like the good solution for the small shop wanting to automate door production and still have versatility.
I don't think we can solve the need for trimming with just better gluing because no matter how straight and true of stock we start with, some of it just gets bowed because of tension imbalances that show up from the machining processes. An ogee profile, for example, removes a tremendous amount of material on just one edge and what starts out as a true board can end up concave or convex, hence the need for tuneup.
But let me ask one more time: You were able to machine a millimeter off the end grain and still get a smooth cut? Was there much blow out as you exited the cut? Did the blow out go away with climb cutting?
Regarding machining end grain - I was taking exactly 1 mm on the test cuts. Any more would be scary climb cutting on the shaper. Was there much blow out as you exited the cut? No the blow out with climb cutting occurs at the start of cut with end grain.
Did the blow out go away with climb cutting? On the test pieces the blowout left would not come out when you remove the 1 mm when doing the long grain cut. The oak maybe, but not the fir. You would need a backup block to get 100%. On our window sash processing it took a long time to work this out because with slot and tenon corners you have end grain both directions. We used to clamp a back up board to the sash but this was time consuming. We modified an Aigner clamping device for a back up board and that has saved a lot of setup. The ultimate answer for this is the timed jump cope on a window machine or track fed tenoner or a unique type shaper.
CNC router shops sizing big doors and windows usually do the ends first, climb cutting then come back at the long edges. I believe they have to leave more than a millimeter to get rid of the blowout. Whatever machine used, hold down is important. The SAC profiler we are rebuilding has 13 feed wheels for real positive pressure when doing these cuts. Of course we are only talking cabinet doors here.
I favor moving the cutterhead and keeping the material constant because of the footprint. A 6' cut could probably accomplished with an 8' footprint. Moving a six foot door through the cutterhead would require at minimum 12' of stroke.
I also lean towards hydraulics for actuation because in climb cutting it would be too easy for the cutterhead to defeat pneumatic because air compresses both ways. This is just my layman's knowledge. I would, of course, let the people across the street design the actuation and hold down mechanisms. I am hoping to keep my involvement time-wise to a minimum. My job is to identify the need and provide the funding. Most of these parts are generally available as off the shelf gizmos. Any metal work that is needed can happen with a CAD file and waterjet cutter, also available in the neighborhood.
I bring this up to point out the benefits of continuous improvement. Trying to get Unique Machinery to customize a machine for me might be viable but it might not. It is for this same reason we handle website development in-house.
Many on this forum will disagree with me about versatility. I personally think that machinery should be very simple and single purpose. I also favor machinery that is right sized for its purpose. I currently have an SCM shaper with a 48" footprint. This seems kind of excessive to me when the majority of my cope cuts are only five inches long. Building your own machinery is a pain but after you learn who the creative machinists are I think the process will become easier.
The majority of woodworking operations consist of simply clamping something into position, rotating a cutterhead then applying linear motion. Where it gets complicated is when you try to make these machines too versatile.
My coping shaper, for example, has a split fence system, the ability to raise or lower the spindle and the ability to change the belt speed. This would all be great if I was doing custom millwork but I'm just coping doors. I don't use the fence, I have never changed belt speeds and the arbor never changes height. I use stacked cutterheads and simply use interchangeable platform heights to move from one profile to another. This shaper sells for about $12000 new and requires far more footprint than is needed to do the job elegantly. The components for the machine, not including the frame, are probably about $2000. I can, for example, buy a 1 1/4 inch arbor quill off the shelf for under $300. One of the reasons I am fascinated with this project is that I have about a half dozen machines I have wanted to build that all involve shaper arbors.
For example: We build most of our drawers with pocket screw construction and rabbeted 1/2 inch plywood bottoms. We use a Castle drill for cutting the pockets but the grooving and rabbeting is done with yet another table saw and another shaper. Because of the layout of our shop these machines both require their own dust collection. This is an incredible footprint intrinsically but also requires a lot of cart management and real estate to navigate these carts.
Once these parts have been machined and collected together we still have to bring them to a bench and clamp them into position for inserting the screws. This is a lot of strokes. One machine I have designed will rabbet the plywood and groove the drawer sides yet only require an additional three inches of footprint beyond the bench that you do the actual assembly on. There's no travel time involved with this approach. With a few more strokes this bench can have an integral clamp for holding the parts together while you screw them. This can work in a factory setting or can roll under your outfeed table if you don't have the space to have a dedicated work station.
I have a half dozen of these machines that are all very inexpensive and perfect for a company that believes in Lean manufacturing. The first couple of machines will take a few more strokes but after you learn who to do business with the rest are really easy. I'll use the guys across the street to develop the prototype then I plan to shop the machine to Castle Machinery. They already have the lawyers on staff and the technological know-how to bring this to market. My role is just the idea.
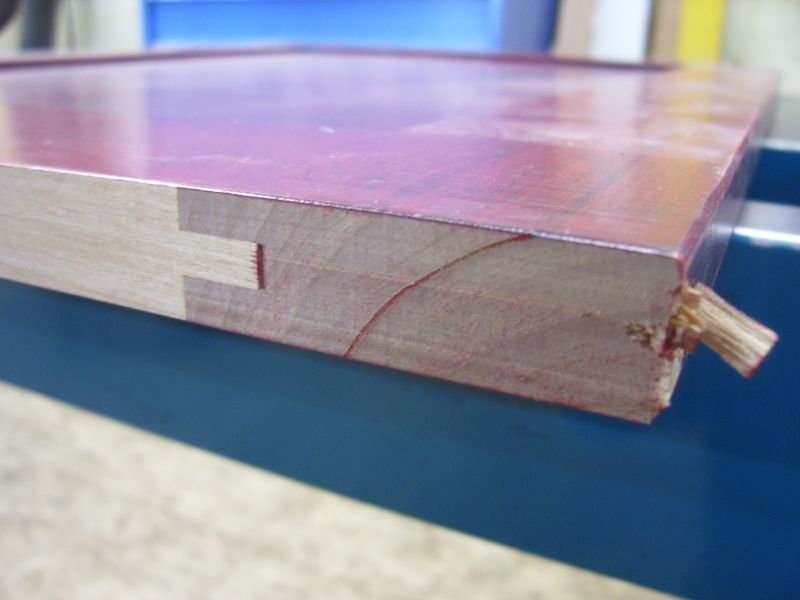
If I understand correctly you size the door to the opening with the slider then want to take off a millimeter or so all the way around for clearance? If that is the case the simplest low tech method would be to use the shaper with a split fence and feeder. I had a couple old cabinet doors and set the shaper up to remove 1mm using an 80mm diameter Oertli spiral insert head we use for pattern shaping. I did half the fir door conventional cutting and the alder door climb cutting. You can see the chipping from the leading edge of climb cutting. The end grain cuts I did yesterday were better with the larger diameter rebate cutter. The spiral insert leaves faint lines but they disappear with a little sanding. This is interesting with the end grain being cleaner with climb cutting. With a hand router it usually pulls the end grain with a climb cut - must be the larger diameter. We normally don't do any climb cutting with the shaper but removing only 1 mm is not too dangerous.