Glued-Down Wide Pine Flooring
A long discussion of installation methods for wide board floors. August 21, 2006
Question
I'm considering gluing and screwing down (with headless screws), rough sawn white kiln dried pine (now 8% moisture) for a floor - living room, dining room, and kitchen. I will plane one side smooth to maintain consistent thickness, and just butt the edges and ends together. I will take a quick pass with a sander but leave the floor fairly rough and uneven. Then of course I will coat it in urethane. I have seen this done and it looks quite good and traditional. I have the option of using pine with some blue mould stain or clear clean pine. And comments would be appreciated.
Forum Responses
(Sawing and Drying Forum)
From contributor A:
There is no need to use glue on flooring. Be prepared for seasonal gaps and movement. Consider that you are planning to use a very soft wood in high traffic locations. An underlayment may be needed if you are on a crawlspace or any foundation that does not restrict moisture from entering your flooring from below. Acclimate the wood indoors for as long as you can before installing. Buy some kneepads.
From contributor B:
How wide are your boards going to be? Would routing tongues and grooves be an option?
From contributor C:
If you're going to use wider planks I would get a biscuit cutter for a router and glue and biscuit the butted ends. I have done this on many floors and it keeps the butted end joints from warping up and separating. I don't think I would lay a floor without a tongue and groove but, it's your choice. Tongue and groove can be done with a router and router table if need be.
From contributor D:
You don't say how wide the boards will be or how you will maintain a consistent width for each run. Right off the saw without any edge treatment will make installation a nightmare. The problem with not using a tongue and groove is that when the boards move, there is nothing to keep the floor as one unit. Stray ends popping up and boards cupping can be a source of splinters. It may sound like a neat concept but I am afraid after you live with a shack-like floor for several years, the novelty will wear off.
For end matching after the ends are squared a groove can be routed in each end and a spline can be used to keep the boards as a unit. You should not glue these splines. A wood floor should either have a layer of roofing felt between the subfloor and the boards or a good grade of glue made for floors. Wood on wood will result in many squeaks.
From contributor E:
It makes you wonder how people got along all those years before there were routers and moulders. I wouldn't bother to glue, but would consider using a screw with a head (deck screws?) and then plug the hole. It'll work great and look wonderful. It's not rocket science.
From the original questioner:
Thank you all for your thoughtful responses. The widths will be random and approximately 5-1/2s and 6-1/2s. Each run will be sized by running it through the tablesaw. Obviously running tongue and groove on these boards complicates the issue although I have a 3hp shaper and want to do the best job possible. Floor is 3/4" plywood over Trujoists. I also have a biscuit jointer. To contributor D: Your comment regarding the novelty of the floor has also given me food for thought, especially with the soft wood.
From contributor F:
I have a planed, heart pine floor. A couple of comments - first, pine is soft wood and it will scratch and dent, especially as contrasted with oak or other hardwoods. Second, ditto what contributor D said about the roofing felt below the boards - this will eliminate most of the squeaks. Third, the floor will move over time as the seasons change and your ambient humidity changes. Consider the tongue and groove option with your shaper.
From contributor G:
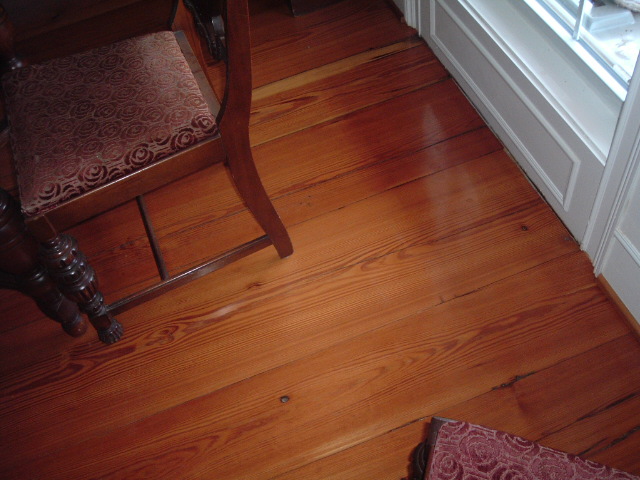
This is a floor that I do on a regular basis. This comes off the mill at 1/2" and then one pass through the planer, about 3/8". Glue down with a trowelled-on urethane glue. Lightly sand and finish. This is a little rustic but if you like that look this is a good way to get those 15" wide boards and not have to worry as much about wood movement. Nothing will get these boards off of that subfloor. That glue is the strongest that I have ever seen. If you make a mistake, get out the chisel or router. If you have the option of getting 1/2" flooring this might work for you.

Click here for full size image
From contributor H:
If you do not glue it down, lay a layer of red rosen paper between the underlayment and the pine. This will help reduce squeaky floors.
From the original questioner:
My intent is to glue down the floor. I'm not sure what this will do to the pine boards as the wooden subfloor inevitably moves with the seasons. (Georgian Bay, Lake Huron). The dents and scratches that are a part of a pine floor hopefully won't be so obtrusive with the rough sawn look I am trying for. The stock I am getting is 1 inch thick and after planning one side it should be around 3/4 - 7/8".
I have surely decided to make it tongue and groove. Water based urethane would be nice to use if I can find something as good as oil based. I'm told that oil based fills in grain etc. better than water based, so that could be a disadvantage of going with the water based urethane.
From contributor I:
Penetrating Oils are a great option for soft wood floors. The do not show the dents and scratches near as bad as poly. Consider modified Tung oils such as Waterlox or linseed oils such as Duraseal #210 Penetrating Oil.
From contributor D:
All the floors in our house are glued. We have wide SYP boards in part of the house; the widest run is 17" the other runs go from 15" on down. The wider boards are not quartersawn but do come from the center of the log. The floor moves as a unit; the only cupping is a little with the 17" run in the dead of winter when the house is super dry. The upper deck is glued to the joists since it is a timber frame. We also have red oak, white oak, black locust, walnut and hickory. Most is quarter/rift sawn. All of it was sawn, dried and milled right at my sawmill. We still make custom flooring for anyone who can afford it; we do not install anymore. Glue is good, however it is more work than the paper.
From contributor J:
I too am going to install white pine flooring this summer. Are you guys gluing the whole floor or just the tongues? If gluing the whole floor is there a chance of cracking? I thought of gluing the center of each board to keep from cupping. It is 10 in wide tongue and groove.
From contributor D:
You use a special toothed trowel to apply the glue to the subfloor. You do not glue the boards together.
From contributor F:
I would like to add on to contributor D�s comments. I had the misfortune a year and a half ago to remove a tongue and groove oak plank floor that had been glued together in the bottom third of the tongue and groove portion of the floor (the individual flooring boards had a line of glue run between them below the tongue). I say misfortune, only because it was an incredible pain to remove the old oak flooring, with chunks of the plywood subfloor coming up as we pried up the oak flooring to install heart pine. The wood glue, in addition to gluing the individual boards together, had seeped down and glued the oak boards to the plywood subfloor along the seams. In this instance, there was not any roofing felt or other underlayment under the glued oak. It took three men over two days of very hard work to remove only 600 sq ft of board flooring, fill in the gaps in the subfloor where the chunks had been removed, and sand it smooth in preparation for the new heart pine floor.
On the plus side, the old glued oak floor had been installed for about 15 years, was very solid, no squeaks, cracks, gaps, high points, etc. It had been exposed to high humidity and low humidity over that time - and that old floor was as solid as they came - basically no issues whatsoever. It was a 2" wide plank, so I don't know how well a wide plank floor would do, but if my experience was any indicator, if you glue the floor down as contributor D recommends you should be very satisfied with the results (as long as you never plan to remove the floor).
In the same house, if I had to compare the glued oak floor with the pine over roofing felt floor, the glued floor was more static, less squeaks, and less movement overall.
From contributor J:
So you�re telling me if I glue 8-10 in wide boards down solid to the subfloor, I won�t have any problem with shrinking or cracking? What happens with changes in seasons? Wood has got to move. Do you use the same glue as used on laminate flooring?
From contributor G:
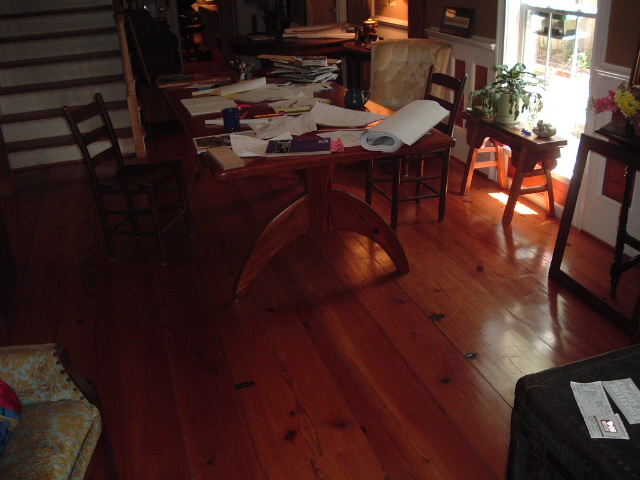
This is the floor in my house. These run the full length of the dining room, 15'. They are 15" then 12" then 9" alternating in width. They were glued down with West System epoxy directly to a concrete slab. I have had no problems in 4 years now. I have done many of these floors by showing customers my floors. The only thing I do differently now is that I use the urethane glue. I mill this myself and they start off at about 1/2" then plane to 3/8". Then glue down and sand.
Click here for full size image
From contributor G:
Never tell my wife I posted this photo. The mess is all mine.
Click here for full size image
From contributor F:
To contributor G: Gorgeous floor! Think of it this way - the wood expands and contracts because the individual cells expand and contract with moisture changes. By gluing them down, you are forcing the cells to remain static, and to individually absorb a small amount of stress. Plywood is made by gluing alternate grain wood laminates together. Once installed it does not typically separate, crack or warp due to normal humidity changes, for the same reason that a glued floor won't shift.
If you only glued the outer edges of a wide board, then you may get some cracking because the cells would be allowed to collectively expand and contract - hence, the recommendations to glue the entire plank.
From contributor K:
If you butt the ends of the floor without splines, then do it in the center of a floor joist. If you use splines, then glue in one end, but not the other.
From contributor B:
As far as butting the ends together, just run your tongue and groove on the ends as well as the sides.
From contributor J:
Does it matter if I used 3/8 or �� thick boards when gluing - and what kind of urethane glue should I use and how do I get it?
From contributor D:
The best glue for floors can be obtained from a flooring supply store. It is not inexpensive but is made for the job. The thickness of the boards depends upon how long you plan on living in the house. 3/8" flooring does not have much if any sanding life. It also does not have much of a tongue and groove. �� does have a lot of sanding life (refinishing) before the tongue is breached.
Also, it is a lot easier to run a router along the ends of the squared boards to groove them and use splines than it is to run the ends of the boards through a shaper. I have used splines with thousands of square feet of flooring; it is not necessary to glue one side. There are some pictures of our home at the following site. Related web site: Walnut and Cherry Floor
From contributor L:
To contributor G: Are you saying at 3/8 inch you are using tongue and groove, or just butting everything with straight edges?
From contributor G:
We are just laying the planks down on a bed of glue that has been trowelled on using a notched trowel. I have a 12' Altendorf slider to straight edge the boards so they go in pretty snug. No tongue and groove required. Bostick's best is the glue that I like to use. Contributor D mentions that the tongue and groove has a longer life for future refinishing. I have to disagree. Tongue and groove flooring is made with a 1/4" groove that leaves 1/4" on top and 1/4" on bottom. The 3/8" square edge has more wood to sand overall.
From contributor M:
I am currently resawing barn beams into 1" flooring for my customer. I am sending the tongue and groove and mill work to a local custom cabinet shop. My customer is considering not using a tongue and groove because when I resawed the beams I didn't edge the lumber. I left the hand hewn or old band mill marks on the edge at his request. Looking on the face of the lumber the edge shows a darker patina from aging that didn't reach deeper into the wood. My customer is afraid of losing the old reclaimed, rustic look, and is considering just butting the joints together. This presents the problems of not having straight edges to work with when butting the joints together, and how can the floor expand and contract as on unit to prevent individual board movement creating raised lips on seams of joints?
Would a biscuit joint work as long as the edges meet straight enough that the biscuit won�t be seen? I haven�t ever installed flooring - should he use construction adhesive to glue the floor down or is there a glue more specific to flooring usage?
From the original questioner:
I'm interested to know what type of urethane you are using for these pine floors. Oil based or water based? Types of stain?
From contributor F:
Glue down with a notched trowel and a glue that is about like melted caramel, roll it with a heavy roller, read the glue instructions about open time and do small areas to avoid the glue skinning over. When you want to tear the floor up, buy or build a new house (It will be easier on your back). I would recommend a new subfloor to start with and screw and glue it down it down to kill the squeaks.
A glued floor is not installed for future removal. A skilsaw cutting through the finished floor and subfloor is the easiest way to take one out that I know of. The worst thing that I have seen happen with an unfinished glued down floor happened during sanding. Too much heat caused the boards to cup and break the undercured glue bond. So I would recommend extra cure time and light sanding to avoid heat build up.
As for tongue and groove or biscuits, I don't think that a good gluedown would need them, especially if going thin, but if you decide to add them you can cheat them to the bottom of the plank to give you more sandable thickness towards the top. Add a "Celtic Knot" or other inlay design element for a rewarding challenge. Keep in mind that the "rustic" look does not mean shoddy workmanship. You can tone down or distress a good tight install to look rustic, but you can't make a bad install look good.
From contributor K:
When installing pine floors with splines, I would highly recommend gluing one end. This will help eliminate squeaks. End matching is best (tongueand groove on ends). A tongue and groove is basically an integral mortise and tenon. I would not glue these. A good pine floor to sand should have the pitch set at a very high temperature. The pitch will gum up your sandpaper if you don't. I don't know much about gluing solid wood floors down. I never have and I don't think I ever will. The wood must be able to move. Use plywood or solid wood sheathing for your sub-floor. The nails will not hold in particle board. Yellow wood glue is fine to glue splines.
From contributor G:
A friend stopped by today and asked if I could mill some flooring for a bar that he is building. I built one two years ago with the "thin" method and he is going to try it. I will post photos all along the process for everyone to view how we do it here. This photo shows us milling a 15" beam into 1/2" boards.
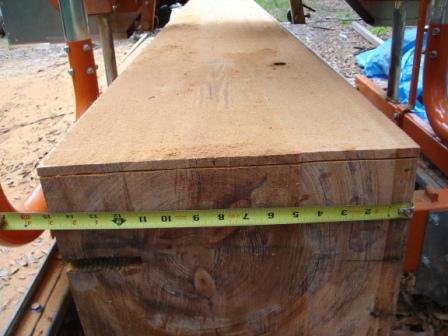
Click here for full size image
From contributor G:
These boards are 15" wide and 11 feet long.
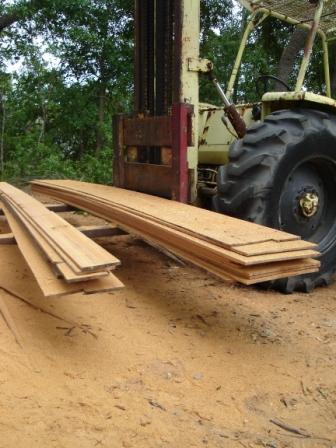
Click here for full size image
From contributor G:
One pass through the planer set at 3/8" and that's it - a very quick 800 bucks but of course you need the fork lift, mill, lumber yard, shop, help, and planer.

Click here for full size image
From contributor L:
To contributor G: I thought I was with you, until I saw the beam pictured. So is this heart pine? Is it dried to 8%? You don't just grab these things off the ground and cut them up and glue them down? It's got to be an old beam out of a warehouse or something?
From contributor G:
These beams come from a building that was built in 1852. These are 11 x 15 x 24'. That means the tree was at least 20" in diameter, 24 feet from the ground. That is a big tree. It is the real longleaf yellow pine and as you see makes for beautiful lumber.
From contributor N:
I will be starting a remodel in 4 months and have been offered barn wood for flooring. It is from the mid-west (one of the largest hardwood forests of the world) and I believe is now extinct. It is from Cincinnati and is dated from the early 1800s before the Civil War. It was an Amish Barn, hand hewn, Oak and Ash. I am told it has been brought to several distributors and they are in awe of how tight the grain is. All of this info was given to me over the phone by the woman whose family owned the barn. I would love to have a wonderful wood floor for my house, but am a bit nervous about the preparation of the wood and installation, etc. They are sending me a sample board. I told them I wanted wide planks, perhaps even several different widths, but wanted the stain to have a uniform color (deep-rich color) I do not want it to be to busy or too rustic in color variations. It has been aged and dried. I have been reading about gluing the boards down and not doing tongue and groove. Is this whole process normally less costly? We do have a great connection with a wonderful lumber yard - how costly is it to prepare the wood after delivery to be installed? Any help or info would be appreciated.
From contributor O:
I did my kitchen floor with wide board kiln dried pine that I got from a local mill. The boards ranged from 15" to 20 plus" in width. They were laid down over a 3/4" plywood subfloor with no splines, tongues or grooves, just butted together and face nailed with hand cut flooring nails with a large head for looks. The mill owner recommended we put them down over a layer of red rosin paper and that we paint the underside of each board with
polyurethane and then lay it down wet on the rosin paper as we installed each board.
This floor has remained in use for twenty years with no cupping, squeaking, or ends lifting, and is installed over what was originally two rooms so that half is over a basement and the other half over a dirt crawl space. This method, at least in my experience, is quick and effective. I have used this method subsequently in three other areas of the house with the same results since.