Gluing and clamping pressure
Is clamping necessary, and if so, how much? January 21, 2003
Question
With great interest I read Gene Wengert's article "Woodworking 101" in which he talks about gluing in some detail.
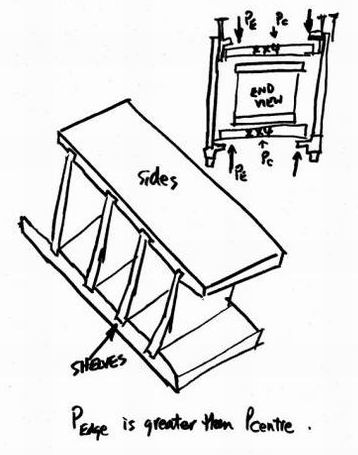
Gene does talk about clamping pressure, but I'm still not sure I understand how to glue up one of my projects. I have a pine shelving unit built with 2 x 10's. The finished shelf depth is 18" (quite deep). The sides of the shelving units are rabbeted to accept the shelves.
I've got some Elmer's Probond yellow carpenter's glue, and the instructions state: "join mated surfaces snugly and clamp if necessary to maintain contact". This would imply that clamping pressure is not important for gluing effectiveness.
I've always clamped with a death grip, believing that more pressure is better, but Gene points out that glue can be squeezed out, making the gluing layer too thin.
I plan to glue the shelves to the uprights using 2 x 4's on edge to somewhat distribute the pressure along the 18" (and to avoid clamp marks), using regular bar clamps. Obviously, the pressure in the centre (9" in from the edge) won't be as great as the pressure at the edge, where the clamps are situated.
Is clamping pressure important here? Will the center of the glue joint not be as strong as near the edge?
Forum Responses
To avoid the 2x4 clamping beam from rising in the center when you clamp the edges, simply sand the surface to create a bow. Place the center of the bow at the midpoint of the clamp area.
When you tighten the clamps, the edges of the 2x4 will draw tight to the edges and the center will maintain contact and not lift.
It is true that too much pressure may cause too thin of a glue line. But in your case, as in most, this will not be a problem. The softer wood, especially end grain, will accept the glue with moderate pressure. Death grip clamping is not always the answer. Clamping is a "feel" thing - different woods, geometries, etc will dictate this. Crowning your glue cauls is a good idea. Too much crowning can require too much clamp force to evenly distribute the pressure on your work.
From the original questioner:
I thought of crowning the 2x4's but I figured it would be difficult to "calibrate" them (how much crowning?).
The method makes perfect sense. (Nevertheless, I'm curious about the Elmer's Glue instructions that say to "clamp, if necessary". My instincts tell me that clamping is absolutely necessary, always.)
Clamping does several things - it gets the two pieces close enough together (0.002 to 0.006 inches is ideal), it squeezes glue into the nooks and crannies, it squeezes out excess glue, and it holds the work stationary until the glue is set. The better the uniformity of glue clamp pressure, the better the joint.
You can also use shims to help distribute the pressure. Note that end grain gluing has little or no strength. For this reason, your joints will be very weak, no matter what the pressure. This is why all sorts of joints are used in practice... to get an end grain joint to have some side grain. Dowelspines work in this way too. Or maybe a small cleat under the shelf at the joint, etc.
Gene Wengert
From the original questioner:
I have read several times about end-grain glue strength, but didn't get it until now. It's interesting that in the case of my shelves, the strongest glue bond is where the 3/4" of shelf contacts the horizontal surface of the rabbets... not the 1 1/2" end of the shelf. So it would appear that my efforts to ensure that the bottom of the rabbets are smooth (chisel) isn't as important as the sides. The clamping pressure I have been worrying about is the end grain clamping pressure, which seems to be less important than the tightness of the rabbet-fit. Granted, the better the workmanship, the better the job.
Most of the wood cells, which are like long, slender soda straws, run vertically in the tree. Therefore, in the lumber, they run lengthwise. So gluing end grain is like trying to glue the ends of soda straws - a lot of open space and not much surface, compared to trying to glue the sides.
I'd like to add that with an adhesive like PUR (or is it pur?), the adhesive will penetrate into the hollow ends of the cells. When it hardens, you will have fairly good mechanical strength with all the little bits of glue that went into the cells.
Gene Wengert
From contributor J:
A good glue joint implies that mating surfaces are well machined and warp free when brought together dry. When adhesive is added and the parts are drawn up snugly and uniform squeeze-out is obtained, they will not require clamping. The example that comes to mind is small corner blocks which are usually simply 'rubbed-in', that are slid back and forth a bit to get good glue contact - good suction, if you will - and left to dry. The glue line is thin enough but not too fat. I've glued up many moderate sized panels (2 or 3 pieces per panel) without clamps - because they were not too large and heavy, but most importantly because the edges were well machined and square. Sliding the glued edges back and forth gave good squeeze out and a good glue line. So far, touch wood, no problems...
Some adhesives develop high instant tack (adherence) and so the need for clamping for a long time when the fit is perfect is reduced.
Gene Wengert
From the original questioner:
I just realized that an easy way to test the difference in gluing effectiveness is to try a couple of samples. Glue 2 pieces of wood with and without clamping, then try to separate the pieces.
Having said that, it's kind of a moot point, because I think we would all rather clamp if we have a choice. However, it's good to know that the above method works.
I've also wet the surfaces down to improve the 'tack', as you refer to it, Gene. I instinctively do this when the surface isn't perfectly smooth, figuring that the glue will flow better into the nooks and crannies. I use this method when using mortar with bricks sometimes. I think once again we all agree that more accurate machining improves the tack.
The key to understanding this question is to realize that waterbase glues shrink when they cure (have you ever noticed bar clamps become less tight after curing?). Contributor J makes a good point in understanding that if the surfaces conform well (mostly when the pieces are very small), hand pressure is sufficient because the shrinkage in the glueline is compensated by the conformity of the pieces. But most of the time, pressure is required to bring the pieces into intimate contact. But think about it - the more force to accomplish this, the more stress in the glueline (after curing) and the more glueline shrinkage results in a porous/weak glueline. That is why passing the paper shim test (dry) under reasonable pressure will tell you the quality of your joint. Too much pressure can create what is called a starved joint, but there is no such thing as squeezing ALL the glue out of a joint - come on, not possible. But the mechanism here is still related to shrinkage of the glueline, or lack thereof.
For most applications, no one would dare think of assembling furniture in any manner without clamping other than the corner blocks or something of similar use. Even the corner blocks are usually shot with a nail to generate some pressure. A thick glue line has very little bond strength. A thick glue line creates surface bond rather than penetrated bond strength. Another no-no would be to try to sand or cut the wood to allow a bow in between the clamps. The simple solution to that would be to use more clamps as necessary to avoid bowing in the middle.
I think everyone missed the point of the construction technique. With a 2 X 10 being glued to a side rabbet, the shelf should not be glued along the entire width of the shelf. The expansion of such a large piece of wood would most certainly cause the joint to fail if it was glued the entire width. It is better construction to glue only one end (front) and not glue the rest. Kelly Maher gives seminars on solid wood construction and this is his technique to avoid joint failure.
From contributor J:
Sorry, you've got it wrong here, with respect. There is no conflict in grain direction at all when a solid shelf is glued to an (assumed) solid vertical gable. Both pieces shrink and swell together across the grain. If a longitudinal cleat was introduced from the front of the gable to the rear to support the shelf, the cleat would be dimensionally stable in a longitudinal direction but the gable would across the grain. Dovetailed in. glue at the front would suffice allowing the rest to float.
In addition to getting the two pieces of wood close enough together for proper gluing, pressure also squeezes out the excess adhesive and pushes the glue into the microscopic nooks and crannies. In some cases where adhesive is only on one of the mating surfaces, pressure also assists in transfer of the adhesive to the other face. Also, the spread of an adhesive is often not uniform, so pressure allows the glue to spread evenly throughout the faces.
Wood is a dynamic material. With a big face, can you guarantee that the wood is flat to within 0.005"? Has any MC change occurred between the time the wood was machined flat and the adhesive applied? If so, even a small change, the wood has changed size or shape. Is the adhesive water-based? If so, the water will cause size changes after spreading and before the adhesive has set. Pressure keeps the wood in intimate contact until the adhesive has cured substantially. Although you can go without pressure on some pieces, overall, you cannot do so if you want a joint with high integrity and strength.
Gene Wengert
