Holding Down Solid Wood Parts on a CNC Router Table
Holding small pieces down with a CNC vacuum table is one of the trickiest aspects of CNC work. Here is some detailed advice. May 7, 2007
Question
We are new router users and have been cutting only flat panel work for the past 6 months. We have some solid wood items such as valances and moldings we'd like to machine but are uneasy about how secure the parts will be on the vacuum table. Can I get some help on how we should approach holding the parts?
Forum Responses
(CNC Forum)
From contributor C:
I'm in the same boat as you when I cut solids. What I do is leave an onion skin of about 0.040" and trim rout out the piece or take it to the wide belt and sand it out. Otherwise you will have to build a dedicated spoilboard for each part, and this is not economical if you are doing custom parts that do not repeat. I always leave the blanks nice and big to help avoid splitting, usually the diameter of the tooling plus 1/4" of extra material.
From contributor T:
There are a few options. If you have an aluminum grid table, you can mount pods on it and lift the solid wood parts off the table. The dedicated spoilboard approach isn't too bad, especially if you need to make more than one of each part (repeat work). For this, you make a template out of MDF with air holes and gasketing material around the perimeter of the part. Otherwise, the skinning option is another worth considering; it does require either sanding off the excess material or hand routing it loose.
From the original questioner:
What do you do to prevent the wood from moving? We test cut a valance today and half way through, the material was moving. The material was sanded, but not near as flat as sheet stock.
From the original questioner:
From our experience today it appears some universal fixturing may be the path we need to take.
From contributor J:
You should tell everyone what size table and how big your vac pump is. The other thing would be to cover the rest of the table if possible to trap more vac. I have seen people use tape around the edges of the wood to get a gasket type seal around a slightly warped part.
From contributor C:
Are you vacuuming the blank itself? How many passes are you taking at the material? It shouldn't move if you have it gasketed properly. A good rule of thumb to start off at is a cut depth that equals the diameter of the tool.
From the original questioner:
Our table is 5x10 with a 20hp pump.
From contributor T:
I forgot a couple of other options. For one-offs, I have seen people tape or screw the parts to the table before they machine them. It's not pretty, but it works.
From the original questioner:
We're not vacuuming just the part. Just laying the part on the table, which may be our problem, losing too much vacuum without the balance of the table being covered.
From contributor C:
Is your table flat?
From the original questioner:
I probably should have said spoil board, not table. We surfaced the spoil board just before machining. The program was using a 1/2" compression tool with .720 depth of cut. We intended to leave the onion skin but didn't get that far.
From contributor C:
That's way too deep a cut for solid wood. Please describe your spoilboard.
From the original questioner:
It's a 3/4" piece of rangerboard.
From contributor C:
So it's gasketed with reasonable size through cutouts to let the vacuum seal to the part?
From the original questioner:
The only gasket is the perimeter one beneath the spoilboard. We don't have it zoned or gasketed specifically beneath the part, but I'm beginning to gather that it's the way we should be approaching it. Am I on the right track?
From contributor C:
So you're trying to vacuum through a 3/4" piece of MDF? I think you need to remove the MDF and vacuum your blank right to the table. Leave the onion skin if you do this. Or make a dedicated spoilboard.
From the original questioner:
Thanks. I think we're going to attempt some dedicated spoilboard setups.
From contributor J:
It can be a lot simpler than what you are moving toward a little too quickly. Contributor C is right that .7... is way too much to take at any rate of feed (not discussed yet either) in one pass on solid wood. The whole idea for having a whole table vac is to not fixture unless you absolutely have to. I haven't yet heard you describe anything that says you must do this.
1- Cover the rest of the table.
2- Use simple masking tape as I previously suggested to help seal the edge.
3- Take maybe three passes at this, or even four.
If you are still having trouble, post again and I will take you further by maybe slowing feed also and a few other things, but start here and then let's see before you make gaskets and screw stuff down, etc. Why make more work than you have to? It will also teach the things you will need to know to continue doing these types of parts in the future.
From contributor L:
Do you have pin stops at the edge of the table? My Buselatto has pneumatic actuated pin stops with a threaded hole in the center. We use 3" diameter aluminum disks with a screw at the center to hold down parts. Be careful to avoid hitting the pin stops with the router bits.
If you don't have pin stops, you can secure your valance to a larger piece of melamine. For example, you need to cut a �" x 6" x 36" arched valance, attach the solid wood flush to the back and 1 side edge of a �" x 24" x 48" melamine drop. This larger piece will vacuum down much easier. Write the program as if the part you are cutting is 1�" x 6" x 36". Cut one 0.375" deep pass followed by a 0.77" deep pass. Before you attach the solid wood, run the program on the melamine only so that you can see the cut path. You don't want to be routing through screws!
From contributor E:
Try covering the open spoilboard with some 6 mil plastic (I have used dust collector bags). You can easily cut open areas where the parts are located. The plastic doesn't cost much and can be re-used.
Depending on what software you are using, set it up to onion skin the part and take multiple passes. This is easy to set up as a machining style in AlphaCAM (and I'm sure other software, too).
I would try an upshear bit at first, as this is best for removing the chips from the cut. However, you might try a down shear bit if you have trouble holding the part. Keep an eye on the chip load, though.
If you are cutting more than one part at a time and you are onion skinning, make sure you don't cut through the onion skin until all of the parts have been machined. Cutting the onion skin on all parts as the last operation will help prevent vacuum loss during the heavier cutting.
From the original questioner:
Much thanks for the help. We cut another today using plastic to cover the table, double face tape on the board and 3 passes leaving a .030 onion skin. The people on this site are great.
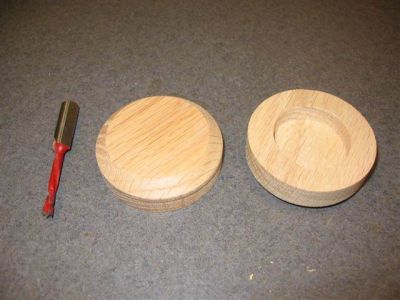
From contributor F:
Fixturing is key to small parts, but we use a lot of two faced tape for one-offs. We cut a bunch of these oak disks yesterday. We through-cut then repositioned on the dedicated fixture to do the opposite face. It was considerable trouble, but in the end it worked out well. I only wish that we had run 1000 of 'em to absorb the cost of the trial and error.
From contributor A:
Why would you make that on a router? That's a lathe part.
From contributor F:
That's easy. We don't have a lathe. They are just caps to cover bolts on a beam assembly for a church.