This article was reprinted with permission from Wood Tech Tooling, www.woodtechtooling.com.
How to Reduce Breakage
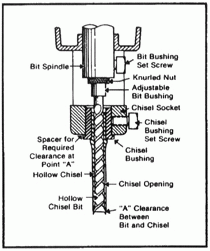
Hollow Chisels and Bits are made for long, hard use. With reasonable and proper care you can obtain good service from these dependable tools. Adjust bit and chisel carefully. If the bit head comes in contact with the cutting and bevel of the chisel, excessively heating occurs and the metal will crystallize. A clearance of about 1/32" at point "A" should be maintained at all times. On chisels larger than 3/4" this clearance should be increased to 1/16". Excessive clearance is equally harmful and should be avoided.
1. Insert proper size bit through chisel opening.
2. Place chisel brush on chisel shank.
3. Slide correct bit bushing on bit shank. Be sure end of shank hits bottom of bushing.
4. Raise entire assembly up through chisel socket and tighten bit bushing lightly.
5. Position chisel bushing in chisel socket with 1/32" spacer.
6. Push chisel upward, then tighten chisel bushing set screw.
7. Push bit upward as far as it will go. Tighten bit set screw against bushing securely. Screw knurled nut up as far as it will go.
8. Loosen chisel and remove spacer. Square up chisel with fence. Raise chisel up as far as it will go. Tighten chisel set screw against bushing flat.

To obtain maximum performance:
Oblong mortising precautions:
When making oblong mortises up to 1/2" in width do not make consecutive cuts. The resulting unequal pressure brought on by cutting with three sides of the chisel may cause it to break or bend. If the chisel bends and contacts the rotation bit, both tools can be damaged beyond repair. Alternate strokes should be used thus equalizing pressure by cutting on four sides with the first passes and two sides on the final passes, taking care to cut in center of chisel.
This article was reprinted with permission from Wood Tech Tooling, www.woodtechtooling.com.