The Hardwoods: Naturally in Demand
Reprinted with permission from The Hardwood Council website.
Home buyers want the warm, inviting atmosphere that such North American hardwoods as oak, cherry, ash, maple, birch and poplar create. Nothing can replace their appeal in:
-- built-ins and custom cabinetry
-- doors and door jambs
-- flooring
-- mantels
-- mouldings and trim
-- paneling
-- shelving
-- staircases
-- wainscoting
-- window casings and sills
Like silk, precious stones, linen and leather, the hardwoods are premium materials with unique, natural character. Substitutes may counterfeit hardwood looks, but they can't match the vitality, variety and value of the real thing. Consumers know the difference.
The hardwoods make any home more appealing. Understanding how to work with them will pay off in consistent quality and customer satisfaction.
Moisture Content: A Balancing Act
All woods absorb moisture when the air is humid, and lose moisture when it's dry. You can manage the resulting expansion and contraction by understanding how the hardwoods behave, and by following a few simple guidelines for site preparation, handling and installation.
Wood cells always contain some water. Technically, this moisture content is expressed as a percentage of the weight of the dry wood: 40 to 160 percent in fresh-sawn lumber; 6 to 9 percent (optimum for dimensional stability) in hardwoods kiln-dried for flooring, millwork, furniture and cabinetry.
Wood gains and loses moisture before and after installation, as surrounding conditions fluctuate. Over the centuries, woodworkers have found ways to compensate for this effect, adopting new materials and techniques along the way. Today, these principles can save you time and money, and help ensure customer satisfaction.
Guidelines for Dimensional Stability
Maintain Occupancy-Level Conditions
Proper handling and job site preparation are the keys to working successfully with any hardwood product.
Before delivery of hardwood lumber, millwork and flooring, be sure the house is closed in, with all outside windows and doors in place. Maintain occupancy-level temperature and humidity for at least five days. Allow excess moisture anywhere in the house to evaporate. Let sheetrock dry for at least two days, and plaster for a week or more, depending on weather conditions.
Never truck, unload or store unprotected hardwood products in rain, snow or other wet conditions.
Let the Wood Adjust to the Site
When it's delivered, divide lumber, flooring or millwork into small lots and store them in the rooms where they will be installed. It will take at least a week for them to reach a balance with their surroundings.
Dimensional changes on-site will vary with region, season, individual construction practices and interior climate controls. For example, along the Gulf Coast, hardwoods will acclimate to an 11 to 13 percent moisture content, expanding slightly; hardwoods installed in the Western Rockies may level off at 4 to 8 percent. (See "Quicktips," below.)
Builders most frequently ask for further specifics on a single application: installing hardwood flooring on a concrete slab.
How to Install Hardwood Flooring on a Concrete Slab
Hardwood flooring is one of the hallmarks of quality construction. Craftsmanship and materials are clearly exposed to inspection, and few aspects of the home are as high in consumer appeal. That's why experienced builders pay close attention to minimizing expansion and contraction when preparing to install this traditional material, especially in concrete slab construction.
With the right subfloors, hardwood flooring can be installed successfully on either on-grade or above-ground slabs. Below-grade installation is not recommended.
The slab must be flat and level with a trowel finish, free of grease, oil, stains and dust. New concrete is heavy with moisture, so test for dryness before beginning the subfloor. (See "Quicktips," below.)
The National Oak Flooring Manufacturers Association recommends two choices in sub-flooring systems: plywood-on-slab and sleeper.
Which System?
Either subfloor system is satisfactory for 3/4" inch flooring up to 4" wide. For plank flooring 4" and wider, use the plywood-on-slab system, or top the sleeper system with an additional nailing surface. Best materials for this surface are 5/8" or thicker plywood, or 3/4" boards no wider than 6". Allow 1/2" spacing between 3/4" boards.
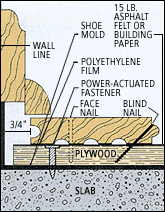
Plywood-on-slab
Begin by covering the slab with a vapor barrier.
Asphalt felt or building paper: first, prime the slab and apply cold, cut-back asphalt mastic with a notched trowel (50 sq. ft. per gallon). Allow to set for two hours. Unroll 15-lb. asphalt felt or building paper, lapping the edges 4" and butting the ends. Over this, apply a second similar coating of mastic and roll out a second layer of asphalt or paper in the same direction as the first, staggering the overlaps to achieve an even thickness.
Polyethylene: Cover the entire slab with 4 to 6 mil polyethylene film, overlapping the edges 4" to 6", and allowing enough film to extend under the baseboard on all sides.
When moisture conditions are more severe, prime the slab and apply cold, cut-back mastic with a straightedge or fine-tooth trowel (100 sq. ft. per gallon). Lay 4 to 6 mil polyethylene film over the slab, overlapping the edges 4 to 6".
In either case, roll the film flat or "walk" it in, stepping on every square foot to ensure adhesion. Puncture bubbles to release trapped air.
Install the plywood after the vapor barrier is in place. Loosely lay a nailing surface of 3/4" 4' x 8' exterior plywood panels over the entire area, leaving a 3/4" space at the wall line and 1/4" to 1/2" between panels. Cut plywood to fit within 1/8" near door jambs and other obstructions where finish trim will not be used. Lay plywood diagonally across the direction of the finished floor to help prevent cracks along panel edges.
Fasten plywood to the slab with power-actuated fasteners, securing the center of the panel first, then the edges, using nine or more fasteners.
Do not use power-actuated fasteners or concrete nails when radiant heat pipes are embedded in the slab. Instead, cut the plywood into 2' by 8' planks and score the backs 3/8" deep on a 12" grid. Lay panels in a staggered pattern with at least 2' long planks along starting and finishing walls. For systems other than radiant heat, the plywood planks may be glued to the plastic with asphalt mastic. Spread using a 1/4" by 1/4" notched trowel.
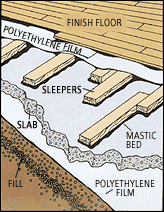
Sleepers
Begin by sweeping the slab clean, applying an asphalt primer and allowing it to dry. Next, embed the sleepers on their flat faces in rivers of hot (poured) or cold (cut-back) asphalt mastic, in rows 12" on center, at a right angle to the direction of the finished flooring. Stagger the end joints, overlapping the ends 4", with 1/4" space between.
Before installing the floor, loosely lay an additional vapor barrier of 4 to 6 mil polyethylene film over the sleepers, overlapping the edges on top of the 2 x 4s. Avoid bunching or puncturing the film, especially between sleepers.
Nail the finished flooring to the sleepers through the film.
QuickTips
Take Moisture Content Seriously
Changing moisture content makes a significant difference in the dimensions of solid hardwood products. To illustrate, here's what happens to plainsawn 2 1/4" oak flooring.
Moisture Content Change | Approximate Width Change |
1% | .008" |
4 | .033" |
8 | .066" |
| (U.S. Department of Agriculture) | |
Test Concrete Slabs for Excess Moisture
Rubber mat method
(Useful only on light-colored concrete.)
Lay a flat, non-corrugated rubber mat on the slab. Weight it to seal it against the surface. Look under the mat after 24 hours; if the covered area shows dark, wet marks, there's too much moisture evaporation from the slab.
Polyethylene film method
Tape a 15-inch square of clear polyethylene film to the slab with moisture-resistant tape, sealing all four edges. If no condensation collects under the film after 24-48 hours, the slab is dry enough for floor installation.
Make tests in several spots in each room. When tests indicate excess moisture, wait for the slab to dry naturally or accelerate drying with heat and ventilation, then test again before installing floors.
Seal for Stability
For wider plank flooring, seal the back surface before installation and after acclimation.
Moisture passes primarily through end grain, so when wood has been cut or mitered seal the ends with a transparent sealer before installation. If you trim a prefinished door, seal the cut edges for the same reason.
Follow Guidelines with Walls, Ceilings
Hardwood strip flooring is increasingly popular for interior walls and ceilings. Storage, handling and installation practices are the same as those for flooring applications. On perimeter walls, install a vapor barrier on the inner face of studs or masonry.
Allow for Expansion
When laying a solid hardwood floor, leave a 3/4" gap at the wall line for expansion. Baseboards will cover the joint.
Technical assistance: Allegheny Millwork & Lumber Co., Pittsburgh, Pa.; National Oak Flooring Manufacturers Association, Memphis, Tenn. � 1999 The Hardwood Council
Reprinted with permission from The Hardwood Council website.
Editor's Note: A good source for custom cabinet doors and components is WalzCraft.