Question
I've been building cabinets with an integral toe kick, but see the advantage of building with a separate kick. What is the preferred method of attaching cabs to toe kick? Or are they mounted to the wall only? How does an island fit into this picture?
Forum Responses
From contributor R:
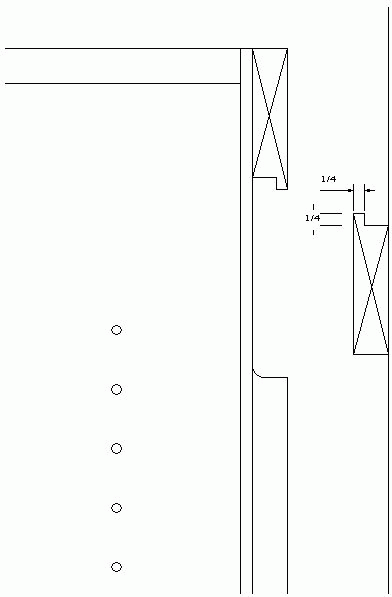
I build all my base cabs with a separate kick. I attach them to small strips that have been glued and nailed to the bottom of the cab. The kick just fits over the strips and is attached to them with brads on site.
To avoid confusion: Build cab box. Turn over so bottom is up (easier to work on). Build toe kick box and set on cab in place. Cut attaching strips and glue/nail strips to cab bottom against inside of toe kick box. Remove toe kick box and let everything dry.
This method is self-aligning in the field and once kick is level, cab is level. For islands, do same thing, except you can attach the kick box to the floor with strips in the same manner, then set the island on top. You can also use levelers/feet on the inside corners of the box if the island is to be left unattached to the floor.
I use this toekick method for full height cabs, also. This allows me to be within 7/8" of the ceiling (if necessary) when the cab is installed on its base, because the cab can be picked straight up and set on its base and the only clearance needed is the thickness of the attachment strips (3/4") plus a little wiggle room (1/8"). Tilting a tall cabinet upright is easy this way, because you don't have to worry about hitting the ceiling.
After years of doing this, we have started to use legs. I tried them long ago but found reaching the back legs to adjust was no fun. Now we don't use back legs. We hang the cabinets to the wall (yes, base cabinets) from a modified French cleat. Then tweak the level adjustment with legs on the front only. You can slide the cabinets along the wall, so installing this way is more forgiving. Toe kicks are now just a board that snaps on the front, and can be removed if needed. Saves an average of about half a day per kitchen.
Comment from contributor S:
Using legs is a much quicker way to deal with kicks. We used legs that adjust through a hole in cabinet bottom with a slotted screwdriver. Reaching the back legs is then done from above. You also become the electrician's and plumber's best friend, because they can get easier access to make connections. If you need to remove a single section for whatever reason, still very simple because cabinet is not nailed to the kick. Countertop is not an issue, because you can lower the cabinet section in order to clear the counter overhang, and just slide it forward. My only knock against cabinet legs would be that they are only fastened to bottom of cabinet with small screws, so don't push back into place too hard - you risk breaking legs off.