Today's
Sponsors:


Vintage Wood Products

VortexTool Co. Inc.

VyTek

W. Moore Profiles, Ltd.

W.L. Fuller

Wagner Electronic Products

WalzCraft Industries

WEIMA America, Inc.

Weinig Group - USA

Western Dovetail

Williams and Hussey

Wisconsin Knife Works

WMIA

WMMA

Wood Doctor's Rx, LLC

Wood Technology Inc

Wood-Mizer

WoodCabinetDoors.Com

WoodenBoat

WoodFinder

WoodJobs.com Search Consultants

WoodLINKS

Woodmaster

WoodPlanet Inc.

WoodSprayGuns.com

WOODWEB

Woodworker's Supply/woodworker.com

Woodworker's Directory

Woodworking in America

Wright Timber

Specialtytools.com

Speed Sander

Spink Lumber

Sprayguncaptain.com

Stefani

Steve H. Wall Lumber Co.

Stiles Machinery

Stiles Shop Solutions

Stoneys Hardwoods

Super Source Tooling Inc.

Supergrit Abrasives

Superior Wood Products

T-Tool USA LLC

Target Coatings

TaylorCraft Cabinet Door Company

Techno CNC Routers

Template Services

The Veneer Store

Thermwood Corporation

Tiger Wood Ltd.

TigerStop

TigerwoodDecking.com

TimberKing

Timesavers Inc.

TMS Machinery Sales

Tomlin Architectural Millwork

Tooling on the Web

Toolstoday.com

Top Drawer

Touch Up Solutions LLC

Tractivity

TradeJobPlacement.com

TradeSoft

Trakware Systems Inc.

TRB Flooring Company

Tropical Hardwoods

True North Cedar

Ubidmachinery Inc.

UC Coatings Corp.

Unique Building Supples

Unique Machine & Tool

University of Wisconsin

UWMO Auctions

VacDry Kilns

Vacuum Pressing Systems, Inc.

Vacuumpods.com

Valspar

Vecoplan LLC

Vector Art 3D

Vectric Ltd.

Veneer Systems Inc.


Installing refrigerator end panels       The search for better methods. April 3, 2002

Question
One of the more tedious items I've encountered over the years has been fastening outboard refrigerator end panels - the ones that are not supported by base cabinets, and in some cases, not supported by upper cabinets either. The real challenge is when the panel falls between the studs (and retrofitting blocking is not an option). And the worst case scenario is with a Sub-Zero refrigerator - absolutely no extra room at the sides or back wall.

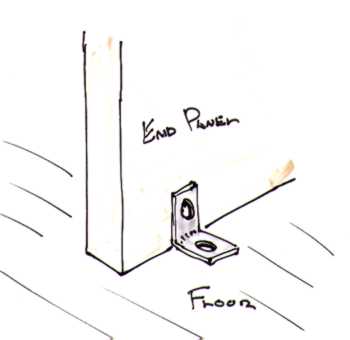
About the only way I've come up with to get the deed done involves using small metal angle brackets and drywall anchors (the wide threaded type that self-seat with a cordless drill). I've included some sketches of how I go about it, and I'm hoping to hear from others on better/different strategies for this painful chore.

The first sketch illustrates the situation - the spacing of the metal angle brackets depends on the mood I'm in, but at minimum, I try for three on the bottom, and four up the wall.

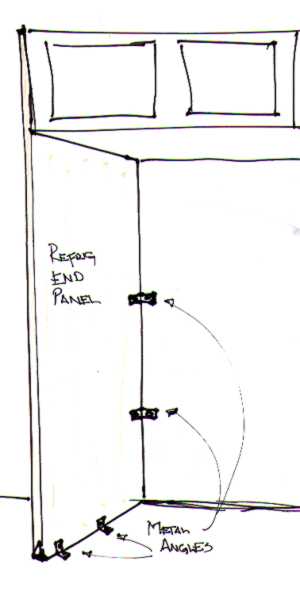
Fastening to the floor is pretty straightforward, unless it's tile, in which case I drill pilot holes through the tile with a hammer drill.

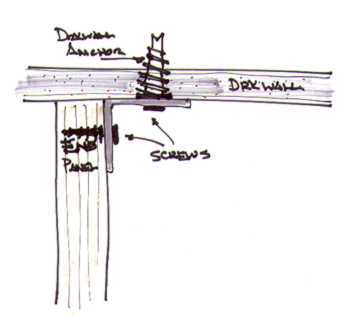
Fastening to the drywall isn't difficult, but I've found it goes *much* easier if I install the drywall anchors first, loosely fasten the angle bracket to the wall, put the panel in place, screw the angle bracket to the end panel, and then finish tightening the screw in the drywall anchor.

Here's a sectional view of the same area.

Forum Responses
I don't think there are many options here, especially if panels are only 3/4". If panels have face frame, we ring the inside of panel flush with face width, resulting in a cleat to attach to floor and wall. With 3/4" panels, we try and make panels 25" deep when possible (this works very well with full overlay), giving additional room at wall and pocket screw panels to floor.


This seems like too much. I use a spreader at the back wall, pocket screwed to the end panels, and fasten that to the studs. Between the end panel and wall I apply adhesive caulking as well as the floor. If there are no cabinets I think the metal angle at floor level is okay.


K-V manufactures a figure 8 double washer thing that would come in handy here. Liquid journeyman is my shtick.


You either ask for blocking or sheathing behind the fridge. If the client has a Sub Zero, the contractor should be made aware of the unique installation. I've installed many, and the ones that go the best have blocking or studs that are just inside the end panel. One recent installation was a bonus, because the units were wall to wall, and floor to ceiling - the contractor applied ply instead of s-rock to the wall. No need to set anchors.


These are tough. I use 2 ft - 4 ft pieces of aluminum angle instead of the small clips because it is straight and easier to get right in line. Not a lot of difference in price, but quicker. Pre-drill 3/16" holes in both legs and drill the wall for the EZ Anchors with a 3/16" drill bit. The anchors feed right into the holes no problem. You can sometimes also spread the width a little at the back to help (36" at front, 36 1/4" or so at the back). EZ Anchors are another thing I would not leave the shop without!

Would you like to add information to this article?
Interested in writing or submitting an article?
Have a question about this article?


Have you reviewed the related Knowledge Base areas below?
  • KnowledgeBase: Architectural Millwork: Millwork Installer

  • KnowledgeBase: Business: Project Management

  • KnowledgeBase: Cabinetmaking

  • KnowledgeBase: Cabinetmaking: General

  • KnowledgeBase: Cabinetmaking: Installation

  • KnowledgeBase: Cabinetmaking: Residential Cabinetry

  • KnowledgeBase: Primary Processing: General

  • KnowledgeBase: Woodworking Miscellaneous

  • KnowledgeBase: Woodworking Miscellaneous: Woodworking

  • KnowledgeBase: Knowledge Base


    Would you like to add information to this article? ... Click Here

    If you have a question regarding a Knowledge Base article, your best chance at uncovering an answer is to search the entire Knowledge Base for related articles or to post your question at the appropriate WOODWEB Forum. Before posting your message, be sure to
    review our Forum Guidelines.

    Questions entered in the Knowledge Base Article comment form will not generate responses! A list of WOODWEB Forums can be found at WOODWEB's Site Map.

    When you post your question at the Forum, be sure to include references to the Knowledge Base article that inspired your question. The more information you provide with your question, the better your chances are of receiving responses.

    Return to beginning of article.


    Refer a Friend || Read This Important Information || Site Map || Privacy Policy || Site User Agreement

    Letters, questions or comments? E-Mail us and let us know what you think. Be sure to review our Frequently Asked Questions page.

    Contact us to discuss advertising or to report problems with this site.

    To report a problem, send an e-mail to our Webmaster

    Copyright © 1996-2009 - WOODWEB ® Inc.
    All rights reserved. No part of this publication may be reproduced in any manner without permission of the Editor.
    Review WOODWEB's Copyright Policy.

    The editors, writers, and staff at WOODWEB try to promote safe practices. What is safe for one woodworker under certain conditions may not be safe for others in different circumstances. Readers should undertake the use of materials and methods discussed at WOODWEB after considerate evaluation, and at their own risk.

    WOODWEB, Inc.
    RR4 Box 265A
    Montrose, PA 18801

    Contact WOODWEB


  •   Home » Knowledge Base » Knowledge Base Article