This article was reprinted with permission from Wood Tech Tooling, www.woodtechtooling.com.
Two basic types of jointer stones (Hard and Soft) are used in the woodworking industry. In general, hard stones are used on older machines running at 3,600 RPM's. Detail to precisely forming the stone is critical, as the stone can "reform" the profile on the knife if mis-made. Soft stones - as used on more modern 6,000 and higher RPM machines, are more forgiving and can be "chipped in" to properly fit the knife.
Jointer Stones are similar to grinding wheels in composition.
Abrasive materials
* Silicon Carbide: ( Green) Cuts cooler and faster than Black Silicon Carbide.
* Silicon Carbide: (Black) Smoother finish, longer life.
* Aluminum oxide : (White, Pink, Orange) Cuts fast and cool, best for Straight Joints on Planers.
Bonds
Vitrified:
1. Easier to shape
2. Cuts cooler
3. Holds the profile better and longer than resin bond.
Resin:
Grits
For HSS Applications:
Hard stones:
* 60-120 White Straight Knife
* 80-400 grit Black Silicon carbide (Straight & Profile)
* 240-400 grit Green Silicon Carbide (Straight & Profile)
Soft stones
* 280-400 grit: Straight knife
* 500-600 grit Profiling
For Carbide Applications (See Jointing Carbide Knives for more information):
Hard Stones:
* 220 -240 grit Black Silicon Carbide (Profiling)
* 240 -400 grit Green Silicon Carbide ( Straight & Profiling)
Soft Stones
* 150-220 grit special blended Aluminum Oxide (Profiling)
Note: harder than the super soft stone, but not quite as hard as the hard stones used for 3600 rpm on HSS.
* 240 grit Black Silicon Carbide (Straight)
Helpful hints
1. Use a dedicated grinding wheel to form the stone. DO NOT use the same wheel to grind knives, as steel chips will be transferred back to the jointer stone. This will produce "nicking" of your knives.
2. Finer grits (higher numbers)produce better finishes because the grains are finer. Coarse grits will remove more steel, and finish
results won't be as smooth.
3. The harder the stone, the more precise the shaping must be. Soft stones can be chipped-in with the actual cutterhead to assure exact counter profile.
4. Soft stones aren't designed to remove nicks from knives.
5. Wax impregnated stones are more forgiving, and the lubricity helps prevent the stone from being over jointed. An added benefit is a reduced dust level.
6. Always be familiar with MSDS for both the stone and the steel being used. Wear appropriate venilation equipment and have proper air transfer to avoid inhalation.
7. IMPORTANT NOTE: As in any jointing stone forming process, use ONLY a wheel to form the stone that has not been used to grind ANY knives. Using a grinding wheel that has been in contact with knives will result in small metal particles being impregnated into the jointing stone. This foreign matter will adversely affect the stone performance by nicking the knives.
Shaping instructions
Note: Grinding accuracy is critical in determining proper jointing stone selection.
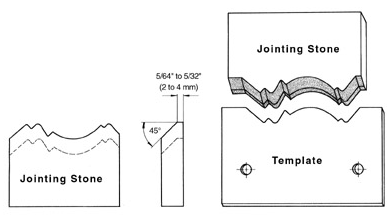
First, layout the stone using the pattern knife to be jointed. It is most important to maintain as accurate a mirror image fit as possible to the profile being jointed, as the jointing stone will in effect re-profile the knife if not properly formed. Now pre-shape the stone as accurate a fit as is possible.

Taper the stone on both sides at a 45° angle. This angle allows faster chipping-in of the stone. Insert the stone into the holder on the machine, and chip the stone in for exact fit. The use of only one knife in the chipping-in process results in a better fit. After the stone is chipped-in to fit, start the spindle and bring the stone into the knife at a slow to moderate speed. One technique is to bring the stone in and out in 1 second intervals, making minor adjustments at each interval. Another technique is to bring the stone in and hold it in slight contact with the knives. Depth control adjustments are made while contact is being made. This technique is tricky as extended time of contact can cause the stone to glaze.
This article was reprinted with permission from Wood Tech Tooling, www.woodtechtooling.com.