by Charles G. Monnet, Jr.
Part Two of a six part series providing in-depth information on proper sharpening and balancing procedures for jointer knives. Copies of the 167 page Knife Grinding and Woodworking Manual are available from Charles G.G. Schmidt & Co., Inc.
Balancing, Part Two
C. Balancing Straight Knives. Straight knives which are of the same length, width and thickness, if ground in pairs, can be very easily balanced. Extreme care should be used in setting the knives on the knife bar for grinding. If the knives are not set evenly more will be ground off one knife than the other, making the balancing operation more difficult besides wasting the knife. Even though straight knives are ground in pairs it should not be taken for granted that they will be of the same weight and balance. Always balance the knives on a balancing way such as the Dependable B-1. Be sure to keep the balanced pair of knives together so that they can be set opposite each other in the head. It is not necessary that all knives in a set be of the same width and weight. The important thing is that the knives opposite each other in the head be of the same size, weight, etc. There may be times when some of the knives may be gapped or damaged and it is necessary to grind more off of these knives to get them properly straightened. As long as the knives opposite each other in the head balance each other there will be perfect running balance of the head. Care should be exercised to see that the knives are all set-out (projected) the same distance on the head.
Straight knives ground in the head on a cutter head grinder, if ground on a precision machine, will usually be equally enough balanced that they will not have to be taken out of the head and balanced after several grindings. The heads should be checked carefully for balance after they are put on the machine. If there is any pounding, vibration or indication of out of balance the knives should be taken out and balanced. Anytime that the knife gibs are taken out of a head they should be marked so that they go back in the same slots. The gibs for heads are balanced in pairs and placed in the head opposite each other. Care must be taken when setting knives in the head, that no dirt, oil or other foreign matter comes between the knives and the knife gibs or the knives and heads. On jointed heads, if the knives are properly jointed, the knife marks will be equally spaced if the head and knives are properly balanced. When running four knife heads if an "extra" mark appears at regular intervals of every four marks this indicates out of balance. This mark is known as a "revolution" mark. However, if there is an uneveness in the spacing of the knife marks but not at regular four mark intervals, this indicates that the knives are not all properly jointed.
D. Balancing Milled-To-Patterned Knives. All milled-to-pattern knives are (or should be) ground in the head. Nearly all milled-to-pattern knives have corrugations on the back. Milled-to-pattern bits should be set out on the head the same number of corrugations. Then if the knives are ground on a precision cutter head grinder, such as the Dependable 106-A, they should be so nearly balanced that they will not have to be taken out of the head for balance. The head should be checked after the machine is started to see if there is any indication of out of balance. If the heads appear to be out of balance then the knives should be taken out and balanced.
E. Balancing Ground-To-Pattern Knives. The most difficult of all balancing is the dynamic balancing of ground-to-pattern bits on a square head. Balancing for special detail moulder work is equally as important as the balancing of straight and milled-to-pattern knives. Unless good balance is obtained poor work will result. Special detail work is usually exacting and requires a better than average finish. Due to difficulty of jointing ground-to-pattern knives only one knife work (finish) can generally be obtained with these knives. In spite of this fact, these knives should be made in pairs so that the second knife can be used for balance and to help in the cutting operation.
The first thing an operator should do is balance the two knives on a balancing way such as the Dependable B-1. If one knife is heavier than the other, it should be taken to a grinding wheel where an amount is removed from it which is estimated to be sufficient to bring it in balance with the other knife.
When the two knives weigh the same they are alike in dead weight. This however, does not insure that they will run in balance when placed on opposite sides on a square head. (see Tightening Knives on page 65 [this will be carried in Update #29 - ed.]) The cutters must be equal in thickness, equal in projection beyond the cutter head lip, and they must be in line with one another on opposite sides of the head. (see figure 55 and 56)

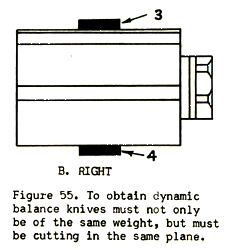
So in order to give running (dynamic) balance the knives must be running in approximately the same plane. Just because the knives are of the same weight and are placed on opposite side of the head does not insure running balance. Running balance cannot be obtained when knives are placed on a head as shown in A of figure 55, (setting is exaggerated) even though the knives are of equal weight, equal projection and equal thickness. This cutter head with knives would show perfect balance on a static balancing stand. Centrifugal force is the factor making dynamic (running) balance necessary. When the head (A of figure 55) is running at high speed centrifugal force exerts a strong pull on each knife directly away from the axis of the revolving cutter head. Since (1) pulls away centrifugally at one point along the axis and (2) pulls away centrifugally at another point along the axis (theoretically) the cutter head spindle is pulled into a modified "S" form. Although such distortion is very slight it is enough to set up terrific vibration. Good work can never be accomplished unless the cutter head is running smoothly. To obtain proper running balance the knives should be placed on the cutter head as shown in number "B" of figure 55.
Cutters which have been run for a while show the parts of the cutters that have been cutting and show up any cutter not cutting. The edges of the cutters doing the most work will be worn off the most. Parts of cutters that have not been doing any work will be keen. Small errors in balance or cutter setting can be corrected by honing or sharpening. Actually, after a machine has been running for a while and the cutters have had a chance to wear-in, the edges of the cutters are probably nearer to a true cutting circle than they were at first. Parts of the cutters doing work will have smooth, worn areas made by chips sliding up the cutter before breaking off. The thicker chips slide up further and therefore any cutter having a wider band of worn area has been doing more cutting. The rest of the cutter (not doing any work) is usually covered by pitch. This is particularly true of soft woods. When honing or sharpening is done the cutters having the widest band of worn area should be ground off the most. When done carefully this will make all cutters cut a more equal load.
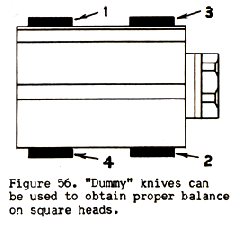
When making a "combination set-up" as explained in 1. Use gauge for Setting knives on page 66 getting proper balance becomes most difficult of all set-ups. There may be cases where a pair of knives bolted to opposite sides of the head cannot be placed exactly in line. There may be times when a special detail moulding has to be run in a hurry and there is not time to grind a pair, or the several pairs, of knives required to make the moulding. When only one knife is ground it is necessary to use a dummy knife on the opposite side of the head. A knife or blank should be selected that is nearest being of the same width, thickness, and weight as the detail knife. Figure 56 on page 58 shows a head where knives 1 and 2 are the cutting knives and knives 3 and 4 are the dummy knives. Since the dummy knife is not projected out on the head as far as the cutting knife it will not have as great a centrifugal pull as the cutting knife. In order to compensate for this discrepancy the dummy knife should be slightly heavier. When using a dummy knife that is lighter or when running indicates less centrifugal pull on the dummy knife this may be compensated for by using a washer under the nut on the knife bolt. If a lot of "combination set-up" work is to be done it is a good idea to have a few extra washers of varying thicknesses. Another method of obtaining proper running balance is by use of old square head bolts in the T-Slot where these bolts are regularly used. Old bolts can be cut to varying lengths so that by trial and error the correct bolt or bolts can be used to give a smooth running balance. There is not any danger of the bolts sliding out of the T-Slot while the head is in operation because centrifugal force holds them tightly against the under side of the slot. The use of old bolts and washers for balancing is not a recommended practice. At best, only an approximate balance is ever obtained. This practice can also lead to carelessness in balancing knives ground in pairs that should be balanced against each other without the use of washers, bolts, etc.
For best results in running ground-to-pattern knives it is always recommended that the cut begin made be distributed around the four sides of the cutter head as evenly as possible. The knives should be distributed so each side is taking about the same amount of cut. When this is done smoother cutting action will be obtained.
Other Factors Affecting Balance. A cutter head correctly balanced will not have running balance unless the head is centered properly on the spindle. This brings out the importance of using heads with good self-centering devices. The faster the spindle speed the more important it is that the heads are centered correctly. Failure of a self-centering device to work properly is often caused by hammering it on or off the machine. This not only springs the sleeve or self-centering cone but the peening action will raise the metal and cause the cutter head to run out of round. Foreign matter is another cause of cutter head out of balance. A cutter head that has pitch or gum heavy enough to be seen on the head will not give good performance. Square head bolts, nuts, and washers should be of the same size and weight when running on opposite sides of the head. These should be balanced in pairs or in sets and marked so that balanced sets will be placed opposite each other on the head. Knife Gibbs as used on round head are balanced in pairs at the factory and placed opposite each other on the head. The gibbs and heads should be so marked that when the gibbs are taken out they will go back in the same slot where they were originally.
Editor's note: copies of the 167 page Knife Grinding and Woodworking Manual are available from Charles G.G. Schmidt & Co., Inc. you can click on their link to reach their web site, and send an e-mail request for more information, or call them at 201-391-5300.
The entire series will be available at WOODWEB's Archive Section.