by Charles G. Monnet, Jr.
Part Three of a six part series providing in-depth information on proper sharpening and balancing procedures for jointer knives. Copies of the 167 page Knife Grinding and Woodworking Manual are available from Charles G.G. Schmidt & Co., Inc.
Setting Knives
A. Round Heads.
1. Setting Knives Accurately Very Important. The importance of setting knives in the head accurately cannot be over emphasized, whether they are eventually to be jointed or not. On hand-fed machines (such as hand jointers), even the lightest jointing is inadvisable unless the minute heels (from jointing) are removed by honing, otherwise the wood will tend to ride on the cutters. Without jointing it is impossible to have all of the knives making the same depth cut and one of the knives will skin the knife marks of the other thus producing a poor finish. Always check the knives with a straight edge after grinding and before setting. If one knife is straight and the other one is 1/500th" hollow it is impossible to set the two knives so that both are cutting equally along the entire length. Only a very slight excess projection of one knife is needed to cause this effect which gives what is known as "one-knife" work. The factors causing this effect are number of knives in the head, spindle speed of the head and feed speed. For example, with a four knife head, of 6�" cutting circle running at 4,000 RPM, and a feed speed of 65 feet per minute of the stock, if one knife projects 0.0014 inches more than the others, only this one knife will be making the finishing cuts (knife marks) and "one-knife" work will result.
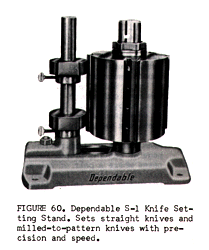
2. Use Good Setting Device. If the knives are ground out of the head a very accurate setting device should be used, because the more accurately the knives are set the less jointing is necessary. If the knives are not set accurately heavy jointing will be necessary to bring all the knives to a proper cutting circle. This will produce uneven heels on the knives�light some places and heavy other places. It is well known that smooth work is impossible when the cutting knives show anything but a light even heel. A knife with a heavy heel, the same as a dull knife, has a tendency to pound or hammer rather than cut. Set the knives carefully at first and you will save more time than if you set them hurriedly and have to regrind them. Set the knives with a good gauge and take the time necessary to do the job properly. It will pay in the long run. For setting knives in slip-on type heads the Dependable S-1 Setting Stand is highly recommended. See figure 60 above. The Dependable 323-M Knife Jointing machine is equally as good for setting knives as for jointing them.
3. Setting Knives By Use of Wood Blocks. Should you be so unfortunate as to not have any type of knife setting gauge, straight knives for both round and square heads can be set by means of blocks. Obtain tow pieces of the hardest wood available. These should be about 3" long by 2" thick and must be of the very same thickness. Therefore, they should be cut from the same piece of stock. Clean the bed of the moulder thoroughly. Then place one block under each end of the head having a knife tightened only enough to hold it in the head. Then rotate the head until the knife contacts each block lightly. Make sure that the knife does not cut into either block. Tighten the knife and repeat for each knife to be set.

4. Use Proper Knife Projection. The recommended distance for a knife to project out beyond the head proper is 3/16". A safe rule is to never allow a knife to project out beyond the length of the cutting bevel, and at the very extreme should not project more than 1/16" beyond the bevel. See figure 61 on page 64. K is the knife. H is the head body. G is the knife gib. When machining green lumber the distance A should be greater than for dry stock. When the gib G shows excessive wear from contact with the knife it should be replaced. Several types of planers are equipped with portable grinders. Since the knives can only be ground a limited amount by these portable grinders before re-setting, it is a temptation for the operator to project the knives beyond the recommended projection in order that the knives may be ground for a longer period without re-setting. Too much knife projection or worn knife gibs, due to excessive projection, frequently causes the knives to break and fly in all directions.
Generally, the minimum knife projection that should be used is 1/16" to 1/8". Knives with a cutting angle of 20� to 25� can stand more projection beyond the lips of the head than knives with 25� to 30� cutting angle. On the lessor angle (20� to 25�) a maximum projection of 9/64" to 3/16" and a minimum projection of 3/32" are recommended. With the greater cutting angle (25� to 30�) a maximum projection of 1/8" to 9/64" and a minimum projection of 5/64" are recommended. With less projection more power in consumed in cutting and es because if one knife is set-out on the head farther than the other knife or knives, out of balance will occur and poor quality work will result. For best results a knife setting stand such as the Dependable S-1 should be used. If a scale is used in setting the knives, the knives should be set from the front. This is particularly important when setting ground-to-pattern knives because one knife may have the pattern ground deeper (closer to back edge) in the knife. If this is true and the knives are set from the back, one pattern will be projecting out farther than the other and therefore will be taking a much heavier cut. When setting ground-to-pattern knives, it is equally important to set the knives "widthwise" as for (diameter or) cutting circle. Unless each knife is lined up exactly, the correct pattern will not be obtained. (see Balancing Ground-To-Pattern Knives on page 62) When using a setting stand, the knives are set to either a template or a piece of the actual wood pattern and in one operation the knives are set for width (the pattern) and (projection) the correct cutting circle.
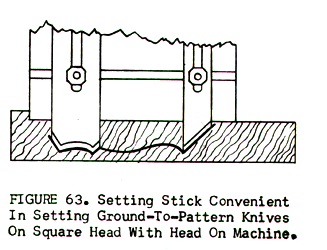
2. Setting Ground-To-Pattern Knives By Use Of Setting Stick. When making a set-up of ground-to-pattern knives on the machine a setting stick (or template) made of plywood is an inexpensive and convenient way to set the knives. (see figure 63 above) The plywood stick should be made with a notch that hooks over the end of the head, and the edge of the stick fits against the head body. The outline of the moulding is marked on the stick by use of a very sharp pencil. The knives are then set to the markings. The setting stick can be kept and used again and has an additional advantage of not changing as a moulding sample taken from the end of a run would do. The moulding sample would be slightly different than the original due to wear of the knives. A good practice would be to keep a supply of �" plywood sticks which could be used as templates.
Editor's note: copies of the 167 page Knife Grinding and Woodworking Manual are available from Charles G.G. Schmidt & Co., Inc. you can click on their link to reach their web site, and send an e-mail request for more information, or call them at 201-391-5300.
The entire series will be available at woodweb's archive section.