Question
Our shop already makes all of our own crown molding and arched crown on a tilting molder. I am trying to figure out the best and safest way to make this crown. I was thinking on a tilting shaper but I really don't like the idea of a 6" tall molding head just out in the open. Any other ideas?
Responses
(Architectural Woodworking Forum)
From contributor T:
In my furniture world, I turn the profile on a lathe and then segment the turning as needed. In some cases it might be turned with the larger diameter away from the face plate.
Until getting a CNC, I handled it as contributor C is suggesting on a lathe. I built a corrugated back knife holder with a shaft on it that I could mount in the tool rest base, and a leadscrew to feed the carriage with the knife into the work. After roughing the face angle onto the blank, I could then feed the knife into the face and cut an exact match profile to the linear moulding I had run as I was using the same knife I had used in the moulder. I don't think I ever tried it other than on the face mill side (Delta DL40 lathe).
Of course this has limitations as far as sizes. I don't think I ever did anything over 3' diameter, mostly because I never had a need, and over 4-4.5" face is a lot of torque, but I think I ran a 5.25" once or twice, slowly. A good turner with a standalone tool rest and steady hand might be able to make up to whatever size the lathe will spin. Then it's just a matter of cutting out the section you need. Even now with the CNC, the profile may need to be split in order to machine it and then joined to form the full piece.
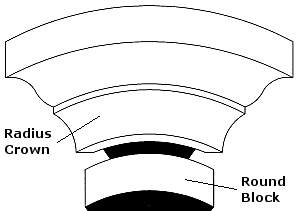
For crowns with a radius smaller than 12" we will either use our 3D software on the CNC or send the project to a lathe specialty shop. I've run curved crown mouldings on our shaper in the past. However, after one knife breaking incident, I was done with that. Talk about a knot in the pit of your stomach... very scary. However, I'll take a knot in my stomach over a piece of steel any day!
We've run them on the CNC router and it works okay, but there is more sanding required and some blending where it joins the straight parts. We bought the heavy tilt shaper just to run curved crown, so it is left set up for that. We run both inside and outside curves on it much the same way, just have to move the power feed to a different location and change the enclosure around the head. We have a couple of items that we sell that use the same curve every time so it was worth the setup/learning curve. The knives need to go back to the grinder fairly often to keep them as sharp as possible since you are cutting against the grain part of the time. Given a little practice and some fooling around you can do a lot with a shaper and a feed. For one-offs that are not a true radius, we run them on the router - usually set up just before we go to dinner and let it run since it takes quite a bit of time to do the very fine passes for the last cut. I'll come back to the shop later in the evening to check on it and make sure everything is shut down okay. If we had a 5 axis machine it would be a lot faster.