Today's
Sponsors:


Italpresse

J & G Machinery

J and B Hardwood Co.

J&P Machines

J. Gibson McIlvain Company

JMHsoftware.com

Joos USA Inc.

JusDust.com

KCD Software

Kentucky Pacific Lumber

Kerber Farms and Mill

Keystone Wood Specialties

Keytrix Data Systems

Kleiberit Adhesives USA, Inc.

Kreg Tool Company

Kremlin

Lacy Cypress Inc.

Laguna Tools

Leadermac USA

Leitz Tooling Systems

Lewis Lumber Products

Lignomat

Limtech Industries, Inc.

Logosol

Lumber Resources

Lumber Smith

M.L. Campbell

MACHINEKING.com

MARTIN Woodworking Machines Corp.

Mastercam - CNC Software

Maxima Software

Maya Positioning Equipment

Mereen-Johnson Machine Company

Merritt Woodwork

Microvellum

Middle Valley Lumber

Mikron Woodworking Machinery

Mill Outlet

Millwork Inc.

MLS Machinery

Monarch Machinery

Monarch Metal Z Clip and Panel Clip

Moulder Techniques

Mountainside Wood Products

MultiCam Southeast

Multicam, Inc.

Nail Gun Depot

New England Drawer

New England Kiln Drying Association

NEWCNC.com

Nyle Dry Kiln Systems

O'Shea Lumber Company

Old Mississippi Brick and Heart Pine Company

Oliver Machinery Co.

Omnitech Systems

ICA North America

Impact Search and Placement

Industrial Air Solutions

Integra Precision Grinding and Manufacturing

IpeDepot.com

irsauctions.com


Machining Mullions for Glass Doors

      Advice and a step-by-step how-to for making those pesky mullions. May 14, 2006

Question
I occasionally make glass doors with mullions-they are a real pain-I've tried making a wide part and the ripping the excess out of the middle and gluing the pieces together and gigs to machine the part at correct size, neither way is as safe as I would like. Someone must have a better way. Is there a special machine that can do this? Any suggestions would be appreciated.

Forum Responses
(Cabinetmaking Forum)
From contributor A:
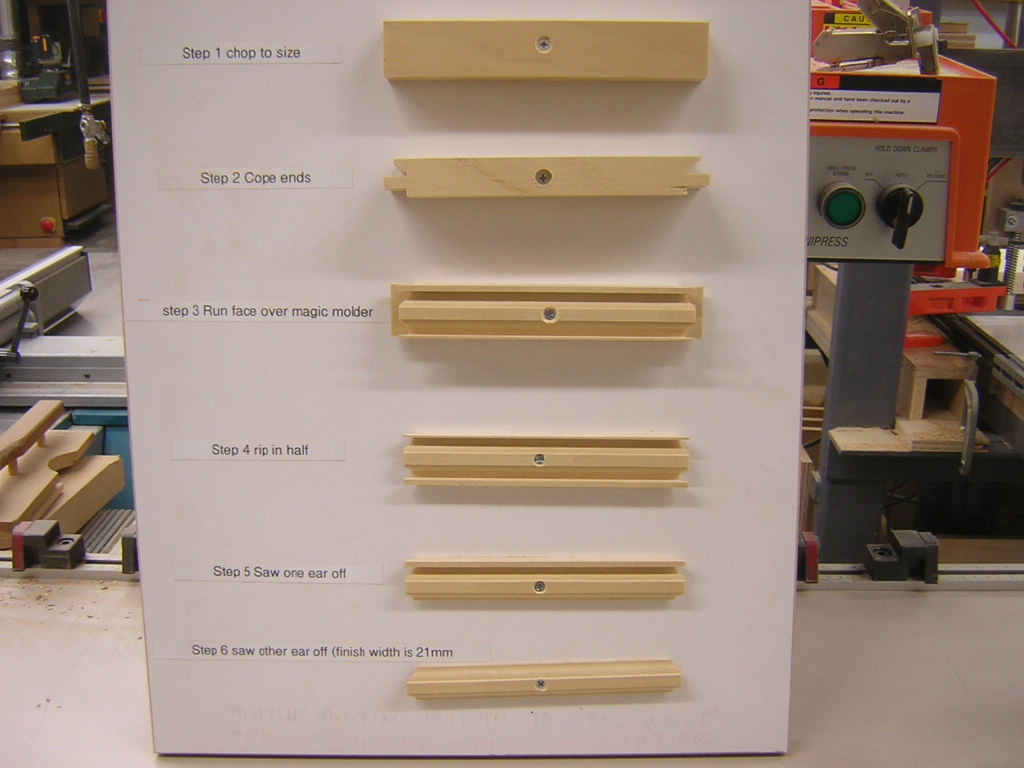
We build doors like this from time to time and our labor to produce a door is now about 25% of what it was when we first made them.We cope and stick all of our doors with Leitz insert tooling. We had LRH Tooling Company produce magic molder inserts that mirror the profile of the various stick patterns we use. The process is fairly straightforward but it helps a lot to get the sequences in the right order. We made the storyboard you see as a way to get these processes straight in our own head, as well as provide a training tool to make others more proficient. The magic molder insert costs about $100. The storyboard method of training is priceless.


Click here for full size image


From contributor A:
Here is a shot of the magic molder set up for an Ogee profile. Now that I see this shot I realize we should change the insert on the saw to be a little tighter around the profile.


Click here for full size image


From the original questioner:
Thank you for the help, great idea you have. I will also use your storyboard idea - why didn't I think of that? Let's take the rest of the day off.


From contributor B:
The best way I have found is the same way as on an easy door machine using a shaper and a reliable floating jig. Rip parts to 1-1/8", cope as normal, then profile each edge using the jig removing 1/16" from each edge. Finished part is 1" wide and profiled just like the door frame.


From contributor C:
We run our mullions on a moulder and have a router table set up for coping them, which is better than messing with the shaper set up. A local shop with a moulder can stock you with them - just keep them packaged tightly. The new system epoxy from 3M (I can’t remember the name of it right now) really holds it together fast and strong. It’s the green one that uses air and heat.


From contributor D:
I've always:
1. Coped a wider piece (3")
2. Ripped them a 1/16" heavy
3. Switched the pattern profile so it doesn't remove for glass. This allows for a full width part only profiled on the top.
4. Pattern on the fence. I've run 4-1/2" mullions this way.
5. Ripped them on edge on the TS.


From contributor E:
It's easy, and it's hard. Just use your standard sticking cutters but use an "Off Fence" to back up the parts. Make the "Off Fence" just a little thinner than the height of the parts. Then you can use a power feeder to run the parts.

The secret - use a shim the same thickness as your glass profile on the outfeed side of the shaper fence. Add the same thickness shim to the Off Fence when running the second side. This is the only way I can get parallel parts. We cope after sticking by using a backer on the tenoner made with the tenon knives. I do think that a set of knives for the Williams & Hussey would be as good as a Sticking Machine as in window shops. I intend to do this as soon as I make some money on a job. Anyway, the molder would allow you to make different width muntins. Some of my door customers want 1/4" between the glass, but I prefer 1/2". On the molder, make a jig to hold the part on the second pass by using your coping knives. I use the Bostik table lube to make thing slip along. Wax is OK but may screw up a finishing job.


Would you like to add information to this article?
Interested in writing or submitting an article?
Have a question about this article?


Have you reviewed the related Knowledge Base areas below?
  • KnowledgeBase: Knowledge Base

  • KnowledgeBase: Cabinetmaking

  • KnowledgeBase: Cabinetmaking: Custom Cabinet Construction

  • KnowledgeBase: Cabinetmaking: Cabinet Door Construction

  • KnowledgeBase: Solid Wood Machining

  • KnowledgeBase: Solid Wood Machining: General


    Would you like to add information to this article? ... Click Here

    If you have a question regarding a Knowledge Base article, your best chance at uncovering an answer is to search the entire Knowledge Base for related articles or to post your question at the appropriate WOODWEB Forum. Before posting your message, be sure to
    review our Forum Guidelines.

    Questions entered in the Knowledge Base Article comment form will not generate responses! A list of WOODWEB Forums can be found at WOODWEB's Site Map.

    When you post your question at the Forum, be sure to include references to the Knowledge Base article that inspired your question. The more information you provide with your question, the better your chances are of receiving responses.

    Return to beginning of article.


    Refer a Friend || Read This Important Information || Site Map || Privacy Policy || Site User Agreement

    Letters, questions or comments? E-Mail us and let us know what you think. Be sure to review our Frequently Asked Questions page.

    Contact us to discuss advertising or to report problems with this site.

    To report a problem, send an e-mail to our Webmaster

    Copyright © 1996-2012 - WOODWEB ® Inc.
    All rights reserved. No part of this publication may be reproduced in any manner without permission of the Editor.
    Review WOODWEB's Copyright Policy.

    The editors, writers, and staff at WOODWEB try to promote safe practices. What is safe for one woodworker under certain conditions may not be safe for others in different circumstances. Readers should undertake the use of materials and methods discussed at WOODWEB after considerate evaluation, and at their own risk.

    WOODWEB, Inc.
    335 Bedell Road
    Montrose, PA 18801

    Contact WOODWEB


  •   Home » Knowledge Base » Knowledge Base Article