Home » Knowledge Base » Knowledge Base Article What's New  |  Site Map 


Today's
Sponsors:


Wagner Electronic Products

WalzCraft Industries

Webb Abrasives

WEIMA America, Inc.

Weinig Group - USA

Western Dovetail

Williams and Hussey

Wisconsin Knife Works

WMIA

WMMA

Wood and Wood Products

Wood Doctor's Rx, LLC

Wood Tech Enterprises, Inc.

Wood Technology Inc

Wood-Mizer

Wood-Ply Lumber Corp.

WoodCabinetDoors.Com

Woodcraft Supply Corp.

WoodcraftPlans.com

WoodenBoat

WoodFinder

WoodJobs.com Search Consultants

Woodland Dimension Products

WoodLINKS

Woodmaster

WoodPlanet Inc.

WOODWEB

Woodworker's Supply/woodworker.com

Woodworker's Directory

Wright Timber

SK-USA

SketchList

SlipCon USA, Inc.

SoCalMachinery.com

South State Machinery

South Texas Moulding

Southeast Tool, Inc.

Specialtytools.com

SprayGunWorld.com

Stairguy Stairbuilding Videos

Stefani

Steve H. Wall Lumber Co.

Stiles Machinery

Stiles Shop Solutions

Stor-N-Fold Systems

Super Source Tooling Inc.

Supergrit Abrasives

Surface and Panel Magazine

Target Coatings

Techno CNC Routers

Template Services

Teragren

The Cayce Company

The Veneer Store

Thermwood Corporation

TigerStop

TigerwoodDecking.com

TimberKing

Timesavers Inc.

TMS Machinery Sales

Tongass Forest Enterprises

Tooling on the Web

Toolstoday.com

Touch Up Solutions LLC

Tractivity

TradeSoft

Trakware Systems Inc.

TRB Flooring Company

Tropical American Tree Farm

Tropical Hardwoods

UC Coatings Corp.

Unique Machine & Tool

University of Wisconsin

UWMO Auctions

VacDry Kilns

Vacuum Pressing Systems, Inc.

Vacuumpods.com

Vecoplan LLC

Vector Art 3D

Vectric Ltd.

Veneer Systems Inc.

Veneer Technologies Inc.

Vintage Perkins

VortexTool Co. Inc.

VyTek

W. Moore Profiles, Ltd.

W.L. Fuller

Wadkin North America


WOODWEB DISCLAIMS any and all RESPONSIBILITY and LIABILITY for the accuracy and application of the information below. Readers agree to evaluate the significance and limitations of the information provided, and accept full responsibility for the application of this information. Read More ...

Would you like to add information to this article?
Interested in writing or submitting an article?
Have a question about this article?


Making Interlocking Shelves       Constructing sets of shelves with fitted parts. October 20, 2004

Question
We've run into a client that wants a ton of these shelves and was wondering if anyone had a better way to make the dados for the interlocking parts.

For the one or two we've done in the past, we've used the dado set on the table saw and then chiseled the end of the "notches" square.

This was okay, but we've got to make a bunch of these, so we'd appreciate any suggestions.

Forum Responses
(Cabinetmaking Forum)
From contributor J:
If you have a large radial arm saw or overhead router for dados and for shelves, just notch 'em so they hide the "ramp" from the blade, just like the tennon on a joint.


How about a jig, router and guide to assembly-line them?


Depending on the thickness of the material, one thought is to use a dovetail joint for shelves... Depending on taste, it might add a decorative flair for a finished product (assuming adding a hardwood edge vs. edgebanding prior to dovetailing), or easily concealed with paint...

What will these units be housing?


Years ago I made the same type of shelves. I cut the vertical and horizontal dividers to the overall length of the unit, then routed through the back side of the verticals halfway, then routed through the front of the horizontals halfway. It was easy to assemble by placing them face down, sliding the horizontal panels into the vertical panels. Doing it this way is fast and makes a really square unit.


Rather than dado, I have cut my horizontals full length and applied my verticals with butt joints, securing with biscuits or splines. When working with melamine or laminates, there is less risk of having an edge chipped when doing a full width dado.


I just bought a Her-Saf panel router, and love it! With a template you could make a stopped dado and dap shelf ends very quickly.


We did some similar but avoided dados altogether by using hardware. We made a small groove on the shelf ends to hide the clips. Can't recall the hardware name but it was a clip with two screw holes at each end to apply it and it had a kind of keyhole and slot along the length. The mating part was a screw that went into the vertical in pairs and the shelf would slide and clip into place. It was pretty fast and simple, plus you could ship and assemble later. Also did these shelves with other European fasteners found at Hafele, etc. I realize it's not the answer to your question, but just tossing out an alternative that might spark other ideas. The clips were American before all the Euro hardware hit. I like the Euro stuff better, plus we had a construction boring machine. You don't have to dado with the new hardware, which I found stronger for most applications.


Do they really have to be interlocking? I have made plan storage cabinets like this in the past and made my vertical members fixed and then made all the horizontal members just like adjustable shelves, only I made them a snug fit. You would have to adjust your height to work within the system holes so you have equal spacing.


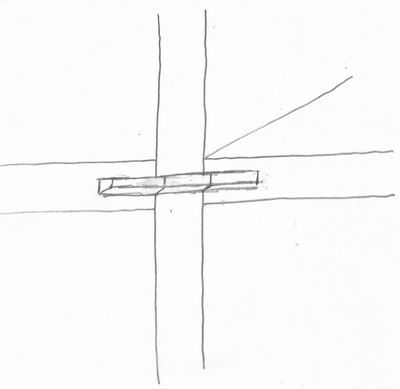
The picture leaves a lot to the imagination. The seams appear to be both horizontal and vertical, so there is no help there as to what it is supposed to look like in finished form. What is the finished material? It also appears that the horizontal and vertical are both flush at the front edge and there is no back. Is that right facing end supposed to float like it appears?

I don't see enough info to determine how you should construct this piece. There are too many variables. It would help if a little more was known as to what the customer expects to see.

Also, is this piece commercial? Free standing? Just going by the sketch, dadoes alone would not do it.


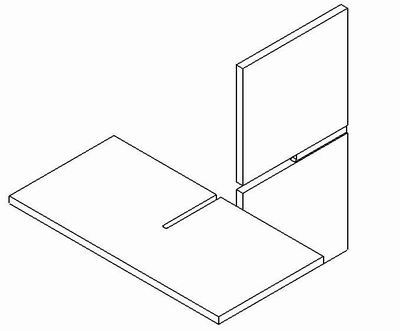
If you have backs, you can screw through them into the unsupported back half of the shelf. If you don't have backs, you can rout a keyway as shown below and glue in a snug-fitting piece of hardwood. 1/4" x 1/4" works very well and the cuts can be made before assembly with simple templates and jigs.


From the original questioner:
Thanks for all of the great ideas. Responses like this are what makes this one of the best professional forum on the net. I think we are leaning towards the 1/2 lap solution.


Or, if you want to go a step further…

Just use a template and a router with a bearing above the bit. Make it big enough to pin a stop at the right spacing and you can step the template from the previous cut.


Have you reviewed the related Knowledge Base areas below?
  • KnowledgeBase: Knowledge Base

  • KnowledgeBase: Cabinetmaking

  • KnowledgeBase: Cabinetmaking: General

  • KnowledgeBase: Cabinetmaking: Residential Cabinetry

  • KnowledgeBase: Furniture

  • KnowledgeBase: Furniture: Furniture Design

  • KnowledgeBase: Furniture: General

  • KnowledgeBase: Woodworking Miscellaneous

  • KnowledgeBase: Woodworking Miscellaneous: Woodworking


    Would you like to add information to this article? ... Click Here

    If you have a question regarding a Knowledge Base article, your best chance at uncovering an answer is to search the entire Knowledge Base for related articles or to post your question at the appropriate WOODWEB Forum. Before posting your message, be sure to
    review our Forum Guidelines.

    Questions entered in the Knowledge Base Article comment form will not generate responses! A list of WOODWEB Forums can be found at WOODWEB's Site Map.

    When you post your question at the Forum, be sure to include references to the Knowledge Base article that inspired your question. The more information you provide with your question, the better your chances are of receiving responses.

    Return to beginning of article.


    Refer a Friend || Read This Important Information || Site Map || Privacy Policy

    Letters, questions or comments? E-Mail us and let us know what you think. Be sure to review our Frequently Asked Questions page.

    Contact us to discuss advertising or to report problems with this site.

    To report a problem, send an e-mail to our Webmaster

    Copyright © 1996-2008 - WOODWEB ® Inc.
    All rights reserved. No part of this publication may be reproduced in any manner without permission of the Editor.
    Review WOODWEB's Copyright Policy.

    The editors, writers, and staff at WOODWEB try to promote safe practices. What is safe for one woodworker under certain conditions may not be safe for others in different circumstances. Readers should undertake the use of materials and methods discussed at WOODWEB after considerate evaluation, and at their own risk.

    WOODWEB, Inc.
    RR4 Box 265A
    Montrose, PA 18801

    Contact WOODWEB