Making Laminate Countertops
This complicated thread combines a healthy helping of newbie advice with some advanced debating about seam location, plus a couple of pro fabricator tips.August 16, 2012
Question
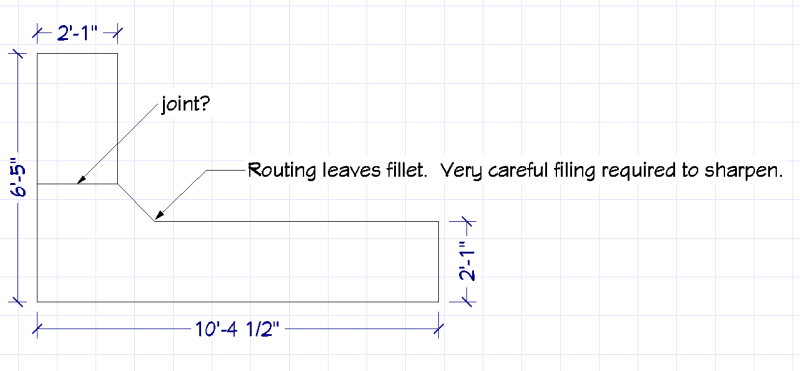
Should I use particleboard or plywood substrate below? Joint or no joint, or if a joint, where is better? The sink goes in the center of the long leg. It�s a top-mount. I plan to use something from Wilsonart or Formica, and the pre-made BevelEdge edge, plus some of their backsplash. I need tips or advice for getting that skew cut straight and the inside corners sharp in prep for the glued-on edge and its mitered ends.
Click here for higher quality, full size image
Forum Responses
(Cabinetmaking Forum)
From contributor B:
Sub it out to somebody who does - seriously.
From contributor L:
I agree, sub it out. No joint? If you don't know the recommended substrate I would suggest reading Willson's fabricating guide.
From contributor C:
No way to do it without a seam. The largerst readily available laminate is 5' X 12'. I'd put the laminate seam through the sink, particle board underlayment, joint where you show would be fine, and pattern it right off cabinets. I might leave the radius on the laminate and file bevel to fit, but that would depend on how solid the decks were. Cracks radiate from sharp inside corners. My saw cuts square but if yours doesn't, it's going to be hard. Guidelines given by the manufacturer will help.
From contributor Y:
Do not under any circumstances put the seam through the sink. That is asking for trouble. Particle or MDF for your substrate.
From contributor L:
Never seam through a sink opening! Seal board edges around the sink cutout with something water proof, melamine glue, silicone rubber, etc. Coat the joint with melamine glue also before tightening the fasteners.
From contributor C:
Contributor Y and L - where would you seam it? Contributor L, it sounds as if you're referring to post-formed tops, I don't think that's what the questioner is asking about.
I've done countless c-tops that way and remodeled many a kitchen where I demoed 20 or 30 year old laminate tops with seams on the sink that were holding up just fine. I can honestly say I've never had a call back concerning this practice, but I do a nice tight seam, and install sinks better than most I take out.
Perhaps it's a regional thing, but around here you'd be hard pressed to find installers that didn't seam at the least visible place - the sink. It wouldn't be considered hacking unless it was done badly. I wouldn't hesitate to do this in my own kitchen. I see more far more failures from water getting under laminate at backsplash to c-top juncture where it has penetrated back edge of substrate, but that's another issue.
From contributor S:
I would put the seam about where you have it shown, that is the only way you could get the whole top out of 1-5x12 sheet of laminate. Supplier doesn't matter, whatever is readily available for you they should all have similar colors. We do all our joints with joint fasteners and a slot cutter and insert a hardboard strip.
Any time we have a sink or countertops where there is potential for water or spills we use an exterior grade poplar or spruce ply, our supplier carries it for laminate work, it has a sanded face. We use particle board for dry areas.
We have seamed through sinks in the past, but I would never use particle board. You can bevel the front edge and insert anything you want first, just cut a dado and glue in hardwood or some type of plastic like acrylic. We don't use straight flush trim bits anymore for laminate, we make our first pass using an 8 degree bevel, this way you never have to worry about damaging the front edge.
We use a good water base glue like 3M and have had very few problems. Either make a bunch of sticks about a 1/4 inch square or buy a bunch of wood dowels. After the glue sets you lay the sticks on the top of the wood substrate and then your laminate on top of the sticks, this way you can get your joints tight and also make sure your laminate is covering all the top. We pull all the sticks out except for one stick about six inches from the joint, this way you can roll the last six inches toward the joint to get a tight joint.
To get a good joint overlap the two pieces of laminate on a straight edge and run a router with a flush bit down the straight edge, then take a 10-12 inch sanding block and sand a slight angle on the bottom side of the laminate. With practice you will be able to make a joint that is hard to find dependent of course on the color and finish of the laminate.
One other thing I never mentioned is we use backer on all our tops. It keeps them from warping, and some people don't use it if the top is going to be screwed or fastened well. I hope I haven't been too basic with the post. Give it a whirl, your top is only about $200 for material, so what�s the worst case scenario?
From the original questioner:
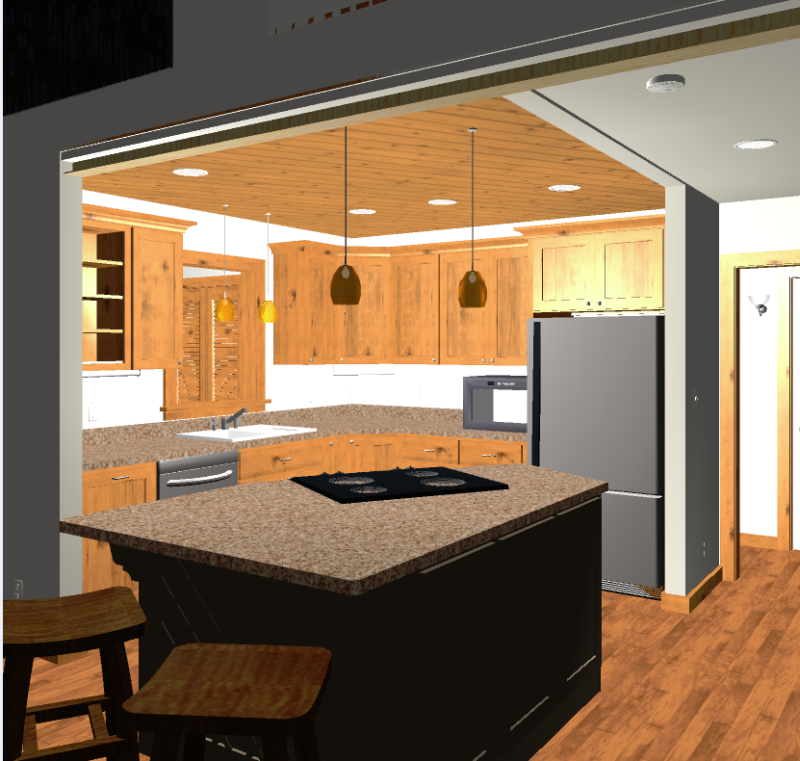
Here is a rendering of what we'll get at the end. You can see the countertop in the back. Note the microwave. The microwave will always be there, and the 5' width laminate will give us the ability to put the laminate joint under it, thus hiding about half of the length. In this job's remote location, there are no shops doing countertop work unless you are willing to take a two hour drive after the one hour drive it takes to get to the interstate. Everyone has to do these specialties themselves.
Click here for higher quality, full size image
From contributor M:
I've had a lot of issues in the past with laminate lifting at the edges and corners when I used MDF as the substrate. It seems like it just sucks all the glue into the substrate. I haven't noticed this so much when using particle board. I've also updated many kitchens and office areas where the old countertop I removed was on a plywood substrate. They all seems bonded really well to the plywood.
From contributor K:
Seams should be tight. If not, that's what they make seam fill for. You have more chances of a self-edge de-laminating than a non-porous surface at the seam.
Click here for higher quality, full size image
From contributor F:
To contributor K: That�s a tough detail if you use a type II adhesive or if you use pre-bonded panels which are type II.
From contributor K:
To contributor F: It's very simple to do and solid. Scuff the surface of the inlay and clean, and adhesion isn't an issue. The laminate would have to degrade before anything can happen.
From contributor F:
Getting a piece of laminate under a laminated face on a pre-laminated panel would require a variety of cutters depending on the thickness of the laminate. Spending the labor to mill the wood for the laminate before pressing the laminate to the core is a lot of work when you can move the joint as far as possible from the water source. What�s the value for doing a joint at the sink that is more labor to the customer? Do they know they are paying for it or is it what you prefer to do? The reason the grade rules say to move the joint is to eliminate the likelihood or risk of failure.
From contributor K:
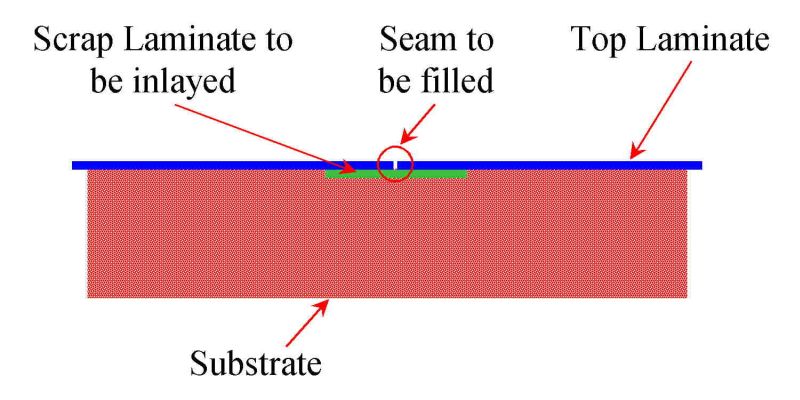
It literally takes minutes (ten at most) to do the inlay. Set your router to the depth of the inlay and rout back and forth to the pencil lines of the inlay in the front and back (30 seconds). Glue in your inlay, scuff the surface for adhesion and while it's drying work on the island. If it's your first time with an inlay, do a test piece. It takes longer to get the edge glued up and a butt seam set. The way as laid out above (and in pic below), there is no butt-seam, no edge gluing and no seam leveling and there is no substrate seam by the sink, only a laminate seam, which has a non-porous surface below it and a non-porous bevel edge in front of it.
In addition it is one piece above the sink and dishwasher, solid, and easier to fabricate. As long as it is solidly fabricated with the seam being moisture protected, with no substrate butt-seam to boot, you are in a great position to make the customer happy while providing a solid product.

Click here for higher quality, full size image
From contributor S:
The Plywood we use is Can-ply, it is exterior grade, sanded, and awesome for laminate. I learned to use this from a guy who has a big commercial shop and does over a 1000 tops a year. He said he has had very few problems with the product. The reason I wouldn't put the seam at the sink, even if there is a safe way of doing it is because it requires more than one sheet of laminate. The cost on one top is not a big deal, but if I have a job with 20 tops, I may not get the job if I add a bunch of extra material.