Modeling Workflow to Design a New Shop Layout
CAD or cardboard cutouts? There's more than one way to mock up a shop in scale model form. April 3, 2012
Question
I am a part time woodworker. I have a 40x40 garage with a 10x12 enclosed spray area. Looking to put up a new shop, maybe a 40x64, and put my spray area and kiln in a separate building. Is there software I can use to set up my new shop? I have looked at Grizzly and Delta, but they don't show everything I have.
Forum Responses
(Business and Management Forum)
From contributor I:
I used Google SketchUp. It is free and pretty easy to use. Most of the machines you need are available in the SketchUp library. Saws, planers, dust collectors and other common machines are easy to find. I had to make my own edgebander, but it was easy to do.
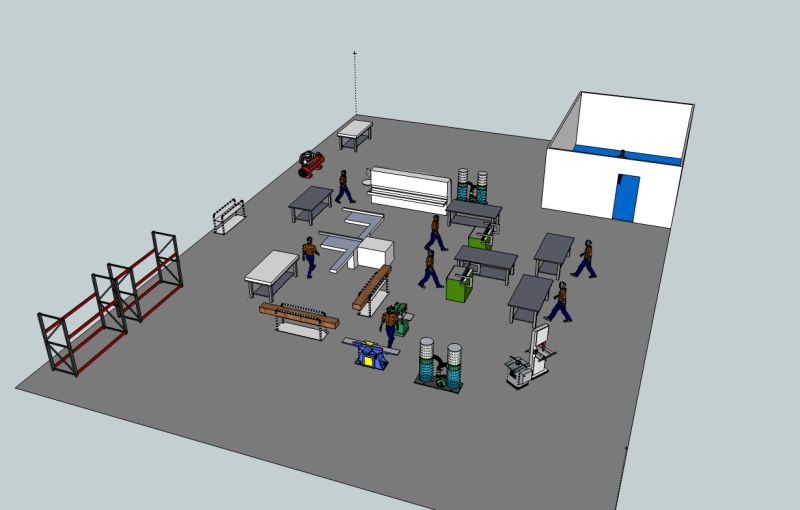
Click here for higher quality, full size image
From contributor M:
When setting up a 65,000 square foot moulding plant, we needed to view many potential machine layouts. Using AutoCAD Lite worked but was tedious. Found the best way was to take a roll of magnetic material used for business cards that stick to fridge and cut and label everything to scale. Then set up building perimeter to same scale on metal sheet including doors, poles, electrical, dust collectors, etc. Then lay out machines (including infeed/outfeed), inventory, lumber racks, carts, people, benches, aisles, posts, forklift paths, etc. in different configurations until you get one that flows well. You can then enter everything in software to double check the fit or make cardboard cutouts and actually lay everything on the floor and walk/drive the flow through the system. Once confirmed, tape every item exactly on the floor and install equipment.
From contributor V:
I have set up and built about 7 shops in the last 40 years using the method contributor M describes. I have never had a situation where we altered things after this exercise. The best thing is you can gather people around it, push scale carts and lumber around corners, and modify with real ease. Metal is great, but large format paper and 1/8" ply machines work fine also. When it is resolved, you can photograph it, then print to scale, or draw it to distribute to dust contractor, electricians, airline installers, etc.
I resisted posting my real world results since my solution was not CAD and 21st century. But it works, and works better than any other method.
From contributor I:
I think moving the CAD machines around in the computer layout is just as easy as moving the magnetic cutouts around on a grease board (good idea). I suppose it seems easy to me because I am pretty okay with CAD. The ability to use the CAD file to plan and estimate the electrical, air and dust collection was great. Having the layout in 3D is also nice.
I also taped everything off on the shop floor using 2" masking tape and we would walk through the layout looking for problems.
From contributor T:
Something no one has brought up is Value Stream Mapping. These are also sometimes referred to as spaghetti diagrams. Start with a scale drawing of your shop layout, then trace the path a product family travels throughout your shop. Start the pencil at the first process, then trace to the next work station and the next, etc. You will be amazed at how many times you loop and weave and practically tie knots with your pencil lines. Every one of those trajectories represents a non-value added step to the process. Hiking does not make you money, but a minute in transit costs just as much as a minute in fabrication.
From contributor D:
Contributor I, would you share your edgebander model?
From contributor I:
It is a Holz Her Sprint 1310 with scrape and buff. It has the glue cartridge system (but I use granular glue sometimes as well). I love the machine. I love the cartridge system. It was a good purchase. I wish I had corner rounding, but the extra cost was not in my budget when I started.
From contributor P:
I think contributor D was actually referring to the Sketchup model.
From contributor D:
Um, I was trying to figure out how to say that politely :)
From contributor I:
Ha ha! Sorry, I'm stupid. I tried to upload it before and I could not figure it out. I just uploaded it under Edgebander. I also uploaded the boring machine. These are not refined pretty models. I just made them quick and dirty so I could do the layout.