Question
We are looking into having our photos of jobs taken by a professional. Do you think it is worth it?
Forum Responses
(Cabinetmaking Forum)
From contributor M:
I looked into it once and it was very expensive. I'd say it partly depends on what type of clientele you're trying to impress. If you're dealing with very rich people, I wouldn't suggest you show them pictures in a $5.99 photo album from Walmart.
All jobs are not suitable for a photo. You must consider where the camera will be. You have to plan for the shoot. Bring stuff - wine, glasses, bread, and dress up the kitchen. Get the toaster, etc. out of there.
What is a company with excellent product that is priced right with no sales?
Out of business.
Look at the contrast in the pictures: do the lights balance well with the daylight, highlighting the work, or do they seem harsh and wash out sections?
How good is their depth of field: are both the near and far objects sharp?
How good is their composition: is it static or does it offer depth and interest?
Is the color bright or does it feel washed out?
What rights do you get in the negative? Make sure that your contract spells that out.
If you want to try it yourself, photograph your own kitchen. Get a large, solid tripod. Ask around and borrow one for a weekend if you can. Get a good 35mm camera, an SLR will do. You would like a wide view lens - 28mm is okay; 35mm will be tight.
Mount the camera on the tripod and select your point of view. Farther away and you get more; in closer and you get details. Level the camera - do not tilt the camera to select what's included, rather, raise or lower the tripod. With a wide angle lens, this should not be an issue. (Tilting the camera will get keystoning in the image.)
Close the lens aperture to its smallest opening, which will be its biggest number. Maybe f22 or f32. (This will cause some loss of sharpness, but it gains depth of field.) This will cause a very long exposure, which is why you borrowed the tripod.
Take three shots of each setup. Nominal exposure, and 1 to 1 1/2 stops over and under exposure. Shoot 12 views on your 36 exposure roll or 8 on your 24.
Take it to the drug store and wait two days. When you get it back, compare what you have to what you see in the popular press. The difference that you see (and it will be significant) is experience in selecting points of view, the ability to light the scene, and the quality and size of the camera and lens used. That difference is what you pay the 300+ for. (Go look at the photographer's cobbled up shelves, and you'll see the other side.)
If you live near a college, see if they have photo classes in their art department. If so, you might get competent students at a much lower cost. (The type of shoot you're considering is not that difficult a setup.)
The perspective control lenses allow rigid cameras (such as a 35mm SLR) to shift the lens. This lets you put the camera where you want for composition, keep it level, and still change what you capture on the film (similar to tilting the camera but without the keystoning). You get much more capability with a view camera because you also get the ability to tilt and swing the lens. This lets you control what plane your depth of field is in and to rotate that plane so that it is no longer parallel to the film (the aperture controls how much you have).
For example, you want a shot of a wall of cabinets from an angle to get more interest than a flat frontal shot. With a 35mm you have to close down the aperture (big f number - f22) to get lots of depth of field. This is okay, but you then lack control over the foreground - you might want the close-up counter a little soft to force the viewer's attention to the cabinets, and this would require a larger aperture (smaller f number - f 4.5). With a view camera you can swing the lens to align the plane of focus onto the cabinet surface while you independently control the depth of field with the aperture. Lots of control. You can do all this with an old speed graphic. Thus, even a high school student might have access to the equipment.
A shoot such as this is a lot of fun; be sure to pay attention. Get an open personality for the photographer so you can ask and talk while you watch.
However, as a former professional photographer (long before digital) I would respectfully point out the differences between your photo and a professional's.
Notice the lighting. In a professional photo, it is very consistent and completely lights every corner of the photo. This may look easy, but it takes years of experience just as it takes years of experience for we woodworkers.
Your photo has many areas that are so dark you cannot see the details at all. If you had a professional photographer take that same picture, you would see the difference.
Now please understand I take the same photos you do of my work and get similar results. It is sufficient for our business to take some simple pix with a digital camera or an SLR - we have done very well with them.
It certainly would be a step up to improve the lighting and work at a truly professional photo. I could do it with my background as a pro but I simply do not have the time required to set things up, especially in the customer's home.
You could learn some techniques that would greatly improve your results by learning how to use umbrella lighting. You might go to a photo store and get some magazines on lighting your work.
You could make a setup using a second electronic flash and an umbrella as a slave unit that would fire at the same time as your main flash. This would greatly improve your results.
Part of the pro's experience is in stage setting: getting the unwanted details out of the picture. That comes with experience and looking back over the images that you've captured. It's easiest to see in informal portraits - just look for the tree growing out of the top of Uncle Harold's head. With interiors, look for the stray glass or chair that doesn't add to the image.
I agree, $250-500 or so is very reasonable for a professional photographer, and well worth it. I may do it myself.
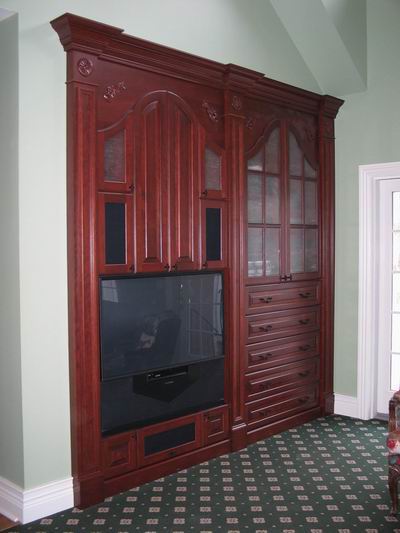
Anyway, just out of curiosity, what did you charge the client for the first one displayed?
That unit was made about four years ago, and I didn't charge enough ($10,500 at the time). If I had to do it next month, I would charge $14,000 installed. That is cherry, antique seeded striated glass, speaker fabric from Acoustex and the drawers all have cd/dvd holders in them. The cabinets are 24" deep. Stained inside and out, including drawers with 1/2" bottoms. The unit that rear projection TV is on rolls out for service. The finish is one color stain, seal, topcoat with CV. We made everything except for appliqu� and rosettes. All cherry is FAS solid wood and A-1 plain slice veneer core for casework. It is roughly 10' tall and 9' wide.
How dare that photographer try and make as much as I try to make in a day! :-)
Actually, it would be difficult to justify spending that kind of money on photographs of our work, hence I suggest going back to my original suggestion of investing in some lighting and training on how to use it effectively.
It sounds like you are motivated to do your own photography and wouldn't mind spending time getting the best pix. After spending many years earning a living as a photographer, I am kind of burnt out on wanting to do it.
If you invested in two umbrella lights with large electronic flashes, you would have a vast improvement in your pix - say another $1000 or so for the best in equipment. Make the flashes variable output with modeling lights built in.
Contributor D, could he not get the same effect with two sets of flood lights on a tripod (two per pod), set at opposing angles to avoid shadows? It would definitely cost a lot less ($125?). Just a thought...
I have used incandescent photo flood lights in the distant past, before I could afford a better setup. They are hot and uncomfortable and don't last very long - just a few hours each bulb, and getting them set up with umbrellas is a jury-rigged setup.
Really the best lighting is having no lights (electronic or incandescent) pointing at the subject - every light being indirect.
The reason I suggest going with good adjustable output electronic lights with built-in modeling lights is that is what pros use. The modeling lights are simply small wattage incandescent lights built into the flash that enable you to set up the lighting and see what kind of shadows you will get before you actually take any pix.
My suggestion was because he already has $1000 worth of equipment and for the price of one or two professional pictures he could afford to get much better equipment - if he really has an interest in photography - and end up saving many tens of thousands in the next 2-3 years and have much better pix.
Investing another $1000 seems worthwhile for the equipment. I would have to spend the whole day at the customer's house with photographer anyway, so might as well give it a try. Figure if I can't do it myself, it only cost as much as four photos from a pro. The more pictures taken, the better they have been getting. The best shots are usually when I spin flash to bounce off wall behind me.
Bouncing off an umbrella or true white panel avoids the color cast and makes the darkroom, computer work much easier.
Take some time and get to the largest photo store in your area, or buy the latest issue of a photography magazine, look at the biggest ads, and call to talk with an expert on lighting. See what specials they have on lighting. Do your homework and don't buy till you really understand what you are buying.
Contributor L is correct about "color temperature" of both lighting and any umbrellas or reflectors you use to bounce light. This is why it is important to only buy from photo dealers who understand this.
As to size of umbrellas, I would get at least two large umbrellas - at least 3-4' across. If you buy a "system" electronic flash with modeling light, they will come with different size umbrellas. Some of these units don't come cheap - I would rather buy two really good ones now and another as you succeed at your photos.
Once you have two large umbrellas and you have some more money, you can buy a third or fourth smaller umbrella light for fill lights.
I used to go on location for furniture/showroom shots with only two large umbrellas with quartz lighting and was able to get some great shots. I prefer electronic flash, though. I remember going on location in LA one time, taking operational photos of the complete innards of the latest U.S. Navy gunboat of the day - it had two huge diesels and two huge jet engines. Awesome and fun! I worked for a technical writing company that made operational manuals on the ship.
These studio lighting systems are modular - you simply plug additional lights into controller as you buy/need them. They also come with the ability to be folded up and stored in carrying cases for transport.
Once you start down this path, you will see instant improvement in your pix. With the modeling lights, you simply shut off all room lights, as they are mainly for accent lighting. You then let modeling lights show you where shadows are - areas that need more light.
You sometimes can use the small flash that comes with the camera as an accent to boost the contrast of the photo and add some sharper shadow lines. Try a few pix with and without to see the difference it makes.
It actually is fun if you have good equipment and take your time. Just talking about it kind of makes me want to try it again - not quite, though!
There has been mention of view cameras that can manipulate the plane of the photo, eliminating keystoning - when you point your camera up or down instead of level leading to distortion of the true verticals. Using a view camera is complex and would only be an option if you really get serious. These cameras are larger format - i.e. larger film sizes for more perfect grain, etc.
These refinements are really not necessary to we woodworkers - you can get very acceptable photos without them - simply always be aware of trying to keep your camera level as you are taking pix. Often a good tripod helps here, along with a cable release to trip your camera to take the pix.
Another quick point - when I say a good tripod, I don't mean expensive, but very easy to use. One with one lever operation, both horizontally and vertically on the same knob. Do not buy a nice-looking one with all kinds of chrome knobs and buttons, etc. Remember - one lever control only. I also like ones that have twist locks for extension legs - fast and easy. You shouldn't have to pay over $50.
Comment from contributor A:
You have provided some very good information, but unfortunately much of it is out of date. Good tripods cost 200-300 with another $100-300 for the camera mount. Typically a ball head.
Electronic flash systems are thousands of dollars. You can get the Paul Buff Ultralights for $400.00 each light and add them slowly, but in the end, after you add up all the accessories, you are still over the thousand dollar figure mentioned.
Then there is the professionalism. I mean, I have a 16 oz hammer, so aren't I a finish carpenter/cabinetmaker? When I go out, I bring from 5-10 lights, stands tripods, 3-5K worth of cameras or lenses, unless I am using large format, then it is more. Knowing how to set the room and light not only the room and furniture, but any other view encompassed in the shot. Properly balancing light ratios and color balance, etc.
Sure, a photographer can cobble together a few shelves the same way you can cobble together a few photographs, but don't we all have to eat? Support the local economy. Hire a photographer to do what he/she does best and continue to do what makes you the most money. Then with really good images of your work, sell more jobs, buy more photographs. Heck, if you buy enough photographes, then they can buy some custom furniture.
One of the things I can't help but notice when looking at sites showing a master woodworker's work is the mood that is set by the lighting in conjunction with the artistic statement of the piece itself. I personally love 18th century interpretations and I am instantly drawn to makers whose work looks as if it was featured in Architectural Digest or the now defunct Colonial Homes. Bottom line is, it's totally worth it.
My advice, however, is when looking for a photographer, to find one is is well practiced in large format such as 4x5, 5x7 or even 8x10 negative sizes. These camera formats are essential to a successful architectural shoot. Why? Because this format allows for the correcting of diverging and converging lines across the horizontal and vertical planes. Most of the time a wide angle lens is an absolute must for a room and if not corrected, will give the viewer an unnecessary feeling of motion in a photograph, which is undesirable for this kind of work.
You also will want to pay particular attention to their ability to light the room. Almost every photographer who is accomplished at lighting understands the value of backlighting and accent lighting. These are the elements that give your photograph dimension and a romantic flare. It makes you want to be in that photograph and to experience that room firsthand.