Pocket-Screw Drawer Assembly
Ideas for constructing drawers with pocket-screw joinery. December 10, 2007
Question
If you build your drawer boxes using pocket screws, how do you fixture a side and end together when screwing, to guarantee perfect edge-to-edge registration? I want to explore this as an alternative to dovetailed joints.
Forum Responses
(Cabinetmaking Forum)
From contributor G:
We made an air clamp table to hold the parts square and in line. Staple and hotmelt glue the bottom to keep square. Since we have to pay 25% on invoice total, we rarely outsource dovetail drawers.
From contributor A:
What did you mean when you wrote "we have to pay 25% on invoice total"?
From contributor G:
Our shop is located in Los Cabos, BCS, Mexico. We pay 18% importation, 7% trucking from our importer in San Diego on materials we buy from the states.
From contributor D:
We line the pieces up and pin nail them. Then we pocket screw them together. Then we put on a 1/4" bottom with 1/4" crown staples. We tried to get the pieces not to torque out with clamps, square blocks, etc. but have found that the pin nails are the quickest and easiest way.
From contributor J:
I cut all the parts out of 12mm Baltic birch. First the bottom, then with the slider I cut the front and back pads (or whatever you want to call them). Then I cut the sides. I pocket screw 4 holes on each side of the bottom for attaching the sides, then pocket screw 4 holes on each front and back pad to hold the sides also. For assembly I pin nail the sides to the bottom, adding some glue of course, then slide in the front and back pads and screw them on (no pin nails), flip the box over and screw the bottom to the sides and pin nail the front and back pads. Done - no nail holes to putty.
I use KV 8405's and they basically hide the pin nail holes that were shot in to hold the sides on temporarily. The drawer is dead square, as the bottom is cut on a sliding table saw. The selling point is these drawers are heavy and with 1/2" bottoms, nothing is going to come loose or rattle. It's not the fastest system, but I hate making that dado in the sides, and using 1/4" for bottoms. What slows the whole process down is installing all those screws, 14 per drawer. If you have a Castle machine, a piece of HPL on the table makes for a perfect pocket hole on 12mm material.
If I could get into higher end jobs I would order my drawers (maple, dovetailed, ready for tandems). If anyone has a faster system, I'm all ears.
From contributor B:
Try Metabox.
From contributor J:
I did. Maybe I'll give it another try with some of my new customers.
From contributor B:
Usually money talks. Metabox costs about $12.00 per drawer not including the front. It takes about two minutes to manufacture, there are no staples in the drawer, the drawer front is not stapled on and can be removed easily. I have never had a failure with Metabox, even with 36" wide drawers. If I did, they have a lifetime guarantee. Can't make a better drawer for less money, tried that.
From contributor J:
They are nice drawers (Metabox). I remember that you pocket hole the back pad and run a screw down into the bottom shelf part (maybe on really wide drawers?). I still have 2 cases of Metabox drawer slides. I'll break 'em out and give them another try.
From contributor R:
I made a little jig that is basically just two pieces of plywood with a wide enough opening to fit the screws and the bit through. I set the sides of the drawer on the bottom board of the jig and the ends up against the vertical board and my drawers come out perfect every time - no pins, nails or other fasteners. I make 3 different height drawer boxes standard, so I built a jig for each of them so that I could put a stop on to catch the edge so the drawer boards would fit tightly for an accurate butt joint. Seems to have been working well for about 5 years now.
From contributor H:
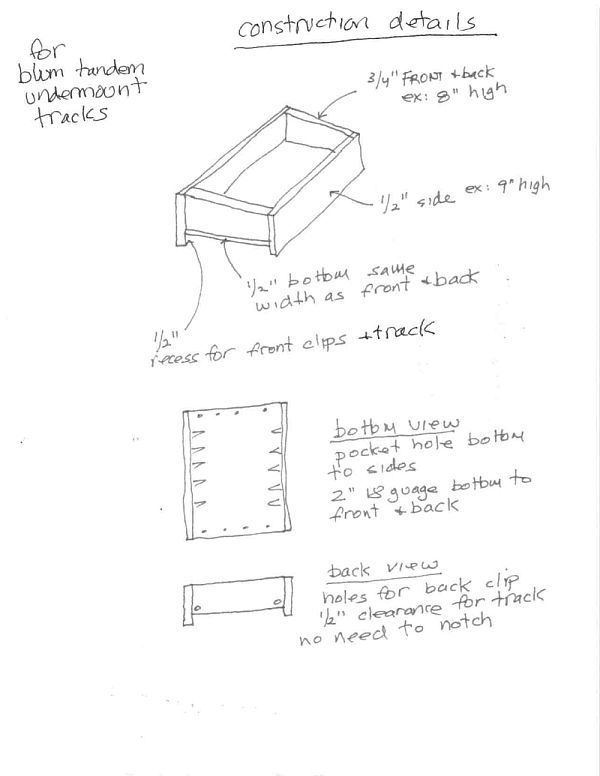
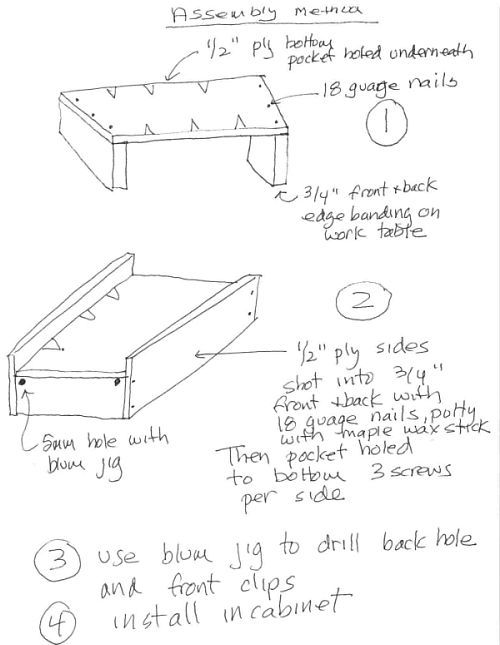
The original question was joining the front and back to the sides with pocket holes. I find an 18 gauge brad faster, and then pockethole the bottom to the sides. My bottoms are 1/2 ply or 5/8 melamine, so this is easy and strong, but if you use 1/4 bottoms, it is not possible.
Click here for higher quality, full size image
Click here for higher quality, full size image
From contributor J:
I like your system. Mine is the same but I pin nail the sides on the bottom first, then drop in the front and back parts. Why not just pocket screw the front and back parts to the sides? Then you don't have any pin nails to putty on the sides, and you can sell the drawers as strong or stronger than dovetails, showing the customer a sample drawer where the front and back are screwed to the sides. Not that your drawers won't last at least 50 years (I give Metabox about 10). Mine are set up for KV8405's, but I see how easy it would be to raise up the bottom for the undermounts. Looking good!
From contributor H:
Thanks. I don't shoot the sides to the bottom for two reasons... The nails will show, as my tracks are undermount, and there is a risk of shooting out on the 1/2 bottom. I have a pneumatic pocket hole machine, so machining is fast. The two nails in the front are filled with maple wax, not regular putty, and take 10 seconds. I do not pocket hole the front and back for speed, and somehow they are always in the same place as drawer face installation screws, especially on shaker or flat panel doors where I cannot use the
Blum drawer levelers.