Question
I am a trim carpenter. Recently, a cabinet shop in my area asked me to install cabinets for them in the houses that we are trimming. All went well, but I was not satisfied with their method of filling the nail holes in the crown. The cabinets are white and they provided white tub and tile (DAP) to fill the holes. I suggested using a filler and touching up with some of their paint, as I have done with nitrocellulose lacquer. But they say it won't work with their two-part finish, because of adhesion problems. Do any of you have a better idea? I am not happy with rubbing caulk in the holes.
Forum Responses
I think filling the holes and touching up with some finish is a good idea. Even though it is a catalyzed finish, the touchup on the nail holes will get enough of a bite that it will stick with no problem. After all, they are just nail holes that will receive no wear and tear.
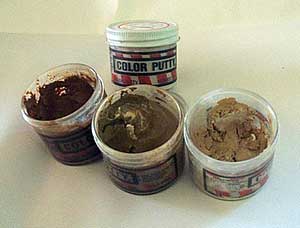
By taking a grape-sized dollop of putty from two different colors and kneading them together, you can fine-tune a color to match the variations found within a given species. I'll often have three or four different "wads" going for an oak installation ... each one matching the different shades found in the varying color from one piece of oak to the next.
I push the putty into the nail hole with my thumb or finger, wipe off as much as I can with my finger, and when I'm done filling holes, "wash" the filled areas with a paper towel soaked in denatured alcohol. If you're patient, you really can end up with an invisible fill.
Wear a pair of latex surgical gloves when doing this - otherwise you'll spend an hour trying to clean your hands when you're through (particularly with the darker shades).
I think someone told me that denatured alcohol shouldn't be used on a particular type of finish, but I can't remember which.
I've used this technique on urethane (both oil and water based) and on conversion varnish finishes, and wouldn't think of doing it any other way (paint brushes need not apply). I get the putty at a local paint store (the kind that professional painters go to), and keep about 8 different colors on the job. If I'm installing a really weird set of cabinets (I remember one job where the finish had a blue tint), I stop by the paint store and grab a handful of colors that I know will let me create the closest match.
The Color Putty is cheap - less than two bucks a pop, if I recall correctly. If you haven't used this technique, try it - I think it'll make a believer out of you.
All that said, I think the white cabinets mentioned in the original post might present a challenge if the white color putty wasn't light enough straight out of the jar. You could certainly tone it down, but couldn't make it any brighter.
The jars pictured below are about 2-1/2 inches in diameter.
Best to mix your own - just keep some alcohol around, throw a handful of flakes in the bottom of a jar and agitate. Within an hour or so it will dissolve. Within a day you'll see a cloudy layer form towards the bottom - that's wax. You can mix the layers back together or decant the clear stuff. The wax makes the shellac more susceptible to water rings, I'm told, though I haven't been bothered.
Figure a shelf life of about 3 months for any mixed shellac, even the kind in the can. The flakes last indefinitely if kept tightly sealed.
You occasionally hear about blooming - the finish getting cloudy. This is caused by moisture condensing on the film. Just be careful about the weather. It's never happened to me with shellac, though once with padding lacquer.
Comment from contributor A:
Oil putty is not appropriate on white catalyzed finish. Use a clean, white shade of wax from Konig or Mohawk and pre-cat lacquer cans of spray with the proper sheen. Keep cans warm with hair dryer in cold weather.