Question
We have been making our own countertops with a wood edge, and have one coming up that has the bar with half moon shelves on the end. I want the top to be round. I realize that I could mitre some pieces and put them together and then make my circle. Is there another way of doing it to get away from the splices? Maybe taking several thin pieces and gluing and bending? Any other suggestions? (We put the wood edge on first and then the laminate and rout.)
Forum Responses
From contributor E:
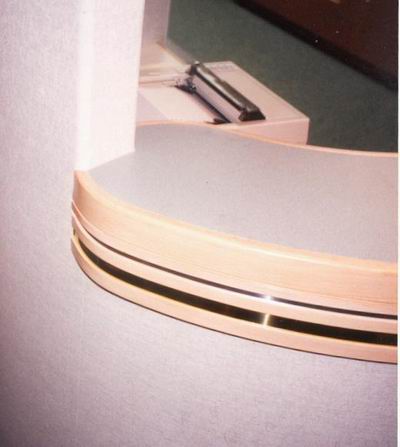
We have made the radiused counter edges by laminating thin strips of wood and pressing in a two piece form. Radiuses from 6" to 60" have been made this way. The tighter the radius, the thinner the wood strips. For 6" we have found 1/16" thick works okay.
The inside of the form must match the counter core radius, and the outside of the form matches the finished radius. Let's say you want a 12" finished radius using a 3/4 thick wood edge. The counter core radius is 11 1/4. The inside form matches this at 11 1/4. The outside form radius is 12". We mount the inside form on a larger board, glue up the pieces, stack and clamp the forms together. Let dry 24 hours.
Some tips:
Drill holes through the forms large enough to insert your clamps. Make the wood strips about 1/2" taller than your finished edge height. Don't worry about lining the edges perfectly - they can be trimmed when dry. If making more than one, laminate your forms with P-L.
The fact that you edgeband first, then laminate will make the fit between the banding and the substrate more forgiving. The way I've done this is make a male and female clamping caul with a router trammel. You can use the same setup to radius the end of the c-top substrate. I make the jig about 3" - 4" wide out of doubled up 3/4" particleboard or MDF and screw the inside side down to another piece of scrap. You may not have to use an outer caul if you have enough clamps.
The more strips (thinner) you use, the less springback you will have when you unclamp the band. It also helps to cover the clamping jig with wax paper or rub paraffin wax on everything to keep from gluing everything to your jig. I would clamp the edge to the substrate a hair high and belt sand flush, then laminate.
When making a striped counter edge, remember that only the outside layer shows. You can put your first layers on with staples and screws and then clamp your last layer on in place with cawl blocks. Also, three way clamps that pinch the top and bottom of the top and then clamp the edge work well.
After going to the work of making that custom edge a normal flush router bit is a good way to screw it up. I route from the top using a 1.125" pattern bit, which in a homemade router base is adjustable for depth and edge thickness. Check out the Art Bitterly setup.
I just had a hair brained idea. I wonder if you could use shrink wrap as the clamp for the last strip? Tack the shrink wrap down to the top and bottom and then use a heat gun to do a controlled "tightening". Kind of like a poor man's vacuum press. I know the shrink wrap they cover boats with in the winter is pretty tough, but all I've seen of it is white - not a good idea for seeing your joint.
Wilsonart has corners in oak and maple, however they are designed to be applied after the laminate is done. They match the bull nose edge material also sold by Wilsonart. I have used these and it makes a wood counter edge with radiused corners way too easy.