Question
I recently glued up a curved stringer with a very tight bend. For this glue up I used epoxy and placed it in a vacuum bag. I went a little overboard on the epoxy and some of it spread onto the breather material. After the glue up the breather material in places bonded with the epoxy and it looked like a fiberglass glue up. While I was sanding off the mess it made me wonder if reinforcing with fiberglass would be an advantage or a mistake.
Forum Responses
(Architectural Woodworking Forum)
From contributor O:
Between layers or as an overlay? The strip canoe people hold the whole thing together with a couple layers of light glass and epoxy on the inside and outside that are (in e-glass) invisible. I presume it would stiffen the assembly. I use it in 17th century German gothic harp necks (which are inherently undersized) for strength but I couldn't say how that would translate to stair stringers.
As a reinforcing material, fiberglass mat and epoxy resin sounds like a good idea, but why? Epoxy is expensive and hard to work with. (I never use the stuff unless I just can't come up with any clamping method). I cold-molded a 30 foot boat hull 20 years ago using epoxy resin. Every hand tool I touched then (and still own) still has nasty globs of glue all over them!
My question for you is "why did you use epoxy in the first place, especially since you were able to vacuum bag the laminate?" I think epoxy glue is best left to boat builders (who are accustomed to going "overboard").
I don't mind working with epoxy if I can keep it contained. The inside stringer is a three point spiral with the last radius of 7 1/2". I wanted something with a long open time and would have very little springback. By taking a large roll of stretch-wrap, the kind used for wrapping pallets of product and wrapping the entire skirt then placing the whole thing in a vacuum bag there was no mess to worry about. Even getting carried away with the amount I used I was able to remove the dried material from the bag fairly easily.
I think I'll do some homework and play around on some test pieces. If it can be hidden between ply�s and add stiffness that would be excellent.

To this end, fiberglass might be advantageous in creating a more monolithic total structure but I don't think a single reinforced super stringer is the magic bullet.
Questions: Is your stair closed underneath and could you include some solid spider-web timber framing? Do you have an adequate jib-foot base on the stringers themselves? Are both the inner and outer stringer fully cross-blocked together? Is there any (inconspicuous) point of attachment that might be made to a bearing wall? (This last point is cheating but still the best advice anyone could offer).
There will not be an attachment to the wall as it is a wall of windows. It was looked into in great detail and there is only one point where an attachment could be made an at that point it wouldn't do much. It will be closed underneath. All of the risers will be extra deep in an effort to create a torsion box. The stringer is 16" deep so it should be quite stout. I have looked rather hard to find good info on spider web timber framing and have not as yet found any real good info. If you have any it would be greatly appreciated. The designer has a national reputation and the builder is one of the upper end ones in my market therefore I'm going to whatever lengths required to insure that the end result is flawless.
I've done this once before and found that the framework did indeed add stiffness but only after all the 2x4�s were glued, screwed and bolted in place. Full structural engineering was also possible (without regard to the stringers themselves). This however, required the addition of iron angle plates at all the connections. As you've consider the use of fiberglass, rest assured that you come from a long line of helical head scratchers!
One individual in this thread made a comment about fire safety and code. Where I hail from you couldn't get inspectors more strict to justify their jobs and I have never had a single one make a comment about my stair being a fire hazard because of fiberglass. My stairs are loaded with it and let me say that once the fire got hot enough to bring one of my units down, one laminated up with plywood wouldn't be in much better shape. I did have one inspector make me prove the stair I was building was strong enough to carry a certain load. His demand was that I put a 50LB sack of concrete on every step and my deflection could not be any more than a half inch at the center of the outside stringer. I thought I did as ordered but misunderstood him. When he came to do the inspection we found that my stair deflected slightly less than 3/8 of an inch. He also told me that he was very surprised that it only was 3/8 of an inch considering he only wanted "one" 50LB sack on every step. I thought he wanted a sack on "either" side of the step meaning I doubled the amount ordered and put on "100LB's" per step. This particular stair was 5' 6" wide from nose to nose and 19 risers tall, eleven feet. If it wasn't for fiberglass I don't think my stair would have been solid enough to support the weight as well as it did.
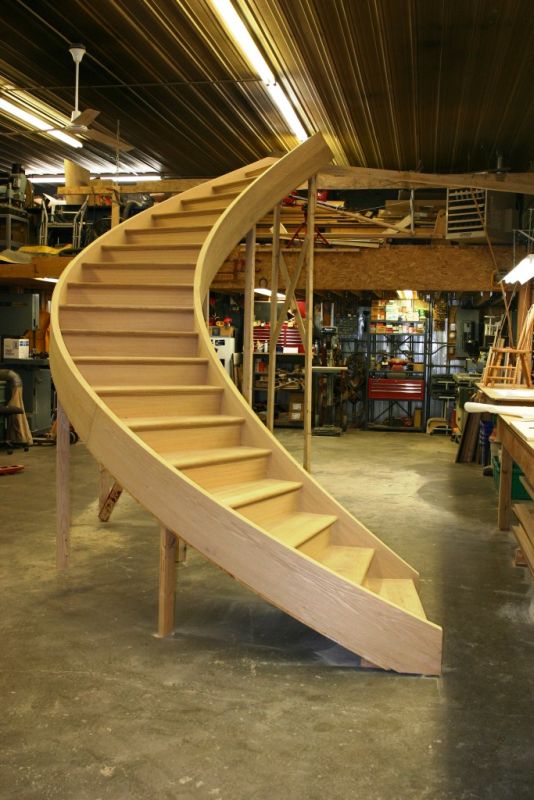
Fiberglassing isn't easy and it takes a lot of patience to gain the experience necessary to work with it competently but once you've worked out the kinks, oh boy are you in for a treat. I threw in a picture of a stair just before it left the shop. Notice how small the width of the stringer is and the thickness is only 1 3/4". I want my stairs to look elegant and having monster, laminated plywood stringers structurally strong enough to hold the weight defeats that goal. Needless to say I am an advocate of fiberglassed stringers and you that are try to utilize fiberglass for that purpose are on the right track.
I was thinking more on the lines of a 60' racing sailboat which might have a total hull thickness of only 1/8" or less. This kind of construction makes use of carbon fibers and epoxy resin (no wood). This stuff is significantly stronger than steel. Unfortunately though, a yacht like this will also burn to the waterline in a matter of minutes.
As to your problem gluing up a very tight curved stringer - I am assuming that you have heard of Franklin Extend wood glue. It has a much longer open time, low squeeze out and cleans up well. Depending on how you attach your treads (mortising) you will want a solid stringer. This is not how I do it but again to the secrets thing. Fiberglass resin should not be used as an adhesive; it will eventually fail because of its brittleness without the glass.
Wood glue does have that elasticity needed and that is why it would be my choice. Since you still use a cage, first wrap a 1/4" plywood face around the inside curve, this is your stringer's rise template also the final face of the stringer's inside curve. Cut 1/4 inch plywood the width of your stringer template but, this is important, the veneer ply's must run vertical to the rise. This way the ply's are easier to bend and you can work yourself up in short sections, overlapping the ply's without worrying that your glue is going to set up too soon. Pitch the bag and use clamps. I notice from your picture you use Bessy's and seeing that I can say you are already ahead of the game because they are the best. Once your stringer is laid up you will obviously have to true the top and the bottom to adhere a veneer to finish giving the stringer a solid look. For the stringer core use Baltic Birch plywood. They come in 5x5 sheets so your waste won't be as bad as in a 4x8. The stuff is incredibly strong. If the 1/4" is too hard to bend then use 1/16" Baltic.


I�m not talking about carved brackets or elaborate moldings they take more time. If the handrails are heavy steel or has stone treads and risers than it may be necessary to add additional support using steel under the treads. Most of our staircases are much more elaborate. They will take a lot more time. We have been fortunate in the fact that a lot of our clients try to have one of a kind and they are able to have anything that they want therefore our projects are often times really cool stuff to make. Sometimes it takes more time for the customer to make a decision than it does to do the work. As far as our design it is not rocket science it actually quite simple. Think about like building a contortion box adding one tread at a time. Like working on a computer there are many ways to accomplish the same thing.
On the inside stringer the last radius was so tight that the fibers would break before making the bend, even at 1/16th". Using a vacuum bag and epoxy worked really well. No breaking of the fibers and no springback. The problem was that I could only do about 1" per glue-up, even using a come-a-long to pull the last radius. I now had two more inches to build up. I next tried repeating the process thinking that the profiles would be close enough to glue to each other - they weren't. Next I tried the traditional method of numerous clamps to the form. I have well over 200 clamps. Four guys putting clamps and cauls everywhere they could fit one in, and I mean everywhere and I still had areas that did not bond. Ground it all back down the first glue-up. I wanted to put the whole thing into the bag but it was pretty hard to pull off so I knew we would never get it back on. I needed a different approach. What I always wanted was a giant zip-lock bag so I could put the curved stringer in the bag and zip-lock around it. As I was complaining about there not being what I wanted one of the guys said that when he worked in a boat shop they used a type of gummy tape for vacuum bags which would stick to anything. I got some from a fiberglass supply store, cut open my bag and tried it. It worked great. Every square inch firmly bonded. I picked up some of the one-use bag material they had and intend to use it to glue on the walnut veneers. The outside stringer has several pitch changes which caused a lot of its own fun.
You are on the right track, as for taping the bag around the laminates after you spread the epoxy. I just used sheet vinyl that I bought from an automotive upholstery supply store near me. I used cloth core carpet tape, to seal the bag, along with rope caulk where there were wrinkles. Although I have thought that a caulking gun with butyl might be worth experimenting with. I am sure that you have figured out that this changing pitch will call for a lot of curve in the edge of your ply�s before you start the bend. If you need any ideas for dealing with that, don't hesitate to ask.
Also, I will go ahead and suggest that when you get to bagging the outside stringer, what I have done is glue the whole thing up at once but leave one layer dry, with plastic film between. After the cure, you can remove the outside half or two thirds, then route all the way through for the tread pockets. The treads can then be inserted from the outside, providing a nice fudge factor for fitting. After everything is fitted together, gluing and clamping on the outside layer is easy, and can conceal lots of metal connector parts at the top and bottom. I was wondering which epoxy brand you are using?
The outside stringer does not follow a given curve. The treads grow and shrink in length based on the designer�s vision of the look. This caused a great deal of twist to the lower portion of the stringer. I had to let the stringer dive to follow the form and then add a second glue-up to obtain the required height, then join the two. When I was dry fitting the skin it occurred to me that I should have made the re-sawn lams much wider and then profiled for heights, to would have been much easier. I book matched the walnut ply�s for the skin and then did a 4-section match. I hope it is appreciated. The epoxy I use is West System.