Safe Control of Small Miter-Saw Off-Cuts
When you have to cut a tiny mitered return piece on the chop saw, bits tend to fly out at dangerous speed. Here, carpenters suggest a half-dozen solutions. August 6, 2008
Question
I am doing a job that requires small moldings to have little 1/2" mitered returns. Whenever I cut them with my miter saw, the little pieces go flying. This does not feel safe at all. How would you cut them?
Forum Responses
(Cabinet and Millwork Installation Forum)
From contributor A:
Cut the miter first, then tablesaw, bandsaw, handsaw, etc. - whatever works that you've got.
From contributor B:
Screw an auxiliary fence to the saws fence so the only opening in the auxiliary fence is the saw kerf. This prevents the blade from grabbing hold of the piece at the end of the cut.
From contributor C:
On the jobsite, instead of trying to cut the small mitre returns and glue the little pieces back on, you might just cope-cut the ends or file the profile. It's not that hard if you put the moulding in a bench vice. In the workshop, we shape the molding profile all around the ends of wide boards and then rip them into sticks. We end up with left and right mouldings with the returns milled on.
From contributor D:
Use the auxiliary fence- just make sure that you let the blade completely stop before you lift it up.
From contributor C:
We have to install cove mouldings with mitre returns under the tread ends of straight and circular stairs. The circular stairs require both convex and concave moulding pieces. These won't fit against any saw fence. The installer works with bundles of the mouldings which have the returns pre-milled on the ends as I have described. For our particular application, there is no better way. There are no little pieces to cut and paste back on (and fall off) and no tricky mitre saw cuts. A little millwork in the shop is always cheaper and safer.
From contributor E:
I changed the depth of cut on the miter saw (my
Dewalt has an adjustable depth stop) so that the blade could not completely cut though the molding, only most of the way. This means after I made the miter cut, the small piece was still attached to the larger one, and then I could take a sharp utility knife and finish the cut, without sending the smaller piece to a different zip code.
From the original questioner:
Thanks so much for all the great responses. I've discovered that using a plywood blade on my table saw (very fine tooth) allows my to cut the little pieces there, using a zero-clearance insert and the pieces don't zing around like bullets. Thanks again for all of the great suggestions and lighting-fast responses.
From contributor G:
Using a chopper - foot operated - Morso, Hoffman, Festo etc. - is best, or one of those bench top (Lion) trimmers. If you are limited to spinning blades, build the fence up and out an inch or so on the side of the blade where the stock supply is. When the piece is cut off, it can then drop down and out of the way, and accumulate for later pick-up.
From contributor H:
I saw a tip in a magazine once where a woodworker used his ShopVac to suck up those small pieces. He took the lid off and there they were. If you have a bunch to cut this may work. He clamped the hose real close so it wouldn't be fast for one-off.
From Gary Katz, technical advisor, Cabinet and Millwork Installation Forum:
I have to cut them all the time, for parting bead, apron, crown, etc. This is the fastest most relaxing and reliable method I've discovered. It's safe and accurate, too.
Make the zero-clearance fixture about 8 in. longer than your miter saw fence. Flush the right side up with your miter saw fence, let the left side run wild, then swing the saw to the left and make a miter cut. Flush the left side of the fixture with your miter saw fence, swing the saw to the right, and make a miter cut. Now you can use the fixture repeatedly, without any fancy setups, just by flushing one end with the miter saw fence and your blade will automatically fall in the kerf.
For making butt cuts, center the fixture, then make a 90 degree cut/kerf. Mark both end of the miter saw fence on both ends of the fixture. Make a small kerf at those marks, too, so you can quickly align the fixture for butt cuts.
The fixture takes about ten minutes to build and should last a year or more. One bit of advice: glue the back to the bottom, but don't fast the back to the bottom except on the very ends. Make your miter 'kerfs' but don't cut all the way through the back. Once you see the kerfs, you'll know exactly where to put additional fasteners and where not to put them. You can guess how I know this.
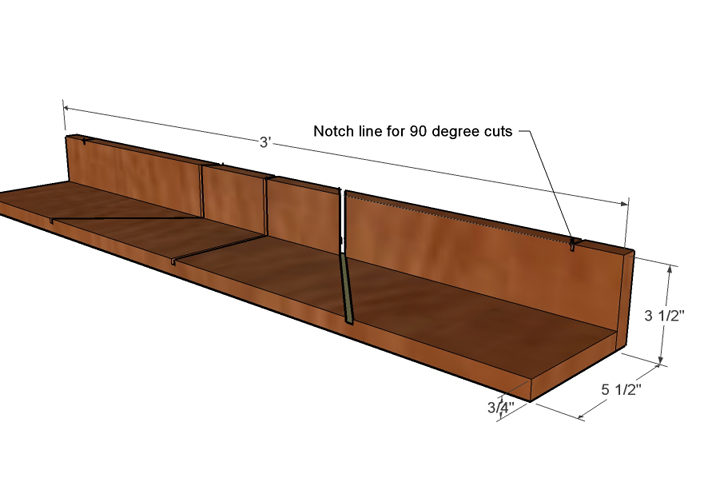
Click here for full size image
From contributor I:
Cut the miter on a long easy to hold board. Cut piece oversize about 1/16. Glue the return on (I use 2 part instant glue). Belt sand flush.
The comments below were added after this Forum discussion was archived as a Knowledge Base article (add your comment).
Comment from contributor J:
I have found that the safest and easiest way for me to cut returns without a jig is to cut the miter against the fence and then lay the piece flat on the saw to cut the 90 degree cut. Just go slowly. Also I have a quick tip for the stair installer for doing the cove returns. I square cut the cove to the right length then 45 cut it at the bottom edge of the top flat spot. I then put the cove profile on the 45 by laying it on front roller of my beltsander. I hope I made sense because it works really well.
Comment from contributor K:
I have found that the easiest and safest way for me to cut small returns is to cut the miter with the piece of moulding against the fence of the saw then cut the piece off with the moulding laying down on the base of the saw and it will fall harmlessly off to the side. I also have a tip for the stair installer who has to cut the return pieces of cove moulding. Instead of cutting and nailing on the little returns of cove I cut the cove square then I cut it on a 45. I then back-cut just below the top flat spot in the cove then I put the cove profile on it by laying the 45 cut on the front roller of my beltsander. It works perfectly.