Scribing Beaded Face Frames into Enclosed Spaces
Neat tricks for fitting a beaded face-frame cabinet into a space trapped on both sides by framed walls. February 11, 2010
Question
I have read where some face frame makers leave a stile loose and oversize in width to deal with a wall to wall fit. I have a 120" wide by 96" tall living room unit that fits wall to wall in an alcove. The face on this job is beaded in the openings of the frame. The face frame is typical mitered haunch for the bead but the joints are dowelled instead of the more current screw together method. The dowel joinery makes the loose stile scribe method out of reach. The height is not a problem because the unit is split by a lower "through" counter top and also has a crown molding.
The tough part is side to side. The job is paint grade and my current plan is to shoot for 1/4" total clearance or 1/8" per side short of the finished wall. I will make typical 3/16" thick by 3/4" wide rounded edged scribe moldings for these two edges. Since the job is paint, I hope that the gaps at the sides end up caulkable and the painter makes them disappear. If not, the scribe moldings would have to be attached. I have a few other wall to walls on this job as well. Any thoughts on fitting and scribing wall to wall dowelled beaded inset face frame cabinetry would be appreciated.
Forum Responses
(Cabinet and Millwork Installation Forum)
From contributor Y:
Check each opening where the cabs are going to fit for straightness first off. You may be able to just put a guide on your saw and cut the scribe then block plane it in. If they are really screwy then you might consider using a scrap piece of stock, scribe that to the opening and then transfer it to the stile again leaving it about 1/32 strong and finishing with a block plane. From personal, consider doing your own caulking. You will take more care in making sure the joint is clean and as close to invisible as possible. I can't tell you how many times I have come back to a job to adjust the doors or some other reason and found the proverbial index finger profile at the caulk joint squeezed up the sides and built up in the corners when a couple more seconds with a wet rag and putty knife would have made it disappear.
From contributor E:
I hwo suggestions. If the job isn't too far away, I'd size up the alcove as to squareness, make the face frames with an allowable amount of scribe and take the rough face frame to the job site, space up against the alcove and trace the inside profile and cut. You can even make the outer stiles long enough to establish the proper rail height and trim flush after making the carcass. If the job is a distance away, I'd make a 1/4 or 3/8 template just as a granite countertop guy does and match the face frame to it in the shop. Personally, I see nothing wrong with your proposed use of scribe moulding. I have spent an hour scribing a cabinet to a wall, only to have the client say "how come there's no moulding where the cabinets meet the wall?"
From the original questioner:
I do lose too much sleep over things like this. Another issue in these cases are the house walls themselves. What I mean is if I was to go there and make a template of this huge opening and then make an exact-fitting cabinet face. It would most likely mar the side walls being pushed into place. The walls are backer with 1/8" plaster and the color is in the plaster itself - no wall paint. The other problem with these installations is when the opening is narrower at the front of the opening then it is where the face meets the wall after installation.
From contributor Y:
The template idea is a good one. I have used that making window seats and other cabinets that have to go into an alcove. Don't know why I didn't think of the same on my prior post. Just a thought since the job is so far away. Why not leave one side loose? Prep it for the dowels, set the cabinet, and scribe the stile again leaving 1/32 to 1/16" clearance to slip it into the opening. Once fitted, glue the stile on with the dowels. Use pinch dogs to hold it until dry as you won't be able to clamp it.
As far as the walls being out of square or narrower at the front than inside the opening, that is typical with a sloppy corner bead and a lazy plasterer. I see it all the time. If it were new construction and was too far out I would take a board and hammer and "re-size" the opening to fit. Next time the plasterer may take more care on his corners or actually bend down to keep the plaster more consistent instead of mounding it at the bottom. Also, done right you can easily fix the effects of the "re-sizing" with some Durabond 45 after the installation. Better yet you can also skim the wall with the Durabond 45 where your gaps are to fill in the scribes. I have had to do that numerous times as well and it works out great. Your counter overhang will hide where you skimmed and just feather it out at that point. If there hasn't been any finish put on the plaster you should use that instead as there should be very little chance of color difference.
From contributor F:
I�m a millwork installer in NYC and this comes up a fair bit. What many shops do on paint grade in this situation is to split the end stile by thickness so that the stile is only 1/2 inch thick and held fairly short of the wall. Then a 1/4" scribe that is oversized is provided that when fit and installed brings the thickness of that stile flush to the neighboring rails. Depending on how you do your bead this might be a solution for you.
The other method that comes in handy for smaller ff's (with bigger ones it�s a little awkward) is the tip and scribe method. This method is used primarily by installers to fit closet shelving. If you are familiar with it you are just changing it from a horizontal to vertical procedure. Oversized stiles, boxes installed, push ff into wall, throw shims/blocks whatever to hold it dead level. Scribe to whatever dimension you want (usually off of centerline so that left and right scribes are eq.) cut, take exact width measurement from wall to wall at bottom. Hook your tape on the scribed end off the ff at the bottom, mark the ff with 'wall to wall dim', push it into place on non scribed end, level, scribe to 'wall to wall dimension' on ff, cut fit and done. This may make no sense whatsoever but it works.
From contributor Z:
Here's a simple way to get the job done.
Click here for higher quality, full size image
From contributor M:
What we usually do in wall-to-wall situations is we put extended stiles on each side of the cabinet(s) that is next to the wall, then we cut the stiles to fit on the job. I use a
Festool plunge cut saw to do the trimming. I get a nice clean cut, even on a painted job.
From contributor A:
Another option is to completely leave off one of the stiles. Scribe the cabinet with the attached stile. Measure off the other wall. Scribe the loose stile, install the cabinet, push the loose stile on and glue and pin nail the loose stile in place. When making these long bookcases/hutches that fit into alcoves, we typically break them into two or three manageable units. Almost all of our casework is beaded face frame. You can pull two beaded cabinets together at the haunched joint and no one will ever know but you. Scribe one box and take your measurements. Remove first box, scribe the second box based on box two�s final resting place. You should not need caulk nor filler mouldings for these installs. These alcove installs are what separate the men from the boys. I was very impressed with contributor Z�s scribe design when he first posted it a few years ago. I still haven't tried it though.
From the original questioner:
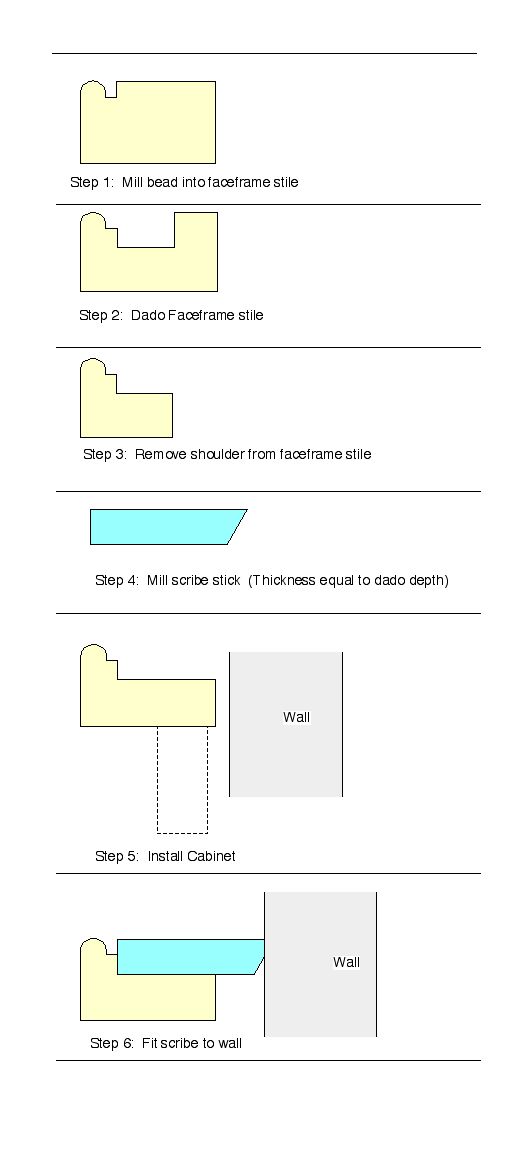
Thanks guys, much appreciated! After I read what contributor F wrote I came up with the exact idea that contributor Z illustrated so well. These are all worthy methods and I have decided to go with the rabbeted method like contributor Z drew. Nothing is easy. I will have to offset my dowels� thickness-wise on the scribe stiles so as not to expose them with the rabbit. I plan to machine the stile so that the scribe inset piece nets 1/4" thick. Hopefully there are no troubles getting it to glue down flat once the scribe work is done. I will try to remember to post back about how well it works out.
From contributor F:
Wow, this is one of the best threads I've read in awhile! I'll be printing this one out as I really like contributor Zs method. Wish I had thought of that!
From contributor K:
If you are shooting for 1/8"on each side then leave a 3/16" scribe on the finished face frame. It seems to me you are spending too much time making special material and special inlay or loose pieces of face frame etc. for a situation where you should just be measuring and squaring up a job right the first time, leave the necessary amount of scribe edge on the outside stiles and leave it to the carpenter on the job to scribe and fit the cabinet in place properly. I don't believe you are saving any time or making it any easier to complete the job when you create more separate pieces to handle, cut and fit on the job. When I build my cabinets I try to complete as much of the work and assembly in the shop as possible and send out to the job with the fewest pieces I can so the install goes as fast as possible. I always measure and square walls and level floors to find out what tolerances I need where, to make the whole project faster in the shop and in the field.
From the original questioner:
I am sure all of us here are trying to minimize work in the field by doing everything we can in the shop where woodworking conditions are optimum. I think I switched gears on you between posts up there. Originally I was thinking about leaving 1/8" max gaps at the walls that could be caulked since these cabinets will be painted in place. I changed my mind and decided to use this other method.
This method actually seems like the least of all evils to me. I will keep one outside stile normal and add 3/16" scribe width to its edge. First step, scribe that side stile to fit the wall shape. Second step, scribe the filler piece on the opposite side stile to where it snaps fairly tightly into its recess. Add glue and clamp and/or nail.
This method could probably even be used on stain grade work because the beads "quirk" is almost custom made to hide slight gaps. There are of course potential problems where the filler piece intersects any rails. The quirk ends there and those need to be perfectly flush. With my paint grade set of course sanding will not be a problem. So, I am counting only two things here - one cabinet and one loose scribe filler. Not sure I can do what you seem to be able to do on your jobs? I cannot square the openings or change the floor. Also, there is no carpenter to pass the install off to. I am the one who gets that job.
From contributor K:
I love the improvisation of contributor Z's idea, no doubt! Eventual these ideas take hold to prove to be good functional methods. Sometimes we tend to overthink a process to the point where we actually make them more involved than if we had stuck to the familiar way of doing it. I do this a lot. Then I will step back and say to myself, what were you thinking? Good luck with it!
From contributor B:
Ever think of using scribe moulding?