Q.
Does everyone scribe cabinet uppers and lowers to the wall? If yes, how much overhang do you need on the back of the cabinet? Do any of you use Z-clips to attach the cabinets? Does it help with scribing?
Forum Responses
From contributor C:
It tends to be the higher end kitchens I install that get scribed to the walls. If it's production work, a scribe mold often is acceptable (the profile I use is most closely compared to door stop).
The custom shops I installed for typically provided 1/2 an inch of extended scribe material on the back of the cabinet, and this worked in most cases. Refrigerator end panels and the like were usually sized an inch or so over, and scribed.
During the first early walk-through for a kitchen, I'm always on the lookout for walls that are way out of plumb. For high-end kitchens, these unusually out of plumb conditions were accommodated in the shop by providing extra scribe material on the cabinets or end panels.
I like to bevel my scribe cuts severely (30 degrees) and cut them "heavy". That way, when I draw the cabinet up tight to the wall, the knife-like edge of the 30-degree bevel actually cuts into the sheet rock for a "blackout" fit.
Z clips are generally used in commercial work, although residential sometimes requires this. They are used for full height paneling and other applications.
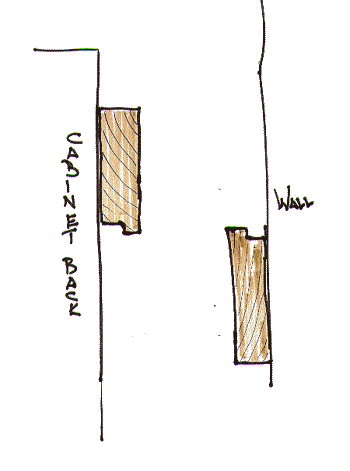
We use a version of a Z clip, which we make from 3/4" X 3 1/2" plywood. We rabbet one edge 1/4" high X 1/2" deep; we install 1 piece on the top back of uppers with the tongue down and away from the box. We then install the same piece on the wall with the tongue up and away from the wall, continuous and level. The uppers will then hang on the cleat and you can slide them around until ready to fasten. The slop between the 2 pieces allows for walls not being straight - sometimes we need to shim the wall piece when the walls are out a lot. No need for two men or a lift! (We build mostly Euro style cabs, but it works as long as you have a space at the ceiling to raise the cabs 3/8" or so.) This also adds extra screws supporting the cabinet, which aren't visible inside the cabinet.
Last week I tried a method I found in a scribing thread posted here a few months ago. I added 1/4" to the same cleat and screwed a 4" piece to each end of each cabinet. This brought me 1" plus from the wall at the top. I clamped all the cabinets together and plumbed them, then ran my router around them for a perfect fit. I had wanted to try this for a long time but just didn't have it down yet. What a pleasant surprise! The key was to carefully plumb the cabinets before scribing.

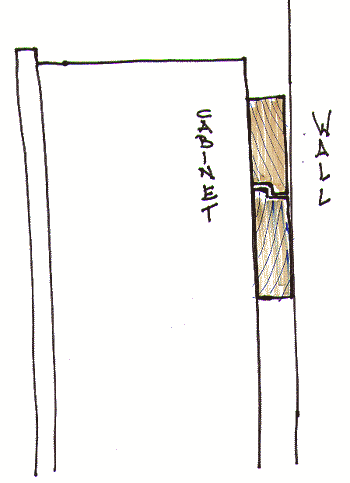
The second sketch shows the cabinet in place:

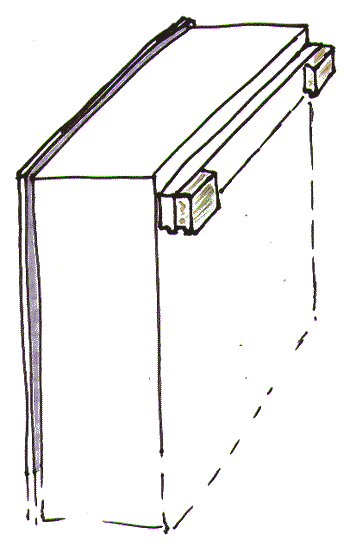
The third sketch is my best shot at illustrating what was discussed as a method to hold the cabinet off the wall for an "in-place" scribe.

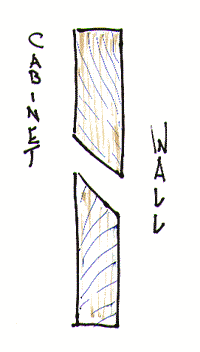
Finally, this sketch is a variation on the rail design - where the hanging rails are beveled instead of rabbeted. One of the cabinetmakers I installed for used this design a long time ago, and as I remember, the bevel helped pull the cabinet tight to the wall.

You got it all correct except that we put the rail flush with the top of the cabinet. That gives good fastening of the cleat to the cabinet all across the top, plus it is an exact line to work from when placing the cleat on the wall.
I have tried the French cleat, but walls here aren't very straight. If there is a hump or dip in the wall, the cabinet won't settle down on the cleat all the way. That is why I build 1/4" or so slop into the mating of the two cleats. The cabinet may pull away from the wall at the top, but a screw or two pulls it to the wall fine. A little room for adjustment is generally a good idea when working in the field, because conditions aren't always perfect. One shop I worked at used the French cleat; the installers usually turned the wall cleat upside down and used the flat edge up when walls were bad.
It takes time and effort both in the shop and in the field to deal with scribe in this particular location. With the exception of extremely rare situations, it's a waste of time and money! Why? Let's count - extra work in shop, poor optimization of material, something more to get hung up and damaged in freight, scribing takes time and time adds cost. Besides that, no one can see under there and once the tile goes up on the wall and the under cabinet lights go in, who will notice?
I have installed both cabinets with 1/4" scribe attached and a system with a wall cleat with Z clip configuration that required scribe to be installed after the cabinets were installed (a ridiculous system).
My answer to this is to make sure the ends are plumb before any scribing takes place. Lowers are pretty simple - just level the cabs and scribe away. Uppers are a little tougher because they have nothing to set on, be it legs or platforms or whatever, like the lowers do. Same for refrigerator ends - they are all by themselves. If you can hold these things properly in place long enough to scribe them they will fit, first time and every time. First time is what we all look for. So plumb is crucial when scribing.
The method I recently found for uppers is to get them away from the wall enough to be able to shim the ends plumb by holding the top in place and shimming the bottom out to plumb. This includes putting all cabinets in a line together and shimming at each end and connections between cabinets until everything is plumb. Once that is done, you can scribe, but not until they are plumb. If it is right to begin with, you can't go wrong. The same goes for bookcases or any tall ends.
It doesn't make much difference if you are working with face frame or Euro cabinets or whatever - a box is a box and it needs to fit properly to look good.
Also, what are bench marks and access lines?
When using the hang cleats, the scribe dimension is added to the back of the cleat, which means the finished end projects from the cabinet back by 1" or 1 1/4" to make room for the cleat. The cleats stay in place after we are done installing and add strength, plus they can run all the way into corners so you can fasten to the stud in the very corner. That can help a lot when studs are 24" oc and you can only get 1 or 2 screws in a cabinet and can't reach that corner stud from inside the cab.
Using the cleat helps a bunch when installing because you can put all cabinets in a line on the wall and slide them back and forth, adjusting the scribe spaces at end walls or corners easily. Then fasten all cabs together, flushing the fronts as you go. Then plumb the whole unit before scribing and take down only the cabinets you need to work on.
To me, a bench mark is a level line made around a room which all trades can work from to install their own items, making a complicated job work out well.
You start out with a hanging cleat that is 3/4" thick and attach to cabinet back panel and also to the wall. The cabinet was made with finished sides, which you say will project 1" to 1 1/4" past the cabinet back panel. The cabinet hanging cleats obviously will not mate up with the wall hanging cleat, so your trick is to add a 1/4" spacer and then another short piece of the same 3/4" cleat stock on the top corners of the cabinet. Then you plumb the cabinet up. So now the edge of your cabinet finished side panel is away from the wall 1/2" to 3/4". (If my math is right, I get 3/4" + 1/4" + 3/4" = 1 3/4" then minus the 1" to 1 1/4" dimension we started off with = 1/2" to 3/4".) Okay, so now what? You use your Quickscribe to route your scribe line 1" off the wall. This then trims 1/4" to 1/2" off the finished end panel and leaves the finished panel projecting 1" to 3/4" past the cabinet back panel.
Here come the questions:
1. If the finished side panel has now been trimmed to project 1" to 3/4" past the cabinet back, it may still not allow the hanging cleats to mate up, unless the panel is trimmed closer to being 3/4". This can only happen if we start off with a finished end which projects from the cabinet back by no more than 1", instead of projecting from the cabinet back by 1" or 1 1/4". Am I making sense? Please correct my logic.
2. Regardless if I have the math right or if I understand your procedure, all of this is good for scribing the outer exposed finished panel, but what do you do about the inner side panel of the same cabinet?
3. If we are starting off with a line of cabinets, say 3-4 in a row, all flush and all same height, are you scribing all of them the same way? Are they all made with the same 1" to 1 1/4" extended end panel? Or are just the end cabinet units made with the extended finished end panel?
4. If you try to install a continuous hanging rail on the wall, I presume you are notching each cabinet end panel to accommodate (except of course the outer exposed end panels). Do you do the notching in the field or does the cabinetmaker prep this for you?
5. When the cabinet is plumbed, you will end up with a big 3/4" or more gap on the bottom. Do you typically do anything about covering or filling this gap?
I think the $64 question is: Are the cabinets made so the ones with "finished" ends (the ends that show at the end of a gang of cabinets) have extended sides, or are there loose end panels shipped that can be scribed and installed after the cabinets are up?
Ultimately, I think it all depends on the way the cabinets are made.
The only ends that extend past the back are the exposed finished ends. How much they extend doesn't matter as long as it is enough; you cut off what you don't need anyhow. The bottoms extend to the same line as the finished end unless we have a light rail, in which case they are cut the same as unexposed ends and tops; then we add a 1/4" loose bottom on the job from near the light rail back to the wall. It doesn't have to be tight to the light rail because you can't see there. They run from tight to the finished end to the wall or adjacent cabinet in length.
There is at least 1/4"+ slop cut in the hang cleats to allow for uneven walls. That also allows me to shim the top of the cabs away from the wall at finished ends when preparing to scribe. Shimming at the top results in the cab back being more than 1" away from the wall at the top before plumbing and when scribing. That way the ends will pull up tight to the wall after scribing because of the slop in the hang cleats. All the cabs are scribed at the same time while clamped or screwed together, making essentially a one-piece cabinet. How much you cut off varies from place to place, depending on what the wall is doing.
When we have an upper that has a finished end only partial ht., such as next to a hood, we rout the end extension off from about 1" above the adjacent cab (hood) up to the top. That way the end doesn't get in the way and the cleat on the wall can be continuous.
I have installed cabs made by others which were made with all ends routed for the backs, with no allowance for scribe at finished ends. Those were the biggest problem to install! I could not get the finished ends tight to the wall no matter what I did. All we could do is add scribe moulding or caulk. If anybody knows what to do with those types of cabs to make them work and look better, I would be real interested in knowing what.
On the last cabinet of the run, the cabinet is hung 1" proud of the other cabinets measured at the front of the cabinets. This is done specifically for the Quickscribe, which will remove enough material for the cabinet to be pushed back exactly 1" with a perfect fit to the wall.
It's a really neat system. I mount my finished end cabinets 1/2" proud of the adjacent cabinets and use a 1/2 block and pencil to mark the scribe, then use a block plane instead of the Quickscribe. Remount it 1/2" back and it's good to go!
We use ours quite a bit; it saves us a lot of time and work when scribing and does a better job than most people do by hand. It also makes great templates of wall to wall conditions.