Setting Up for Lock-Miter Joints
Setting up machines for efficient production using lock-miter joinery. March 27, 2012
Question
At our shop we do a lot of joinery for columns and finished ends. In some applications they are a simple butt joint, in others they are a miter. In the past we have either glued and tapped our miters, or for butt joint we have biscuits. We have realized there is a better and more efficient way, lock joinery. We have purchased a few cutters and have played around and have had very successful results. So my questions is, what is the best machinery configuration? Is it one shaper with two power feeders (one for the horizontal operation, and one for the vertical operation), or two shapers and power feeders(thinking this would be more efficient not to have to change setups between operations)? How are you guys doing it?
Forum Responses
(Cabinetmaking Forum)
From contributor T:
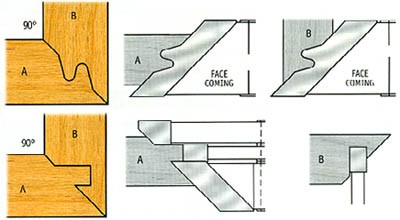
I like this one (the lower pic) from Freeborn as you don't have to have the vertical setup. For solid wood I like the lock miter for panel goods. I prefer the miter fold.
From contributor K:
I also use the lower image that Contributor T shows. I have used both of these and like this one best. As the tool shown with the double tunge design gets sharpened, it will lose tolerance and the joint starts to bind as it is clamped together before it fully seats, causing problems with squareness and an open joint.
From contributor L:
We have a dedicated shaper and inserted head, two power feeds. Expensive but works well. We also have the knives for our molder but unless it is a big job use the shaper. A lot will depend on how often you need it. Setting up either is tough so leaving a dedicated shaper saves time, costs, space, and money.
From contributor L:
I should have mentioned: Once setup with one shaper and two feeds there is minimal change over time. Swing one feed out and the other in, no adjustments required. The Freeborn system shown requires three setups: one for shaping the tongue and miter, two for the miter on the second part and three the groove on the second part. Two and three are done on a table saw? Or did I not understand it correctly? We have an old Moak shaper setup with two feeds. Even if we need only four sticks the setup time is nil. You could do it with one feed but they are a real pain to change from horizontal to vertical.
From contributor T:
No it is just two setups. You run all edges through the shaper, the opposing pieces are then dadoed on the saw. I have the knives for the vertical one as well but the setup is much easier with the freeborn knives. I don't see using this with anything but solid wood? I rarely need lock miters. I can see where your thinking makes sense for your situation but it does not make sense for mine.
From contributor L:
I agree it is best for solid wood but we have used it for slatwall too. We've been making some display units that have maple frames on sides and the top. The top has glass, two sides are open. The backs have solid panels. They are lock mitered all the way around. To make life easier the corners of the frames are all mitered.
From contributor T:
You are mitering slatwall? Or do you mean you are mitering the backer piece behind the slatwall? How much do these pieces weigh? Do you have a picture? I was thinking about the lockmiter setup and it might even make sense to put a tablesaw in line with the shaper to cut the dado using one big table.
From contributor L:
Yes - lock mitering laminated slatwall. Talk about a nasty sharp edge. Not what I'd recommend either but the customer always knows it can be done. The pieces are really floppy going into the feed, and hard to handle. All of them have been relatively narrow due to the clearances for the feeds. One of our feeds is equipped with the vertical column for the support directly to the feed motor ring. That gives considerably more clearance than the typical feed support system. A long time ago I was in a shop where they had mounted a feed from the roof structure. We have a feed mounted to a floor post with an arm that supports the feed for a horizontal reach of about 4'.
From contributor P:
I just finished using the upper setup for some large mahogany table legs, and slight differences in thickness of the stock caused some real problems. Am I right in reading the Freeborn setup, in that the stock is run face side down on the shaper? That would take care of the problem I had.
From contributor T:
You are right, not only that but you are correct.