Question
What's the best way to spray cabinet doors? I have about 50 flat panel cherry doors. I will be spraying conversion varnish. My original thought was to lay four down on a piece of 4x8 cardboard and spray one side at a time, hitting the sides of the door at the same time and then lifting the whole sheet onto our drying rack.
Forum Responses
From contributor E:
I like to do them one at a time, perched upon a shop-made lazy susan stand (setting on a pair of sawhorses). Shoot the edges and one side and move it to the drying rack, grab another and repeat the process. With a fast drying finish, the first one sprayed should be about ready for a coat on the reverse side about the time you are done spraying the last one in the run. Well, almost.
Bob Niemeyer, forum technical advisor
Here�s my panel spraying system, in a nutshell.
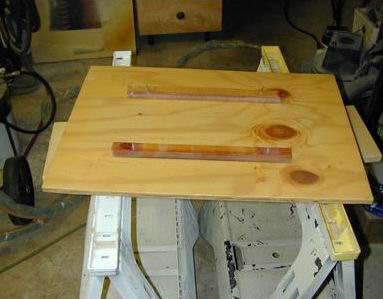
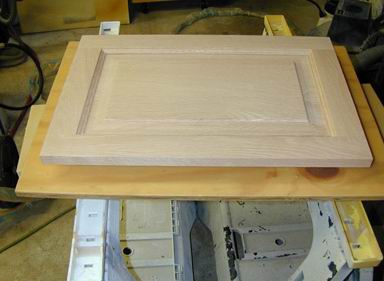
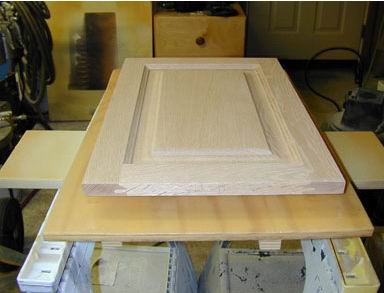
The first image is the lazy susan stand; it's built with a long base and nearly square top made of scrap plywood with the susan mechanism in between. Two narrow strips are screwed into the top. This makes up the susan stand, and (in this case) it is placed on top of a pair of sawhorses. A piece of ply scrap is placed on top of the stand, which protects the stand mechanism from spray buildup and also provides a foundation to place the loose sticks in the appropriate location. There are two #4 finish nails driven through these loose sticks so that you can use them or simply turn the sticks to use the bare edge, whichever the situation calls for. The sticks should be sized so that they will hold the door panel securely and yet be completely covered by the work piece. Covering these sticks with the panel allows you to avoid transferring paint to other panels as you continue spraying the run of panels. The remaining two pictures demonstrate a door panel ready to be sprayed. Note that the ply panel below the door could be smaller so as to further eliminate bounce back.
My sequence of spraying goes like this:
1. Set the door up and spray all four edges first and then lay down a wet coat on the back and move the door to the drying rack and continue with the next door.
2. Spray edges and the front of the door.
3. Thoroughly dry and sand.
4. Repeat #1.
5. Inspect the front of the doors for any bounce back (overspray) and sand lightly with a 150-180 sanding sponge if required, just to smooth the surface again.
6. The final spray would be the top only. Bounce back (to the underside of the panel) occurs only when I spray the edges.
This sequence provides one additional coat on the edges. As I have a slight downward angle on the gun when spraying the edges, it also provides additional coating thickness along the outside surface of the panel faces, which is helpful to eliminate sanding through at these areas and also provides some additional protection to the door or panel as these areas tend to be the most likely to be damaged in use.
With my Kremlin, I have had zero problems with bounce back, even when set up as the pictures show (with the larger panel below the door). With the gravity feed Astro gun, bounce back is minimum. With the Apollo HVLP and airless paint sprayer (for latex paints), bounce back is a real concern and so I make the platform below the panel smaller than the door to allow the overspray to have room to disperse into thin air.
I used to lay all my panels out on sawhorse-supported long boards (a pair of 2x8x12�s) and spray them, dry them, turn them, spray them, etc., all the while keeping a lookout for approaching rain showers, windswept dust, the occasional pine needle or tree leaf, or the invasion of one of the seasonally hatching insects. For those of you that have a real spray booth, these things are of no concern, but I would probably still use the susan system if I did have a booth. The overwhelming advantage to the susan system for me is that I can place the sawhorses just outside the shop and the drying rack inside the shop where the finished panels are less likely to be effected by bugs or the weather elements. The spraying area can be in the sun or shade since the panels will only be exposed to the elements for mere seconds.

I spray edges first and back, then put on a Hafele cart to dry starting at the top, so I don't disturb the finish of the next one. By the time I finish one side, I can start over on the other side, working from the cart.
I place two fairly heavy coats on one right after another while turning the lazy susan after first coat of vinyl sealer (SW) and sand with 320 thoroughly and then blow off and possibly tack, then go with cab acrylic finish. With my two heavy coats one right after another, I can often go with no second coat except possibly on front of doors if I want the best finish. The second coat is put on immediately in my method.
My method is not necessarily recommended as I am a cabinetmaker, not a refinisher.
My very first spray experience and after five minutes it was laying down like a dream. $83 vs. $400+ for other guns + the hoses/pressurepots/etc? Now that's a tough choice.
All manufacturers of latex paints produce two versions of the same quality paint. One for homeowners, which is intentionally thickened to cut down on splatter when rolling, and a pro line which is the same stuff without the thickener and is used by pros with an airless sprayer. This is the version you want to start with.
In Sherwin-Williams, Pro-Mar 200 is the pro stuff and Superpaint is the homeowner stuff. Dunn-Edwards, Frazee and everybody else do the same thing. No point buying the thicker stuff that you don't want and then having to thin it excessively. Start thin and go from there.
I�ve had good luck with SW ProClassic Acrylic Latex paint, but I�ve sprayed it with my airless sprayer that is designed for heavy bodied latex paints. The data sheet for ProClassic states a solids content of 35 percent (3 percent below ProMar 200), so I guess that this would be even better from an atomization standpoint? I happen to have some ProClassic paint and Flotrol in the shop that I could experiment with as soon as I get the 1.9 Astro this afternoon. Should I start at a specific viscosity (#2 Zahn cup) or simply try to get the heaviest paint possible to atomize and continue thinning until I reach that point?
Contributor J, I was wondering about that. I guess I could use water as a thinner and the additives that Flotrol provides to enhance the flow, if needed. Does that sound reasonable?
I am a tad disappointed that this stuff is too thick for me to spray with my existing spray equipment (I do not have an airless or an air-assisted airless). With a spray gun in hand, even when I am outside, I look like a finisher. With a brush I look like a painter. A finisher is an artisan and a painter is a tradesman. Sorry folks, but painters are not dainty enough for us finishing Sally's.
Comment from contributor M:
As a proud Union painter, I can't believe all the narrowminded comments about painters in these posts. The reason that most painters' applied finishes might not be considered high end is simply that it is not practical in this type of work. Contractors are simply not willing to pay for this type of finish, or don't think its needed. If they did, they would go to a finisher and be willing to pay a higher price.