Question
While reading the Knowledge Base articles on stock feeders, I came upon a comment by a contributor R that said he had a feeder set up to swing between two shapers. I'd sure like to see a picture of that setup, if he happens to see this.
Forum Responses
(Solid Wood Machining Forum)
From contributor R:
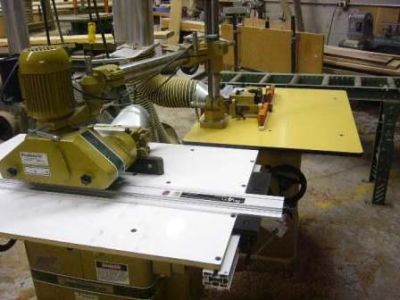
I also do this between my panel raiser and my sticking shaper. I simply set the two machines together like this, facing the front. I have the panel raiser on the right turned back 90 degrees from the other machine with the back left corner of the panel raiser touching the back right corner of the sticking shaper. The feeder is bolted to the panel raiser on the back left side of the table near where the two tops touch. This allows the feeder to be swiveled around to reach both machines. You may need to bolt both machines together somehow or to the floor so they can't be moved from close proximity to each other. This is the feeder setup on the panel raiser:

This is the setup with the feeder swiveled around to the sticker shaper:
1. What is the difference between a panel raiser and a stick shaper?
2. What is a stick shaper (spindle shaper?)
3. It appears that you have a Formica top on both of these machines. Why?
Yes, the shapers have Baltic birch ply laminated with plastic laminate as a finished top. These shapers came as a 3 shaper set that Powermatic put together about 15 years ago that I believe they called an "Accu-door System." I don't know if they still do this or not, but what they did was create a shaper design they called a Powerstack shaper that has a pneumatic cylinder mounted to the bottom of the spindle that with the flip of an air switch, will push the spindle up or down a measured amount to allow you to make a change in tooling that is already setup on the spindle and minimize down time. As part of the package, they put this enlarged auxiliary top on the machine to give more top surface to do arched top shaping on the machines using an air flotation jig. I then modified them further to accommodate the outboard fence to fit my needs. When I want to use the air float jig, I simply slide the fence off the guide's rails, remove the main fence and put down the air float jig.
Comment from contributor C:
If you have heavy cast iron shapers or other machinery which you need to move a power feeder around to, the way I do it is I welded a 4" steel pipe on top of a pallet jack so I can just wheel it over to the machines and put the pallet jack under the machine and jack it up so the weight of the machine holds the pallet jack tight to the machine. Then you can adjust the power feed to where you need it. All of my machines are raised up so the pallet jack can slide under them. It works very well.