Stain and Finish Recommendations
Other Versions
Spanish
Pros share comments and images about their favorite products. February 8, 2005
Question
What are you using for stains in your cabinet shops? I have been using concentrated dyes to make colors with, but I am not satisfied. I have read a lot about using dyes with wiping stains and toners. I am trying to develop a system so that I can offer my customers samples to choose from, and I want my finishes to look top-notch. I realize that each job differs based on the colors selected, but is anyone using just a dye, and is this okay to do? Also, I would like to attend a finishing seminar or school - can anyone recommend one?
Forum Responses
(Finishing Forum)
From contributor D:
I mainly use wiping stains and then wait 24 hours before lacquering over them (or I will get solvent pops in my finish). I have a rep from Sherwin Williams coming to my shop on Monday to show me some samples of their different products.
From contributor L:
I have been using ML Campbell's Woodsong stains. They are a wipe on, wipe off stain that dries fast. After about 45 minutes to an hour, you can topcoat without worries. The stain has an open time of about 5 minutes, so you have to work kind of fast. Topcoating the same day makes it worthwhile.
From contributor J:
Sherwin-Williams stains are the same way. Wipe them on. In 30-45 minutes, apply the vinyl sealer and lacquer or conversion varnish. Plus, SW has wiping and dye stain concentrates so you can make your own formulas. I use mostly dye stain in the first step and vinyl sealer wiping stain toners in the second step, which helps ever-naturally blotchy woods like maple and cherry. In fact, the only thing I use wiping stains on is oak and rustic-looking stain, as in distressing. Wiping stains help add to the aged look.
From contributor M:
I spray dyes. I get a much more uniform color, and they dry quick. In my opinion, pigments muddy the grain, and I have had too much problem trying to wipe stains, whether dye or pigment.
The main problem that I have with spraying dyes is that I do not get good coverage in the corners. The ML Campbell supplier says that they have a product that will keep the finish a little wetter, and improve coverage in these areas. I may give this a shot.
But as for me, dyes accentuate the grain more, and are a step above a wiped pigment stain.
From contributor D:
Can you also spray those ML Campbell stains? I like the idea of being able to spray with my HVLP gun, as I'm tired of all the rags and the mess with wiping. If ML Campbell does have a spray dye/stain, I would like to compare it with this SW product when I get it.
From contributor T:
I guess everyone has been or is in the same boat with this at some point. I had my ML Campbell rep come to the shop and do a mini workshop with me when I first looked at switching from oil-based wiping stains. I now use their Woodsong stains (alkyd based) and their dyes in combination. I always spray and I never wipe (just too labor intensive for my taste). I have developed some standard colors that seem to cover most customers' needs. I have done this by spraying a lot of samples. I don't, however, spray with my HVLP. I still use a conventional cup gun for stains. Their stains are inter-mixable with each other as well as their dyes. The dye alone will probably be too vibrant (?) for most applications and also will tend to spatter when hit with a topcoat if you don't get good atomization (although I do sometimes use them by themselves). Just try a lot of samples, mixing colors, to get some basic looks you want to offer. Also, you can use the dyes to tint your topcoat. This adds some extra dimension and helps with difficult to spray colors/woods. These are some suggestions that have worked for me. My ML Campbell rep is very helpful and willing to advise all the time. Try yours. The more I learn about finishing, the more I realize how very much I don't know.
From contributor L:
I've always wiped on my MLC stains, but you can spray them on. You will still have to wipe them down, though. They do have a series of fast drying dyes and they must be sprayed on because they dry way too quick to be a wiping dye. However, I have not as of yet used any of their dyes.
From Paul Snyder, forum technical advisor:
Dyes are one of the finishing tools you have available and they can have a very nice effect on a lot of different types of wood. It's good to know how to use them and the effect they produce. I think it's a good idea to take each of your dye colors and experiment with thinning ratios to get a range of shades from each dye. Just by thinning the dyes, you can get a wide range of colors. Then intermixing the dyes gives you an infinite range of color. In addition to the pre-mixed colors your supplier has, get all the primary/secondary colors (e.g., red, yellow, blue, green, etc.) as well as the earth tones (e.g., Burnt & Raw Umber, Burnt & Raw Sienna, Van Dyke Brown, etc.). To add to the range and look you can get from just the dyes, add a little dye (1/4 - 1 1/2 ounce per quart) to your finish to make a toner and spray that over the various shades you made. Thin the finish down a lot before adding the dye to it so that your toner coat(s) are very thin. Use 1-2 coats of clear finish over the toner. The toner doesn't have to be the same color dye that you used on the wood. You'll find a number of colors and color combinations that look great on different species. But there are times when dyes alone aren't the best option and you need to use some combination of dye, stains, glaze, and/or toner.
I make a lot of samples and keep them for future use. The bigger the sample, the better, since small samples can look deceivingly good. And don't spend a lot of time trying to make the sample look perfect. If it takes too much work to make a sample look good, it's not a finish you want to use on a larger job. I usually make samples that are 9" x 12" or larger. For example, I had a request for a "mahogany" color on some oak tables and cabinets. I made up these samples for the customer to choose from.
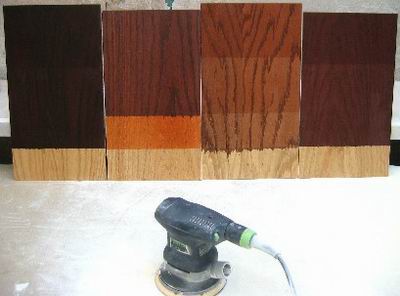
Color Samples
The sample on the far left is a dark stain with a dye toner. It's not as black as the picture makes it look, but it is pretty dark like a lot of the "mahogany" finishes in furniture stores. The second sample started with orange dye followed by a dark wiping stain (no toner in this sample). The third sample is a medium wiping stain (bottom) with a coat of toner in the middle and another coat of toner at the top. The last sample is a dark wiping stain with a toner at the top. In the sample with the orange dye, the dye pops the directionality in the wood and produces highlights that show through the stain. It's a nice look. I write the ingredients to the finish on the back of the sample.
There's a number of good brands of all finishing products. The best place to start is to find out what suppliers you have in your area and contact them. If you have more than one to choose from, that'll work to your advantage in the long run since the various brands have a selection of dyes, stains, and glazes with different colors and working properties.
For stains, I like products that can be sprayed, dry fast, and minimize blotching. Several good brands of stain include Chemcraft, Valspar, Triclad, ICA, Mohawk, ML Campbell, Behlen, etc. Spraying the stain and then wiping makes the task faster and easier. And there's very little waste if you have it set up right. Some brands of stain can't be sprayed because the pigments separate from the force during atomization and this causes a color shift.
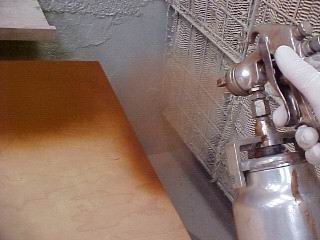
Spraying stain
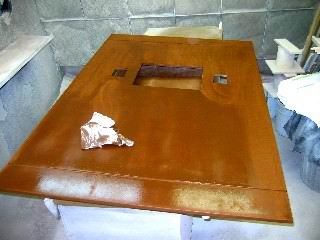
Wiping the stain
Most of these stains dry enough in an hour or less to be topcoated. If you're using a water-base finish, the dry time may be longer. Instead of using a binder like linseed oil, they use a large molecule resin that dries fast and doesn't soak into the wood as much and cause blotching. Some of the stains will let you get a pretty dark color on wood like cherry or maple with almost no blotching. Within each brand, some of the stain colors contain only pigments and some contain pigments and dyes. The ones with dyes in them will cause blotching more than the ones that are just pigments.
Like dyes, stains can be reduced to produce different shades of color. Always use the clear stain base to reduce the stains. The stain base has the right blend of binders, anti-settling agents, extenders, and solvents to maintain the working properties of the stain. Reducing with just solvent can change the way the stain works. Here's a couple samples using the same stain, but the one on the right was thinned with the stain base.

Same stain; right sample thinned with stain base
If the stain and finish (topcoats) are compatible, you can add a little of it to some thinned finish to make a toner. For example, you can add 1-2 ounces of a solvent based stain to a quart of thinned lacquer or you can add the same amount of a water-based stain to a water-based finish to make a toner. If you're using a water-base finish, only thin it as much as the manufacturer recommends. You can also use pigments in your toner as long as they're compatible with the finish and you don't use too much; a little pigment (1 ounce per gallon) goes a long way. Too much pigment starts to look like paint.
To sum it up, get with your local finish suppliers and get some samples of their products. Get the same color (e.g., their version of "walnut" or "mahogany") from each one and use it on the same species of wood to see the differences. For example, some brands of "mahogany" look better on oak than other brands. Make some samples (on veneered ply as well as solid wood) and then use one on a real job. Over time, build your sample base and the finishes you use on different jobs. Then as you're ready, or need to add other steps (like glazes), work them in by starting with samples.
For classes, the American Wood Finishing Institute has a link on this forum and they offer a wide range of classes. There's also a wood finishing program at the Dakota County Technical College in Minnesota.
From contributor D:
Contributor T, why don't you use a HVLP gun? Is it just a matter of preference or does the HVLP put out too much product with not enough atomization?
From contributor T:
There are two reasons I use the conventional cup gun for my staining. I keep sealer/topcoat in my pressure pot so that I can stain through a few racks of doors or a few cabinets. Then by the time I get through one staining cycle, I can start spraying sealer, then repeat the process when I run through those without having to clean/switch back and forth and also without having to move the products back and forth from the spray room (mine is small). The other (main) reason is because I think the pressure of the cup gun helps control the color of the stain/dye better, allowing some tinkering with the shading and avoiding "white" areas in profiles and corners.
I have to disagree with a statement above - you do not always have to wipe stains down. At least, not the way I spray. But there are different strokes for everyone, I guess. I think someone else mentioned turning the air mix up and the fluid flow down. That's how I spray my color, sometimes going over the piece a few times lightly until I get the shade I want, making sure that I don't puddle the stain/dye. I personally have found that if you mix and figure your colors to spray this way, you have less dry time and less problems with splotching/streaking, etc.
From contributor R:
By not wiping off a wiping stain, you leave the pigments sitting on the surface of the wood. This acts as a barrier, keeping the finish from getting onto the fibers and getting good adhesion. If you are shooting a dark color and using a catalyzed finish, you could be asking for trouble. Try an adhesion test.
Dyes don't require wiping because the color component is much smaller in size than the pigment used in wiping stains. Dyes color the actual fiber of the wood, so there is plenty of tooth left for the finish to grab onto.
From contributor T:
Thanks. I am aware of potential adhesion problems in improper applications. I just don't think this is one of them. I have been staining this way for several years and have watched for this. No problems thus far. Just not sure this is one of the biggest adhesion problem areas, especially the way I do it. Would be more likely if I was really wetting the wood, and most of my color combos have some amount of dye added. But, like I explained, I really am sort of building the desired color with a combination of stain, dye, tinted topcoats, etc. I'm not trying to accomplish the final color with just stain. I will continue to watch for problems, of course, and again, thanks for the reminder to watch for it.
From contributor H:
I've been a finisher for 3 years in St. Louis. Last year we switched to a new stain system called Triclad. It's a stain matching system. You get 283 samples with a formula book. You mix in parts. It's a great system. Sometimes the sample doesn't match perfect, but it will give you a close match. It's not cheap, though. My company paid over 1000 for it.
The comments below were added after this Forum discussion was archived as a Knowledge Base article (add your comment).
Comment from contributor A:
I've used HSC Industrial Coatings stains and Pre-Cats for about three years now and I'm in love with them. They also have the best polyurethane I've ever used. I�ve never had any problems and it�s always been great.