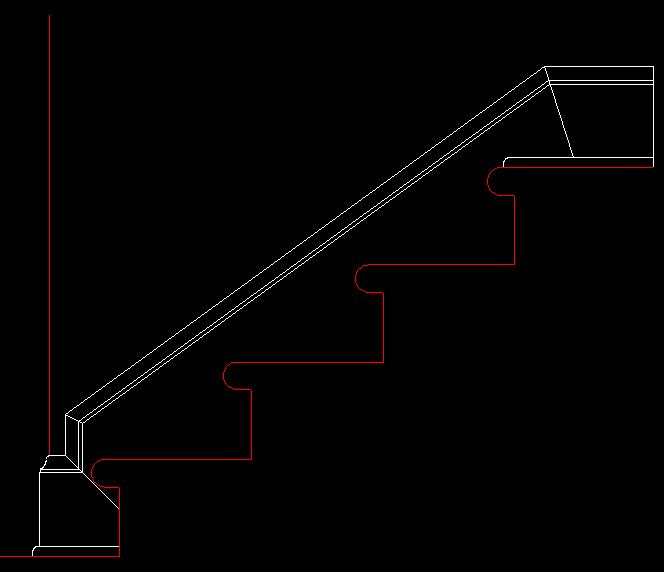
Stair to Base Transition Example
Other Versions
Spanish
French
Follow a trim carpenter from idea to execution as he figures out a tricky baseboard trim transition at the bottom of a staircase. April 21, 2011
Question
I'm planning a baseboard install on my stairwell. It has an easy transition to the floor on the top, but the bottom of the stairs is another story. Often the side wall of the stair continues on for many feet past the last step, which allows for the stair skirt to blend in perfectly with the baseboard. In my case the side wall stops only a few inches from the last step. The problem this creates is that I can make the top look good or the bottom look good, but not both at the same time. Can anyone offer some advice on other options to make the whole plan look good?

Click here for higher quality, full size image
Here are some ideas I'm sketching up. Not really fond of any of them.

Click here for higher quality, full size image
Here is another option attempting to blend out the ill effects at all locations.
Click here for higher quality, full size image
Forum Responses
(Cabinet and Millwork Installation Forum)
From contributor T:
I think you solved your own problem. The last sketch definitely looks the best, and is probably the best way to approach this problem. Just do the same thing on the other side also. Once everything is caulked and painted, you are the only person who is even going to look twice at it.
From contributor A:
Most wall to wall carpeted stairs do not have base or stringers. However, you are aware of this fact. Since you have taken it upon yourself to challenge this century old practice, take several moments to fully appreciate this undertaking.
You need to take a look at a conventional staircase. The stringer is typically a couple of inches proud of the leading edge of the tread. I would allow the base to follow this standard angle. At the top it will flow into the second floor base. At the bottom it will finish higher than the floor base. Run the stair stringer 3/4" past the wall so that it ends up flush with the floor base, cut it plumb following the wall edge. The floor base will dead end into the stringer edge. The base cap on the stair stringer should end (returned upon itself) just before the corner of the wall.
From the original questioner:
I see what you are saying about adding trim to carpeted stairs. I believe I am going to add some false treads to the steps as well. Seems like a good compromise between traditional style and practicality of carpeted stairs. Wood stairs can be so slippery.
From contributor G:
Another option is to continue your baseboard all the way down the stairs with all the joints (external and internal) at 45 degrees, notching out the front of every step to allow for baseboard to travel vertical as well as horizontal.
Your "I dunno, maybe" picture is close to what I'm trying to explain. Each section of baseboard that's on a step needs to be cut at 45 degrees on both ends to allow the next section of baseboard (also cut at 45 degrees) to continue around the stair following its profile.
From the original questioner:
Is this what you're describing? Trim is fun. So many different ways to solve the same problem!

Click here for higher quality, full size image
From contributor G:
Yes, that's exactly what I was trying to describe.
From contributor D:
Not sure what's at the top of the stairs or the style of your home, but have you thought about wainscot going up the stairs at a 34" height? Raised panels so to speak... You're trying to blend two totally different entities. Why not treat them as such?
From the original questioner:
I decided to go with post #3. Here is the final product. I built most of it in the shop with biscuits, then assembled the connector pieces on site. I'm pretty happy with it. The walls were all so out of square it was hard to get all the pieces to come together at the right angles. The rounded corners are bad... I wish they would just go away. Too hard to trim around and make it look nice.
Click here for higher quality, full size image
From contributor D:
Nice job - looks good. Only one thing I would have done different. Rounding the corner... Two ways to do that should you be tempted. Start with 5/4 x 5/4 and shape it and slip it in. For the cap molding, cut a plastic spackle knife to fit the shape, then hold it at a 30 degree angle to the wall. Cut the shape of the top molding and use plaster, just like in the old days with crown moldings. In any case, great job.
From Gary Katz, forum technical advisor:
Nice job. That's precisely what you should have done. The basecap on the stair should be the basecap detail on the base. The skirtboard on the stair should miter right into the base detail if there's room, and if there isn't, then you have to step the skirt down to meet the base. Good work.
From the original questioner:
Thanks for the kind words. I think my wood skills are better than my paint skills, if those pictures are any witness.