Today's
Sponsors:


Elias Woodwork & Manufacturing

Endeavor Hardwoods

Erecta-Rack

ETK International

EX-FACTORY

Excel Dowel and Wood Products Inc.

Extrema Machinery

FastCap

Felder USA

Festool

Finish Systems

Firth Maple Products

Flap-Wheels.com

FormWood Industries

Freeborn Tool Company

Freedom Machine Tool

Fuhr International

Fuji Spray

Gary M. Katz

Goby Walnut Products

Graco, Inc.

Great Lakes Kiln Drying Association

GreCon

Green Valley Wood Products

GUHDO

Hanson and Leja Lumber Company

Hardwood Council

Hardwood Store of N.C. Inc.

Heartwoods, LLC

Hendrick

Her-Saf

Hermance Machine Company

Hi-Knoll Cedar, John Langstroth Consulting

Historical Plus Wood

Centre for Advanced Wood Processing

Charles G.G. Schmidt Co.

Chicago Dowel Company, Inc.

Classic Designs by Matthew Burak | tablelegs.com

Clear Lake Lumber

Clear Vue Cyclones

CNC Parts Dept.

CNCROUTERSTORE.com

Colonial Saw

Construction Programs and Results

Cook's Saw Mfg.

Coulee Region Hardwoods

Country Saw & Knife, Inc.

CP Adhesives

CSH Custom Service Hardware Inc.

Cutlist Plus

Cutting Edge CNC

Delta Power Equipment Corporation

Denray Machine

Digital Wood Carver

Dispoz-A-Blade

Don Hall & Associates

Donald Dean and Sons

Eagle Bay Cabinet Doors and Drawers

Eagle Machinery and Repair Co.

Eagle Mouldings

ECabinet Systems

Edge-It Edgebanding

Electrophysics


Stickering and Drying Large Timbers

      Large-dimension timbers for framing should be handled correctly to minimize bowing and checking. June 23, 2005

Question
I am looking to cut some timbers from Pennsylvania white pine and I’m not really sure how to go about drying them. They are going to be used for a timber frame project. I am wondering if I should leave them in log form and air-dry them for a while, or if I should cut them into cants approximately the size I need them? I’m not really sure how to proceed with them. Any help would be great.

Forum Responses
(Sawing and Drying Forum)
From contributor S:
I saw for several timber frame builders, and most timbers air-dry in less than 6 months and some not at all. The one thing to keep in mind if you are going to dry is to keep the timbers off of the ground abound 18 inches on study blocking - you don't want them to bow. Also, try to keep the direct sun and rain off of them, as they will check and turn gray.


From contributor E:
I am also planning a timber frame project. I was wondering, when the timber framers who do dry, do they dry as a log or as a timber? Also, if they dry as a timber, is it oversized so as to be re-cut to size after drying?


From contributor D:
To contributor E: Usually dry as timbers, not as logs.


From contributor T:
Also, pine dried logs are more likely to attract bugs and will blue stain as they dry. The stain will not hurt things structurally, but the logs will have a concentric ring that will turn blue due to fungus.


From contributor A:
When stickering timbers, it is best if they are on 2 x 2's and have space between them. If you want a fresh face, then over-saw then by 1 inch. Then you can re-saw them before installing and have a clean cut face. If you want it to check to a face plunge, cut it now and stack the cut down. In pine it is not as important to seal the ends as it is in hardwoods, which I do about 4 inches up.


From contributor J:
To contributor A: What do mean by face plunging and stacking the cut down?


From contributor A:
You put one of the 1/16 thick circle saw blades and set the depth of cut to about 1 to 1 1/2 deep. Then, you go about 6 inches from the end of the timber and plunge the blade in and cut down the middle of the face to about 6 inches of the other end. You do this on a face that is not going to be seen. Most of the checking will go to that face.

When you sticker the timber, put the saw cut down so water does not get in and cause problems. I put 2 x 2's about every 4 feet and cover it with tin with a good over-hang. If a good size timber wants to move, it will move no matter what you put on top - short of a D8 dozer. My 2 x 2's have a dado cut and look like a fat letter H to help with staining.
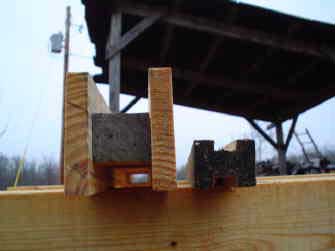


From contributor A:
I also put 4 x 6's under my piles, about ever 4 feet on top of 2 cinder blocks. I put a 1 x 1 sticker on top of that, and then put in the first row of timbers, keeping them about 1 inch apart. Rows after that get the 2 x 2 stickers that look like a fat H. After about 3 rows of timbers I put the big H's, which are 1 x 4's with a 2 x 2 nailed between them. This allows me to pick the pile up later, or stack them on the ground and put the stack up there. They keep stain down as well. I cover the piles with tin with a foot of overhang all around. Here’s a picture below.


Would you like to add information to this article?
Interested in writing or submitting an article?
Have a question about this article?


Have you reviewed the related Knowledge Base areas below?
  • KnowledgeBase: Knowledge Base

  • KnowledgeBase: Primary Processing

  • KnowledgeBase: Primary Processing: Air Drying Lumber


    Would you like to add information to this article? ... Click Here

    If you have a question regarding a Knowledge Base article, your best chance at uncovering an answer is to search the entire Knowledge Base for related articles or to post your question at the appropriate WOODWEB Forum. Before posting your message, be sure to
    review our Forum Guidelines.

    Questions entered in the Knowledge Base Article comment form will not generate responses! A list of WOODWEB Forums can be found at WOODWEB's Site Map.

    When you post your question at the Forum, be sure to include references to the Knowledge Base article that inspired your question. The more information you provide with your question, the better your chances are of receiving responses.

    Return to beginning of article.


    Refer a Friend || Read This Important Information || Site Map || Privacy Policy || Site User Agreement

    Letters, questions or comments? E-Mail us and let us know what you think. Be sure to review our Frequently Asked Questions page.

    Contact us to discuss advertising or to report problems with this site.

    To report a problem, send an e-mail to our Webmaster

    Copyright © 1996-2012 - WOODWEB ® Inc.
    All rights reserved. No part of this publication may be reproduced in any manner without permission of the Editor.
    Review WOODWEB's Copyright Policy.

    The editors, writers, and staff at WOODWEB try to promote safe practices. What is safe for one woodworker under certain conditions may not be safe for others in different circumstances. Readers should undertake the use of materials and methods discussed at WOODWEB after considerate evaluation, and at their own risk.

    WOODWEB, Inc.
    335 Bedell Road
    Montrose, PA 18801

    Contact WOODWEB


  •   Home » Knowledge Base » Knowledge Base Article