Thick Slab Table Top Construction
Thoughts and stories about large slab table tops, and some interesting examples. December 14, 2009
Question
I make log furniture. I recently had a 24" diameter dead pignut hickory cut down. The trunk is still laying in my yard. I would like to have it bandsaw cut into 2" thick slabs, and take two slabs from the center. I would then like to join the two booksawn pieces into one 6' by 4' table top. I would place it on log legs and frame. I am worried about warping, cracking, shrinkage, and a million other things that might go wrong... I would like to read any books on the topic.
Forum Responses
(Furniture Making Forum)
From contributor D:
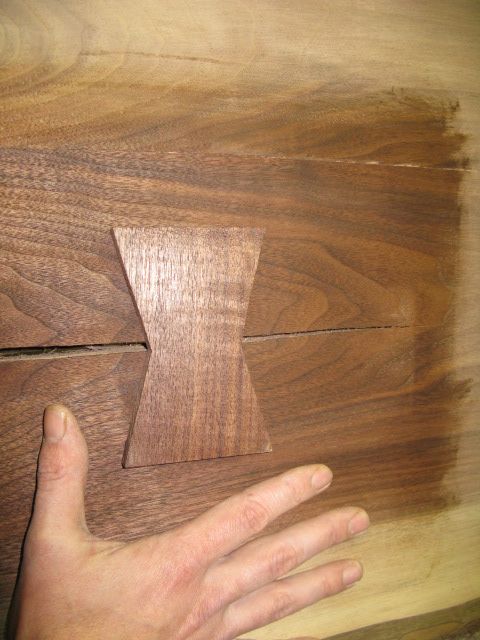
I have my own sawmill and do just the type of work that you are referring to. I can tell you from experience certain woods will check and crack more than others. I have cut slabs from maple, walnut, and ash. The maple and ash checked quite a bit. The walnut was a little more forgiving and actually checked very little. I am unsure about the hickory, but I am guessing it will act similar to the ash. We used bar clamps after cutting on our sawmill to help keep from having dramatic checking. It seemed to help. Many slab tops have what I call butterflies or dovetail inserts in the locations where the wood has checked.
Also check out this publication by the Wood Doctor:
Drying Hardwood Lumber
From contributor B:
Check out a book by Nakashima, "The Soul of a Tree." Where are you located? Where do you get your slabs?
From contributor M:
As far as checking is concerned, hickory is very prone to it. However, I am under the impression that most of the risk comes with kiln drying. I don't know of any books that will describe your process; Nakashima's book is inspirational, but far from a how-to manual on performing his type of work.
These are the bits that I have to offer... Seal the end grain now. After sawing, store the slabs on stickers in an area that is out of the weather and sun, but that gets plenty of ventilation. Make sure that all of the stickers are aligned, and that there is a good amount of weight above the first good board. At 2" thickness, start thinking about building your table in two years. Also, when selecting those two center boards, make sure that they are the two boards that are on either side of (but not including) the pith. Please ask about specific concerns, as I realize my advice is not at all thorough.
From contributor U:
Why 2 years?
From the original questioner:
Thanks for your advice. I was hoping, since the tree has been dead for some time, that much of the drying has been done by nature. I have been cutting up branch sections for firewood and I have been reading about 25% to 35% MC. The bandsaw mill owner basically said the same thing about air drying; one year per inch of thickness.
From contributor U:
That's an interesting bit of folk knowledge, but if you read here, you might learn that the "inch a year" schedule has no basis in reality, other than the weight of constant repetition.
From contributor M:
Is reality something other than the weight of constant repetition?
25% to 35% is at and beyond the fiber saturation point; i.e. the wood has not yet shrunk. This is fortunate, as it would be checked badly if you were reading something like 12% in the log. I'm in the SE, and air-dried wood will end up around 12%. It may be different in your climate. Expect also that the wood will continue to dry (and shrink) once moved indoors as a table. Naturally, all folk don't live in the same climate, but folk around here still say a year per inch. Maybe in two years when you go back out to your stack, bring that moisture meter with you.
From contributor T:
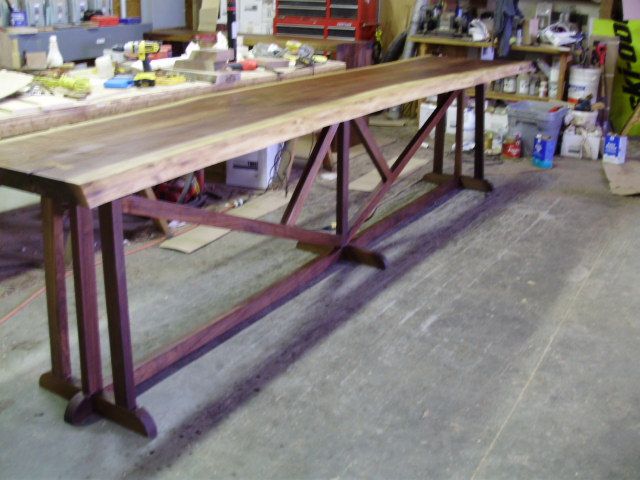
I made this walnut table out of 10/4 slabs. They had air dried with sealed ends for maybe 6 months in my shop when a customer commissioned the table. I forget MC at that time, but it was too high to proceed, probably high teens or 20. Brought them back to the kiln and got MC down to 10-12. Factors affected by too high MC include glue adhesion, handling weight, gumming sanders and planers, and finish quality. Cut mortise-and-tenon joints in high MC wood that's undergoing drying in a heated shop and you'll want to get them assembled quickly. A few days later those joints are likely to be sloppy. For a single slab supported by a sculptural base, you can get away with more. But once you plan to join two slabs together, MC becomes important.
In terms of process, big slabs rarely start out anywhere near flat, so there's a lot of flattening with whatever you got. I started with a power plane and long hand plane, carefully gauging progress with a straight edge across length and width of each plank. I even took a couple swipes on the jointer, even though the planks are wider than my 16" tables. Got as far as practical and then ran them through the planer, taking a couple very fine cuts. Then I glued the two pieces together to form the tops and legs. Finally ran the assembled slabs through a wide-belt sander and final thickness was right around 2".

Click here for higher quality, full size image
From contributor J:
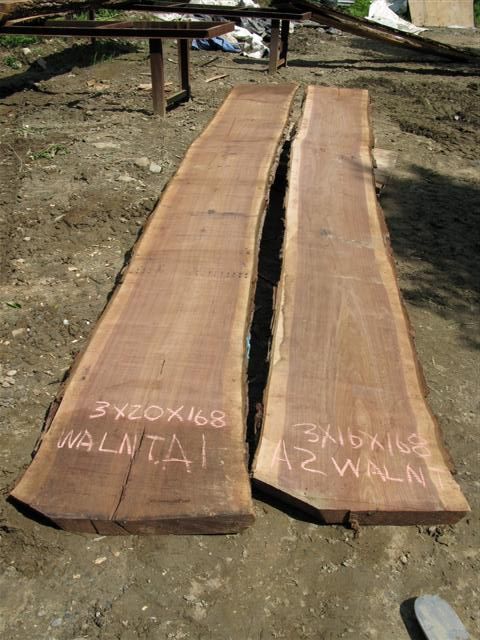
I just completed a slab top walnut table installed at the Park Hyatt Washington, DC. This is the 5th piece of furniture I have constructed in the Nakishima style designed by a respected architect in NYC and installed in this hotel.
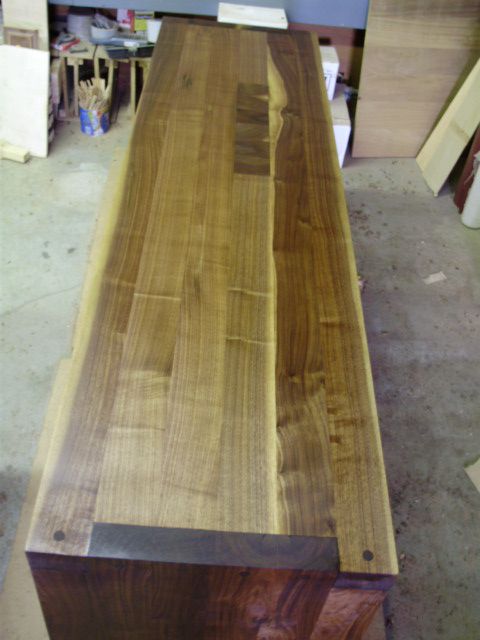
The walnut used was 12/4 x 18" x 13' stock kiln dried to 9-10%, all matched and unsteamed. The flitches used were ripped off center and re-glued to take the tension out of the wood. End cracks were butterflied on both sides of the flitch and either end. Gabon Ebony was used as a filler mixed with epoxy to fill any tiny drying cracks. The architect I have been working with is very talented and understands wood, which is quite unusual.
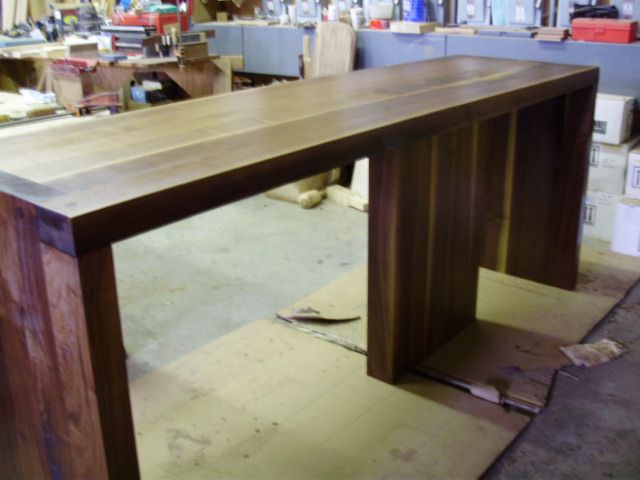
Here is a picture of the communal bar in our shop when it was in progress. Top 2 1/2" x 22" x 12' 8".
Click here for higher quality, full size image
Here is the sidebar table. In this one full flitches were ripped, mixed and matched and re-glued to make the top and leg sections. The center section goes through the top.
Click here for higher quality, full size image
Another view.
Click here for higher quality, full size image
From contributor S:
On the last piece you posted, why rip and then re-glue? The communal bar is beautiful - can you post a picture of the top?
From contributor J:
The reason for ripping and regluing the wide flitches on the communal top is that there is too much tension in slabs of this scale and the slab is subject to movement across the surface of the board and lengthwise. The original flitch was 6" x 22" x 13-6" and re-sawn to 3" and kiln dried. With the architect's approval, ripping the board and re-gluing mitigates this problem, even though I still had to put butterflies on either end, top and bottom, to stop any end checking.
I built a 22 ft. walnut shelf cantilevered from a wall that has (not seen from the top) a pith section routed out to eliminate the tensional problems. On the side bar table the architectural drawings called for picking totally different flitches and ripping them and re-gluing them randomly.
From contributor M:
Were you able to measure how much the piece changed in length? I make a lot of slab furniture and have never documented any changes in length and am curious as to what you saw with hickory.
From contributor S:
With enough tension the piece can crook or bow. That will change the length.
From the original questioner:
I am ignorant. What do you mean by flitch? I thought that referred to veneer. I am going to have to read more about tension in wood. Any suggestions?
From contributor O:
Nothing personal, contributor J, but that rip and reglue crap is way old and not in any way necessary. How did Nakashima handle all those big slabs? Some of his Peace Altars are 50-60" across and none were ever ripped and reglued. It is unfortunate that this kind of knowledge is still being spread person by person just because they heard it or read it somewhere in the past.
From contributor J:
Everyone has their own point of view. I respect yours, and Nakishima is the ultimate master. I would invite you to look at our walnut shelving throughout Blanc de Chine (without ripping and re-gluing) on 53rd Street across from Rockefeller Center (reviewed in Architectural Digest) and our current work at the Park Hyatt Washington DC, which is a flitched table, ripped and re-glued according to the architect's specifications. Also the reception desks were specified as flitches to be ripped and glued (reviewed Interior Design 2007) in the same hotel lobby. It has been my experience that if you want to get paid for high end work, it would be wiser to respect the wishes of the client and the architect who designs the work and pays the bills, than get wrapped up in dogma on how tables should be built.
Here is the Communal Table glued slabs - not equidistant, design decision.
Click here for higher quality, full size image
Communal Table with proposed butterfly (not approved).
Click here for higher quality, full size image
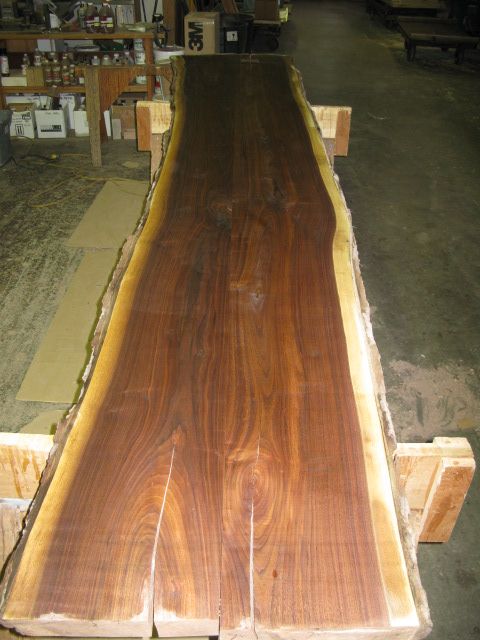
Communal walnut after removal from kiln.
Click here for higher quality, full size image
From contributor O:
I agree fully with building what the client wants. The problem is you stating on this forum that ripping and regluing is a necessary step with wide slabs, which it is not. Just because you are getting paid to build it doesn't make it correct or that you should spread that kind of misinformation to everyone else. As to whether an architect has the education/background necessary to design in wood or any other material is another story altogether.
From contributor I:
Nice tables. I'm curious how you got into both AD and ID with your work? Is it a review of the hotel and you got lucky enough to be included or are they reviewing your work specifically?
From contributor J:
The firms I have been lucky to work for have been reviewed periodically for their "cutting edge" designs, and knowledge of materials, including wood. This does not mean that all of the projects have turned out successfully. Fabricating the furniture, as difficult and labor intensive as it can be, is only one part of the design process.
From contributor B:
A flitch has several meanings. I've heard of veneer referred to as a flitch. A piece of the trunk of the tree with natural edge is called a flitch too.
The comments below were added after this Forum discussion was archived as a Knowledge Base article (add your comment).
Comment from contributor A:
The argument about the correct way to achieve these wide designs boils to down to one's tolerance for risk. When in business, we try to minimize risk as there is so much of it naturally inherent in what we do. Don't resaw and glue if you don't mind the (high) risk of watching your work warp. Resaw and re-glue if you want to maximize the chances of success in keeping your top flat and avoiding the cost and hassle of rework, not to mention the possible loss of clients.