Question
Is anyone using a cleating system on larger projects? I have seen the KV cleat system and understand it to some degree, but would like to learn more about the design. I need to know if the additional expense in the shop will compensate for itself in the field. We do mainly Plam on schools and institutional projects.
Forum Responses
From contributor C:
A cleating system will save a lot on installation labor, will not add much work for the bench crew and will add only a negligible material cost.
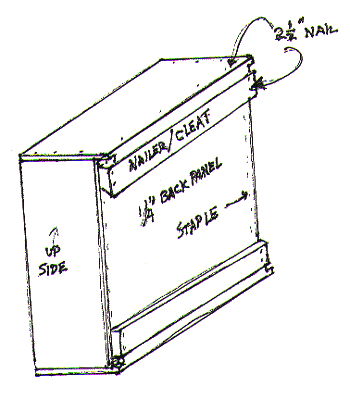
I prefer a wood cleat system. Regardless of what type of cabinets, mondo face frame or Euro boxes, the best and most consistent way to add the so-called French cleat is as follows.
Typical box construction would have the top and bottom cut 1" deeper than the sides, (12" deep top/bottom and 11" deep sides) and have a 1/4" dado starting at the same dimension as the sides, leaving 3/4" standing proud after the back is slid into the dado. The bottom nailer will just be a straight rip - it's the top one here that will make or break the cleat system. I can't stress enough how important it is to always make these the same size, as well as the opposing cleat that will be screwed to the wall, or you will be screwed, literally. I prefer a 45% cut on a 3.5" rip of 3/4" fir ply. So the top nailer of the box will become part of the French cleat. After pushing it up tight under the overhang, nail the ends to the sides of the box and nail down through the top into the edge of the nailer/cleat. Also use glue and be sure to keep the box square as you nail it off.
If you lay the opposing/wall cleat on the back of the cabinet and push it up tight as it would hang, hook your tape on the bottom of the box and measure up to the underside of the wall cleat. If you want the bottom of the cabinets to be at 60", just add the measurement we just took to it, measure up (use a level bench mark), snap your line and screw the cleat to the wall above your line. When you hang the box it will be right where you want it.
After I screw the cleat off, I go back and shim it out straight before I hang the cabinets. This system works well, as you can install the cleats and kicks before the cabinets are delivered and when it's time to set the cabinets you will be amazed at how fast and smooth the installation goes.
Caution: If the ends of the nailers stand proud, you will not be able to pull the boxes together and if the cleats vary in size, your blood pressure will rise and you'll get noticeably more gray hair.
My typical cabinet has Confirmat connectors through the sides into the top/bottom. The bottom edges of the sides are then edge-banded to match the cabinet. By the way, I'm building a kitchen right now that is using the Camar hanging system.
If this were the case, any through fastening system (screws, staples, nails, etc.) would be visible on the bottom of the upper cabinet. If, however, the sides ran long to overlap the top and bottom, which is how I build my cabinets now, the only visible difference would be that the bottom extends 3/4" deeper than the sides. Please clarify.
My cabinets are residential with pre-finished, maple veneer ply sides, top/bottom. They get finished end panels.
The Camar system consists of right and left hanging blocks that mount in the top back corners of the upper cabs. A steel hanging rail ("Z-Bar") mounts to the wall. The hanging blocks have adjustment for up/down and in/out after the cab is placed on the rail. The cab is permanently set with mounting screws through the back into studs.
Comment from contributor D:
I build and install commercial millwork. By doing both, I can solve problems that come up in installation in the building process.
I started using French cleats and now use straight cleats. Here's why:
Try hanging a corner cabinet with French cleats if the walls aren't perfect 90 degrees (which they never are) - it's near impossible.
Here is my solution. A three inch cleat at the top of the cabinet and a three inch cleat on the wall. No shimming of the cleat required. The cabinet rests on the cleat no matter how wavy the wall. The best way to do this is to set all the cabinets together as they will be installed on the wall, take a three inch by eight foot cleat, mark it to size and trim it short by a half inch or so for wiggle room. Run saw kerfs, leaving some wiggle room at the location of each cabinet cleat. Install and level the cleat on the wall as one continuous peice, then knock out the peices between the saw kerfs with a chisel. You can hang most cabinets by yourself and they easily line up every time.