Troubleshooting Inconsistent Glazing Over a White Finish
Although it's really not that bad, a finisher isn't happy with a newly finished cabinet; his questions set off a long discussion of glazed-finish quality control and touch-up. April 9, 2007
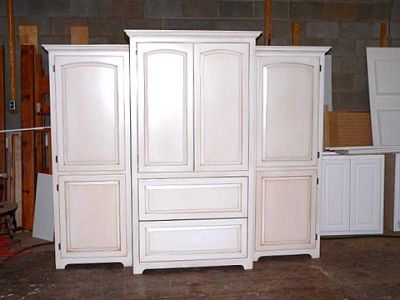
Question
This is my disaster. I did a glaze (Mohawk custom mix) over white. I've done glazed white on little stuff, but this was a challenge. The problem is it's too brown, too much left on. Especially lower right door. It wasn't that the glaze was drying too fast - I was okay with that - it was just that it sunk into the base coat too much and I couldn't get it off. I had two coats of sealer under this glaze to keep it from sucking in too much. I'm not sure what I'm going to do here, as refinish is a nightmare. I actually had the customer up for a look before I got all the doors done (I showed them the glazed back of a door to get the okay), and they really liked it. I've had numerous people look at it and say that it doesn't look as bad as I make it to be. It does look a little worse in this picture; it seems fluorescent lighting really makes the white glazing look horrible. I took these doors into a house with your standard yellow lighting and it doesn't look too bad. I guess in the end, the customer will decide. I'm really not sure what led to the uneven darkness from door to drawer to door.
Forum Responses
(Finishing Forum)
From contributor M:
I use Mohawk glaze, too. I like all their products except their glaze. You might try paint thinner to take some off. The door is noticeable but it looks like the left one is a little dark too. I think that glazing is a practice thing.
From contributor W:
What was the white base coat made of?
From the original questioner:
2 coats white primer, 1 coat white sealer, 1 coat clear sealer, glaze, lac.
From contributor A:
As long as the customer likes it, it's fine. I don't think it looks too bad. Customers that want the glaze look want that look. I just delivered some of the ugliest doors I've ever made - molding, rosettes, smoked glass. Customer designed and I made. They were thrilled. Check was collected. Butt ugly is in the eye of the beholder, just like beauty is.
Your presentation is 85% of it. When you deliver, be proud of your product. It looks good. It is what they asked for. Glazing is an artistic process that gives inherently inconsistent results. They have a quality, hand built product. If they don't like it, you can always make more doors for the ones they don't like. That said, I'd look at different glaze products for future use. I use glaze by WFS Coatings and I've been very happy.
From contributor R:
I think that as a last-ditch effort, I would try airbrushing some of the white sealer lightly from the center of the panels outward, and from the outside edges in toward the center, on the darker doors only. If you are real careful, and have a good gun and a light touch, you could tone this back out and leave the glaze showing in the low spots. Then topcoat again. Obviously, it would be good to try this on some scrap first. Glazing and paint finishes are kind of an art, and sometimes you just need to create the illusion that everything was done the same way. All that matters is the final result. You may need to airbrush the glaze lightly around the edges of the panels of all the doors and drawer fronts to make everything look the same. I could do this fairly quickly, and make these look the same, but I have a lot of experience doing things like this, and some people are better at this type of eyeballing. The artistic side of woodworking is one thing that cannot be programmed into machines, and that keeps some of us going in this business.
From contributor D:
What is in the Mohawk glaze that made it absorb into a sealed surface? Was there enough sealer and clear coat on the piece before you started glazing?
Essentially, the glaze should merely sit on the finish. You should be able to remove almost all of the glaze with a rag before it dries. After it dries you should be able to remove it with a rag wetted with the glaze solvent, paint thinners, naphtha, whatever.
One thing you should be concerned with is that the glaze and sealer coats do not have the same solvent. This will allow you to manipulate the glaze as needed.
You don't mention the particular clear coat that was used. If it is not limited by film thickness restrictions, I would sand the entire piece down and shoot with primer sealer and clear coats again, making sure the finish is adequate. Then proceed with the glazing as usual.
Also, when glazing pieces like this you want to try to be aware of the alignment of the various pieces, and match them accordingly. Meaning, line up the doors as they would be assembled on the unit.
When glazing, use the first glazed door as a reference. It's not so important that the whole door match as it is that the edges that meet match. After you have finished glazing all the pieces and you have them organized as they would appear on the piece, you can check for color and technique uniformity.
From contributor J:
I use waterborne glaze from Beckers. You spray it on, let it dry, then brush off as much as you want. If there is a problem, you can easily wipe it all off with water and try again. I topcoat over it with conversion varnish. You have to be sure to put a light scuff sanding on the base coat so you get good adhesion. We love it.
From contributor V:
White base is tricky. Clear sealer over the base coat was a good idea. That should have allowed you to remove nearly all the glaze. Normally you'd sand the sealer gently, then glaze. Sometimes, though, the glaze takes into the sanding scratches and it doesn't look good. In that case, use a thin sealer mix over the base coat and don't sand it before glaze. Seal again after the glaze and then sand gently before next clear coats.
At this point - maybe a long shot - something to try on a sample or back of door is another clear coat tinted a bit with the base coat color. Keep it as transparent as you can, but maybe this will even things up and maintain the effect of the glaze you want. Maybe only spot this in where needed, then another final clear. Do not exceed the total film thickness spec, though.
From contributor B:
If the glaze is biting into the sealer too much, then let the sealer dry longer, especially in the cooler weather. One of the nice things about using an oil based glaze like the Mohawk is that if you don't like the effect, you simply wipe the glaze off with mineral spirits and try again. Glaze your parts and then lay them out as they will appear on the cabinet. Adjust the glaze as necessary so that you have the same general look or feel from piece to piece. If you don't like the way it looks now, then top coating it is not going to make it look any better.
From contributor I:
Can't you re-paint those two which are out of whack with the others? Then re-glaze to be like the others. I wouldn't try to adjust those that are out... just re-paint.
From contributor W:
We used to have that problem with glaze biting into the lacquer topcoat on pigmented finish. We switched to pigmented conversion varnish and have not had any problems since. It reduces the number of steps as well. The CV is self-sealing so we do 2 coats of CV, glaze, then 1 coat of clear CV on top. It makes a much more durable surface as well.
From contributor E:
I think that it's the drawer fronts that look a little light. This can be caused by a couple of problems. The first is that smaller parts clean up easier because they are just that, smaller. Larger ones have the glaze on longer and sometimes get darker. The second has to do with sealer sanding and is basically the same scenario. Smaller pieces sand up better because they are smaller and easier to work on as compared to larger parts.
I would slightly shade up the lighter drawer fronts. It is much harder to lighten than darken. Also, when you try to lighten up browns, they have a tendency to look pink or red.
From contributor T:
I once did a kitchen that looked nearly identical to what you did. It looked more like fire/smoke damage than antique glazing. But the customer signed off on the sample door we made for her, and we installed the kitchen. She liked it. I didn't. I didn't care. I didn't enjoy it, mind you, but I didn't really care. I sprayed it with a good brand pre-cat and it had a good dull clear topcoat, so she got a very durable, well finished kitchen. That satisfied me. That said, may a curse be upon anyone who wants me to do a pickling stain on wood. What an insult to wood. Then again, I get paid the same either way.
From contributor H:
The problem is the sealer is not cured. No matter what you put over sealer, the sealer must be cured. Then glaze away. No glaze should bite into any clear coat.
From contributor G:
I'll have to disagree with you on a glaze never biting into a clear coat, since that is exactly what a glaze does - bite into any finish it is applied over, and the longer you leave it on, the more bite it takes.
My take on your problem is that most likely it was a combination of things, such as time from application to wiping. This can be critical, especially on white. I don't know what order you glazed the different pieces in, but my guess would be that the darker doors were last and that your blending brush was a little loaded up with glaze and so left more behind (you do use a blending brush after you wipe off, right?).
Finally, glazes are used mainly to simulate the dirt that accumulates over the years and in no environment does the dirt gather evenly on any piece, so unevenness in color is to be expected. Most first time customers that have a glaze done need a little hand holding. Glazing is an art and developing your eye and technique just comes with practice.
The cabinet looks fine. If anything, I would use just a tad more on a dry blending brush to even out the appearance and then topcoat it. Too many people try to use glaze and relate it to the homogenous color like solid paint, which it is not.
From contributor Z:
If a glaze has acetone or lacquer thinner as the main solvent, it most certainly will bite into whatever it's applied to, a sealer or a topcoat. If on the other hand the glaze has paint thinner or naphtha as its main solvent, it can be wiped off whatever it's applied to with either paint thinner or naphtha. I find oil based glazes are easier to manipulate than glazes mixed into a hotter solvent.
From contributor E:
Who uses glazes in acetone or mek bases? You would be foolish to even think of such a thing. An aliphatic base glaze with mineral spirits, naphtha, or 130 solvent are the only way to go, unless you are using a sealer with those solvents. I'm not sure of any conversion varnishes have those solvents in them, but I could be wrong.
From contributor Z:
Manufacturers, in an attempt to produce a product that falls within the strict VOC limits, add acetone, an exempt solvent to the glaze formulas. Paint thinner and naphtha are solvents that exceed the VOC limits of 550 here in California. If you haven't found a glaze that contains some acetone, you haven't searched long enough.
From contributor C:
It was probably not the glaze that was bad. You most likely did not keep the glaze mixed well in the can. You did not brush out enough glaze on the darker pieces, and you did not check your original sample as you went along glazing. Next time this happens you can try back glazing the pieces with a white glaze - this will lighten up the color to give you a better match to the other pieces. It looks like you just did not brush out the glaze enough. You left too much glaze on the doors. Then after you clear coated over the glaze, you could see how the color popped out much darker than the areas where you did brush out more glaze.
From contributor T:
Several companies offer glazes that are almost *totally* based on MEK or acetone. MLC's Amazing Glaze and ChemCraft's powder glazes come to mind. If you already know of them but haven't tried them, call your paint rep and ask for a demo. If not, they are awesome glazes - and in my opinion look better than the motor oil most of us use to glaze with. You simply spray it on over the sealer coat or paint. Spray it very lightly, with a small HVLP gun dialed down to a laser-shot to highlight the route patterns and such, and then a mist over the surface of the door. Wait 2 minutes for it to dry and use a Scotch-Brite or Mirlon pad to abrade off the excess. Shoot with dull topcoat and done. No waiting several hours for the stuff to dry. Two minutes.