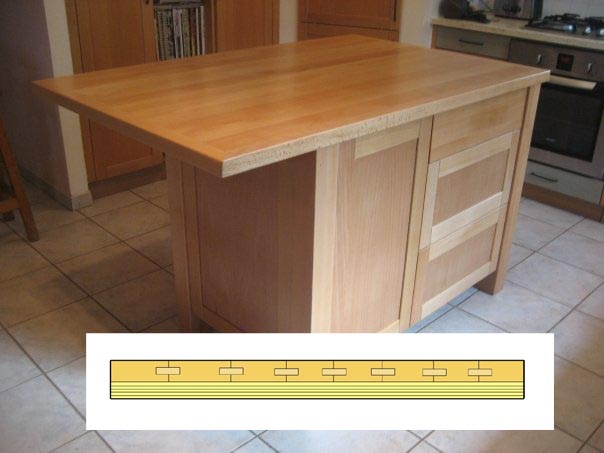
Troubleshooting a Cracked Beechwood Countertop
A good case example of the inevitable cracking that occurs when wood moisture-related movement is not allowed for — this time, in a counter of solid wood glued to plywood. February 11, 2010
Question
I recently made an island for a customer out of solid beech. He is complaining that the top is cracking. I haven't seen it yet but wanted to know what I did wrong. I glued up several boards with splines and then glued the entire top to birch plywood. Edges are solid beech.
Click here for higher quality, full size image
Forum Responses
(Cabinetmaking Forum)
From contributor J:
What you did wrong was glue a thick layer of sold wood (the beech) to a layer of engineered wood (the plywood). The beech wants to change in width as humidity fluctuates, but the plywood won't let it. Cracks are thus inevitable. When you completely remake this for your customer (yes, you have to), make it out of solid wood only and attach it to the base in such a way that it can shrink and expand a bit without doing damage.
Beech, by the way, is among the least stable of domestic hardwoods used in cabinet and furniture work. The construction you chose would be wrong for any species, but beech is especially unforgiving of stuff like this.
Also, you won't be able to have a cross-grain board across the end the way you did on the original, unless you use some sort of unglued tongue-and-groove arrangement so that the parts can move independently. Wood shrinks and expands across its width, but not significantly along its length. The only way you can build a top that looks just like the one you've got there, and have it last, is to use veneer.
From Professor Gene Wengert, forum technical advisor:
The movement that contributor J mentions is indeed correct. The cracks mean that the beech was too wet for the environment in October. If the cracks have appeared already in October, they will worsen as the RH drops when the temperature outside gets colder. I suspect that you did not check the MC of the wood and that you assembled the product in a humid atmosphere and used water-based adhesives.
Note that there are ways to use a solid wood brace underneath. For example, the brace is not glued, but rather it is screwed and the screws are in slotted holes so that the screws can move as the top moves (which also means that they are not real tight and crushing the wood).
But again, having the MC of the lumber very close to the in-use MC (at the time of manufacturing, shipping, etc.) is very important even with slotted screws, etc.
From contributor A:
I outsource wood tops. There are woodworkers much better versed at this than I am. I focus on what I do best and bring it all together for a great result and some income. It will do you good to replace the top. The lesson will be cheap in the long run.
From contributor G:
How long has the top been installed?
From contributor C:
Would it have helped if the beech was thinner than the ply, like let's say 1/4-5/16 of an inch like with engineered flooring? Or is the movement because of the different pieces being edge glued then surfaced laminated? I did some pre-edge glued 3/4 thick maple flooring sections then liquid-nailed and nailed to the rough floor. Would it have helped to install a rough top first, then install solid top like a solid surface top rather than laminating, so there is some room for movement?
From Professor Gene Wengert, forum technical advisor:
Thinner may indeed help, but not correct the problem. Allowing for movement would be the best option of those you presented.
From the original questioner:
Thanks for all the help. I don't know what drove me to do the top like that. I really should have known better. I thought that there may be a problem but brushed it off. He has had the top in his kitchen for five months or so. I did warn the customer about the instability of beech wood, but I was clearly at fault and will change the top.
How should I make the new top? I really want to do it myself, although I am a little apprehensive. Since I won't put on a solid edge as suggested, I won't use splines as they will now be visible. What is the best way to join in this situation? As I need the final thickness to be 4cm, I need to glue up some thick boards (as there is no edge).
From contributor L:
Just do a stopped spline. It's easy if you make the plough with a router.
From contributor Z:
Modern glues are plenty strong. The only real reason to use the splines is to help align the boards. If you have access to someone with a wide belt sander, I'd skip the splines. Just glue up beech boards to the thickness of the old beech plus plywood. Once done, make sure to fasten the top to the cabinet so that the top can move. It can't be solidly attached everywhere.
From contributor F:
If that look were desired, a furniture maker would veneer it using standard thickness of veneer and an MDF or quality plywood substrate. Quality veneer work is not done with contact cement. Be sure and use a suitable adhesive such as aliphatic resin or PVA, etc. The solid wood edging would not be a problem if the top were veneered. I have used up to 1/16" thick shop made veneer with great results. Another tip is those splines on the long grain are unnecessary. Long grain glue joints are stronger than the boards themselves.
From contributor C:
I do thick veneer work routinely as well. I would not use that technique on a kitchen countertop though. The work appears to be very well executed. He just overlooked a certain engineering aspect and unfortunately got bit. It can happen from time to time. The photo looks more like furniture than most kitchen cabinetry I see.
From contributor R:
You can use the end boards - they just need to be allowed to float. I would dovetail them to the ends. Actually I would dovetail the whole top together. (Glue is for amateurs.) What you are building is not uncommon, it's just a breadboard table top. And as has been stated it needs room to expand and contract so your methods of joinery and attachment are just as important as the moisture content of the materials.
From contributor F:
Breadboard ends aren't a solution in this instance because the edging on the end grain sections miter into edging on the long grain sides. When the solid top expands across the grain the miters will gap wide open. Could work okay if butt joints are used with the end grain edging running through.
From contributor R:
Indeed, I didn't look close enough.
From contributor N:
Why not veneer the top out of shop-made veneer (1/16") to MDF substrate, then wrap with solid wood, mitered corners? I guess solid wood border might expand and crack finish around perimeter as a 2"x2" border would expand (maybe 1/16"). To combat that, glue only the top inch of border and leave bottom of border to expand/contract. I'd veneer both top and bottom of substrate to balance surface tension.