Using a Stair-Stringer Router Template
Basic directions for using a manufactured router template to route out stringers for fully-housed stair treads. October 19, 2006
Question
I've got a Porter Cable #2 cast iron stair jig I bought a while ago and was wondering if anyone had a copy of the manual that came with it that I could buy. Old manuals are tough to get!
Forum Responses
(Architectural Woodworking Forum)
From contributor A:
I don't have the old Porter Cable manual, but this will show you how I suggest setting up the template.
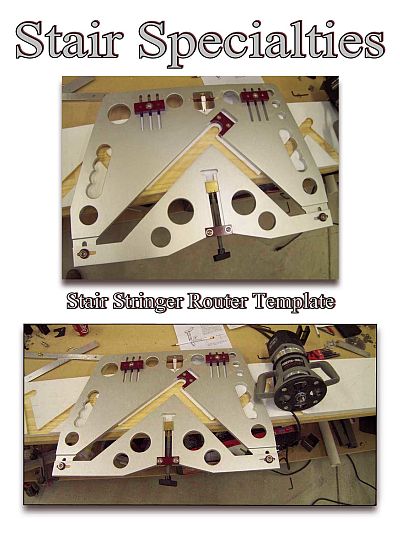
Click here for full size image
From contributor B:
The old one looks identical in function to contributor A�s. The only hard part is setting the bottom section so that the shims for both the risers and treads are the same angle. Then both tread and riser shims can all be cut at the same angle. What I did was draw the first tread/riser with a framing square and set up the jig to it - using the two adjustable stops at the top. Then I ran a square line down to the "V" in the little pointer from the top of the stringer.
Next, I calculated the hypotenuse of the rise and run using the Pythagorean theorem, entered that into memory on a calculator, and went up the stringer adding one hypotenuse each time, and squaring down from it with a framing square. All you have to do is slide up the jig till the square line hits the center of the "V" in the pointer and then clamp and rout. The beauty of this is that you get no cumulative error, and the high end $10 calculators run the numbers to 11 places. That's really all there is to it.
From the original questioner:
Thanks guys! Responses like yours are always welcome - it's good to know that people are still truly interested in what we do. I've been using my jig for quite some time, and first used one 20+ years ago. I got mine when a fellow that I subbed from was semi-retiring and selling his extra equipment- he had three. Setting the drive wedge angle is the tough part. To use the jig, I layout the rise/run for two treads on the nosing line and set a pair of dividers to the line length, then the mark out the rest of the stringer, squaring the intersection to the edge to align the indicator for the cut. I wanted the manual because they often had other info about what the tools could do, and I like to have them.