Wainscot Design Decision: Continuous or Interrupted Bottom Rail?
Finish carpenters vote on which of two wainscot methods is more correcter. December 1, 2010
Question
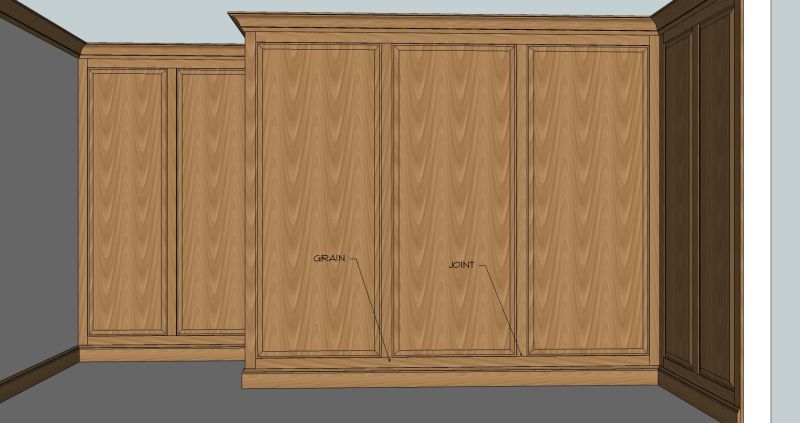
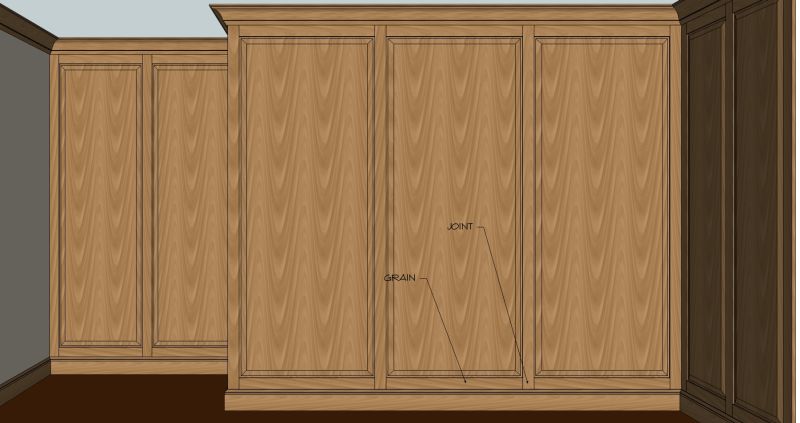
We've been having a discussion in our office about which way is the right way to approach full height wall paneling. Take a look at the two pictures below and give us your opinion, and perhaps why. We seem to have two different opinions. Assume it is stain grade work.
Click here for higher quality, full size image
Click here for higher quality, full size image
Forum Responses
(Architectural Woodworking Forum)
From contributor F:
It depends on site access. Number two allows for shipping in modules in units that will fit through doorways and elevators so if it needs to deliver in small pieces then number two, otherwise number one or if required you could field assemble number one but the field touch up and finish issues make it more costly.\
From the original questioner:
I think your answer makes a lot of sense. The images were a quick pictorial view to show what I was talking about. I threw in a wild grain to accentuate the grain, and I gave up when it came to adding a panel molding.
From contributor O:
Option one gives the assembly a better chance of flat since the bottom/top rails are continuous instead of broken. Subsequent moldings will lay flatter on this assembly, and the assemblies will be easier to move and more rigid.
From contributor J:
I would go with picture number one with the continuous rails. This is the traditional way to approach wainscot. That is just my taste though and it might not look right if the rest of the decor is ultra modern. The panels don't look oversized in the pictures and would be a lot easier to install as single units.
From contributor G:
The correct way is the number one view. Whether you can pull it off or not depends on the size of the final panel and if you can get it to where it needs to go. You can make it the correct way with pocket screws finish it and the take it apart and re-assemble it on site if it doesn't fit. It is a lot simpler as you only have two sizes of parts. All rails are the same and all stiles are the same.
From contributor M:
If aesthetics makes a difference, I like option two. Option one does make the most sense for getting the job built and installed, but this layout seems to make the panels look too wide, or at least more so than the other choice. Option two seems to bring out more of the height, at least to my eye when first taking a quick look.
From contributor A:
I concur with Contributor G. Number two is usually done that way in the field by a trim carpenter who doesn't know any better and is nailing pieces to the wall. It looks awful when it�s done on beaded casework.
From contributor C:
Option one for the simple reasons:
Less joints, flatter, easier to assemble and make, grain flow.
From contributor L:
I like the looks of number two, especially on a full height wall. You folks have a point about putting moldings on a continuous base, but to me that doesn't outweigh the discontinuity of different length vertical sticking. If you want number two to look even better, jigger the design to emphasize the vertical a bit more. The more vertical you see, the worse the horizontal line of the base will seem and the better it is to have strong, grounded uprights.
From contributor M:
Method number one is the traditional way of building stile and rail panels. However, if tradition is not a requirement, you can certainly build it either way. As far as being lazy, method one does require more work.
From contributor P:
So I'm seeing a dominant view that option one is the traditional method, and I strongly concur. And yet, why is it that option two has become the dominant method in cabinetry construction - just a bunch of boxes in a row. And worse, with cabinetry the stiles end up split into two. When I talk with clients about how we make cabinets, that is one of the first differences I point out, and I get a very consistent response that option one is more pleasing.
From the original questioner:
Thanks for all the insightful and interesting responses. Remember we were talking about floor to ceiling panels with rails and stiles.
Just to summarize the responses:
With 30 years in the trade, mostly as a field trim carpenter and installer I prefer option two in this instance because we could never pre-assemble and get it in the house in that manner. Option two allows you to start on the inside corners and work your way to the door jamb or outside wall corner. If this was waist high wainscoting, then I would say option one because it could be pre-assembled and brought in as long units for installation.
My personal experience: I have torn these things out of multi-million dollar mansions in San Francisco and I have seen it built both ways. I have personally installed several floor to ceiling with raised panels and a cope and stick rails and stiles and it was approved by the architect as option two and I think installing that as option 1 would have made it much more difficult. I have since seen two or three more go up where high end architects/designers who oversee every facet of construction approved option two.
After having time to think this over and read all the responses to me the moral of this story is, don't lock yourself into box of seeing things only one way.
From Gary Katz, forum technical advisor:
The first example is the correct way and the way you'll find wainscoting in most historic homes and high-end jobs. The end stiles are usually continuous, the field stiles are not. Doors are assembled the same way. Imagine a door with continuous field stiles and broken top and bottom rails, and you'll see my point. Also, the end stiles must be continuous in order to facilitate corner joinery. Even for mitered corners (the worst), continuous end stiles are nice to have, but for butt joints and rabbeted corners, continuous end stiles are the only way to avoid end grain.