Wainscot with toe kick
Notching and other ideas for integrating a toe kick with wainscot. January 3, 2003
Question
I am building a kitchen peninsula base run of 96 inches that will have a 12 inch deep cabinet on the end. The toe kick will be on the inside of the kitchen and the end because of this cabinet (it faces away from the peninsula). When I purchase my doors, I was planning to buy three sections of wainscot, each 36", to cover the back, which will be seen from the living room.
How do I deal with the toe kick notch on the end cabinet without ruining the wainscot? Was thinking of specifying the bottom rail to be 6" wide, then simply notching, but there must be a better way.
Forum Responses
I put a 4 1/2" bottom rail on the wainscot, let the cabinet end panel run to floor with a 4 1/2" bottom rail. I notch the cabinet end panel 3 1/2" where it meets the bottom of the face frame. I don't notch the wainscot. If you do choose to notch the wainscot (if side of cabinet has doors), cutting a decorative ogee (or any shape) will give it a look similar to a furniture leg.
Zero toekick setback on the 12" cabinet. No ugly notch.
Put a kick along the full length of the peninsula's back side and run the panels off the floor. No notching required. It's clean and quick.
Run the left stile of the cabinet that attaches to the wainscot clear to the floor and then run a 45 degree return back to your toekick.
From contributor B:
I disagree with putting a toe kick all around the peninsula. Toe kicks are ugly. Instead, since no one will stand at the end of the counter and work, eliminate the 12" cabinet's recessed toe kick. A good look is to run a base at the bottom of the wainscot and wrap it around the end of the peninsula so that it looks like furniture from the other room.
Maybe it is my experience of doing a lot of living room cabinetry, but if we are building custom cabinets, why would we want to copy the ugly details of the production cabinets that arrive in cardboard boxes?
From contributor D:
There is however something to be said for efficiency of production. If the production method is to build boxes, using leg levelers (with no end panels touching the floor), a toe kick all around more easily fits the parameters.
From contributor B:
I agree that efficiency is very important for proper profit. I have come up with a method for attaching flush bases to 32mm cabinets without changing the system. A backer is applied to the bottom of the cabinets, then base moulding is face nailed (with a 23 gauge brad gun) to the backer. I apply my crown moulding the same way.
Yes, this adds a little time to the install, but I charge accordingly and the cabinets look outstanding. Keep in mind that you have to keep giving your customers a reason to come to you. If they can get the same thing from Home Depot for half the price, why would they come to you?
Here is a photo of a recent project depicting the flush toe kick and crown that are applied with my method.

From contributor D:
Is that a full face frame job or a combination of frame and frameless? Did you use levelers on this job then?
From contributor B:
Officially it is a frameless job, but I did use solid wood frames on the open upper boxes (tape just does not look good on exposed open cabinets in this price range). But even these cabinets were treated like frameless boxes (no overlapping, frames applied in the shop, everything pre-finished, no nail holes to fill, etc.).
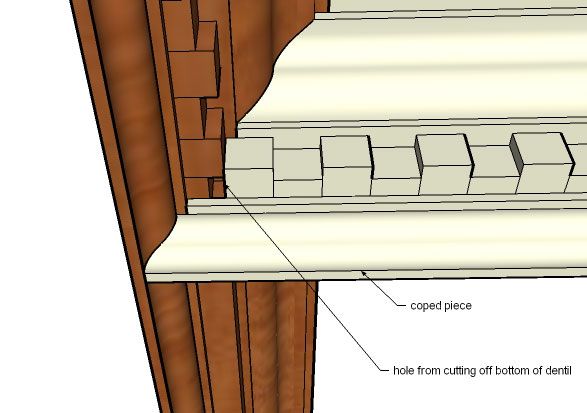
Yes, levellers were used, as well as applied end panels. The base moulding is two pieces (a backer and the front). The crown is 4 pieces (a backer, flat, dentil and crown).
Basically, the principles of the 32mm system were applied in every way to this job. The machines did not have to be changed - instead we use applied ends, filler panels, backer boards, etc. to give the illusion of large frame construction.
Note: A backer board is essentially a filler to which decorative moulding is applied.
Also, the crown and the base moulding match exactly to what was present in the room prior to my arrival. That way, I did not have to remove the moulding in the room - instead, I coped my trim into the existing trim for a perfect match (and yes, it does change from white to cherry).
From contributor A:
I like your method of applied kicks. I usually do it the same way on my typical framed kitchen cabinets. I pocket screw the base backer and leave it 1/2" off the floor. In your method, when doing high-end frameless, do you leave a small reveal between your base and doors/boxes? I do mostly beaded face frames with levelers. I've recently been thinking of my box construction as frameless with really thick edgebanding. I use a lot of Euro hardware so it makes sense to try to keep the ff flush with the panel stock.
From contributor B:
I would agree that you really are doing Euro style with an applied frame (which is how I do my frame cabinets these days as well).
Yes, I do leave a gap below the boxes to allow enough clearance to operate the doors. My doors are referenced from the bottom with "zero" gap off the bottom. So to compensate, I must build the reveal into my backer.
From contributor A:
Have you ever tried edgebanding your deck (bottom) and holding the face frame down 1/4" to provide a stop for your Euro hinged doors? My old boss taught me this slick method and I've only seen one other cabinet guy use it.
From contributor B:
Yes, I have done that (but I rarely do face frame with doors anymore). It really works well and saves time and energy wasted on installing stop hardware. I have seen others use it as well, but I can't remember who. This detail has been around a long time and I see it frequently when I am ripping out old site built, painted cabinets. I think that a lot of modern face frame people have forgotten about that little trick.