Question
I had a customer a while back who decided to use Richlite SS in their kitchen. The countertops were fabricated by an authorized dealer and installed by me. Both the owner and I am delighted with the results, after almost two years the counter has acquired a wonderful patina and looks like it did the day it was installed.
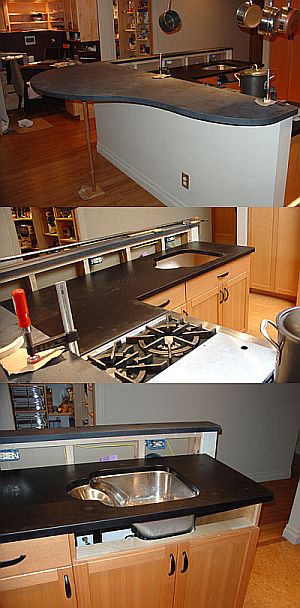
My latest client decided to go with a similar material, Paperstone (actually, to my eyes it looks indistinguishable). I now have in my shop 2 slabs to work with, they are both 1�� thick - one is 60 X 144� and the other is 60� X 96�. Needless to say, they are not easily tossed around. Other than toying with a couple of scraps I have never worked with the stuff, so I�m asking for any tips on fabricating this material.
For this job, I have to cut each piece into an appropriately sized �L� shape and scribe to the walls, and then cut a hole through each piece for two undermount sinks � so I need them to be exact size, with finished edges, and small roundovers.
How about the finished countertop edges - should they be cut 1/8� oversize and routed to finish size? How about cutting the inside 90� corners � any tricks? Should they be rounded slightly? For the undermount sinks, should I use the same general procedure? If I rout, should I use a plunge router with the template or just cut the opening slightly undersized and rout with a standard setup? Do I use a straight cutter or spiral upcut?
What about finish sanding? Right now if you look in an oblique light the top surface appears to have slight horizontal striations in it � are these sanding marks from the manufacturing process? And more importantly, will they go away with an overall finish sanding? I certainly don�t want to make any mistakes, these slabs were not cheap. I appreciate any help.
Forum Responses
(Laminate and Solid Surfacing Forum)
From contributor A:
For the L's, fabricate each leg out of a separate piece, epoxy them together with biscuits. Then you have a sharp inside corner. I have done it the other way before - cut from one piece, routed, and then squared the corner off with a jigsaw, and sanding blocks. It was rather dicey.
Make all cuts slightly oversized, trim with a router with a large pattern bit, then belt sand the router marks off. Finish sand the edges with a random orbit sander. Sand the tops with an orbital, using progressive grits. Don't sand too much - I've been told that you can sand through the kraft paper layers and get some linear artifacts because of it. I've also done these countertops without sanding the surface - it depends on the surface finish you're after.
All in all I'm beginning to think this process will turn out to be much easier than I'm imagining, and after I finally start cutting into the stuff I'll be relieved - and probably the hardest part will be just getting the 12 by 5 foot beast (I estimate a bit under 500 lbs after I cut the sinks and L shaped cutout) into the house and on the cabinets without breaking my back or punching through a wall. I guess I'll just have to round up a few hefty guys who can follow directions.