Question
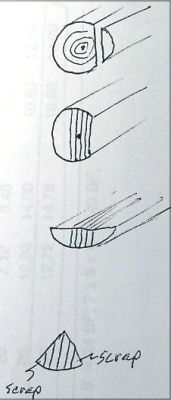
I have a customer who wants quartersawn sycamore. Does every board have to be true quartered for the figure to show, or will the traditional methods of quartersawing produce good results? As I understand sycamore, unless quartersawn, it will warp excessively. Do I have to saw every piece into a wedge shape like the picture, then resaw every board flat?
Forum Responses
(Sawing and Drying Forum)
From contributor B:
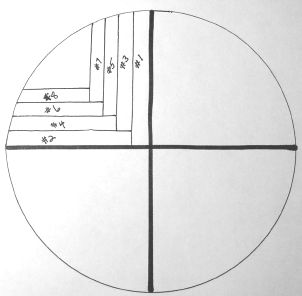
To get the wild ray action in sycamore, you do need to be real close to quartersawn, closer than getting a pattern in oak. If you're worried about stability only, it sounds as if you're afraid anything less than true quartersawn will go to absolute garbage. That's not the case. I know plenty of people who use flat sawn stock. It is a little more unstable than some woods, but certainly not useless. If you do wish to get more quartersawn, once you have removed the truly quartersawn from each quarter and are down to rift sawn pie wedges, clamp these wedges at a 45 degree angle and saw through them. I built a jig to hold them during the first cut. This is slower and decreases yield, but gives more quartersawn instead of rift sawn.
You now have two pieces shaped like a baseball infield. Set one in the cradle and work with the other. If you're good with your clamping, you can balance the piece, but to start with you may want to make a jig to hold it at 45 degrees. Saw as much as you can before you hit your clamps or the jig, then turn it over and finish sawing through and through.
Hope this made sense. It takes time but isn't really too hard. This requires a log at least 20" in diameter to be worthwhile. Smaller or low quality logs can be done by actually squaring the cant, removing boards from the center, then turning the two remaining sections upright and sawing through and through.
Another technique for quartersawing... saw the logs into quarters. Then saw one piece off the fresh face and then saw a second piece off of the other fresh face. Go back and forth from face to face. You will have essentially 100% quartersawn, although the width decreases with each piece cut. Hence, it is suggested that you not quartersaw this way except for logs over 20" in diameter. Although there is high handling, it will work for all sawmills.