Hardwood Details Add Beauty and Value to Any Installation
Reprinted with permission from The Hardwood Council website.
Architectural details often are the perfect finishing touches to a truly outstanding home. Chair rails, crown mouldings and other decorative enhancements in oak, poplar, cherry, maple, ash, walnut and other beautiful North American hardwoods go a long way toward making a home into a showcase.
While these projects may require a little extra effort, they're well worth the time and investment. Here's how to work more confidently -- and economically -- with the quality hardwood products your clients demand.
| Correcting Installation Blemishes Even the most skilled carpenter can occasionally make a cutting, finishing or installation mistake during woodworking. Here are a few tips for correcting nicks, dents and other woodworking blemishes. Applying Wood Filler Fixing Bad Cuts Using Wood Scraps |
Putting Your Skills to Work on a Crown Moulding
Millwork projects demand precise craftsmanship, and a crown moulding installation is an excellent case in point. This project represents a variety of challenges, and the required skills can be transferred to any millwork installation, whether it's a chair rail, baseboard, window treatment, door trim, corbel, stair tread bracket or decorative medallion.
Pre-Installation Teamwork
Moulding installations run most smoothly when each member of the building team anticipates and addresses all elements and potential problems from the beginning. All parties should have drawings and specifications at the earliest stage possible. Remember that decisions and adjustments will affect the final installation and budget.
Check the specifications to figure the perimeter of each room and determine how many linear feet of moulding you will need. When ordering millwork, always add about two extra inches of moulding for each corner to compensate for any woodworking errors made during finishing or installation.
Millwork installation is normally one of the last steps in construction. Millwork orders should be placed at least six to eight weeks in advance. Be aware that the building team will have to agree upon, then choose, inspect and approve material samples before placing an order.
On-Site Layout
Visualize Installation and Restrictions -- When framing begins, document the precise locations of plumbing rough-ins, electrical and communications outlets, air grills and other obstructions that will affect the installation. Make any low-cost modifications before the walls go up.
Note Stud Locations -- Identify stud locations, wall and door frames, and ceiling heights so that holes can be pre-drilled before moulding installation.
Saw Angles and Related Moulding Positions
When cutting mouldings on a compound sliding miter saw, set the angles as directed in Table A and position the mouldings on the top surface of the saw base as indicated in Table B.
Table A
| | |||||
| Moulding position in illustration | Miter Angle | Bevel Angle | |||
| | |||||
| ?52/38? type | ?45? type | 52/38? type | 45? type | ||
| | |||||
| For inside corner | 1 | ?Right 31.6? | ?Right 35.3? | 33.9? | 30? |
| | |||||
| 2 | |||||
| | |||||
| ?Left 31.6? | ?Left 35.3? | ||||
| | |||||
| For outside corner | 3 | ||||
| | |||||
| ?Right 31.6? | ?Right 35.3? | ||||
| | |||||
| 4 | |||||
| | |||||
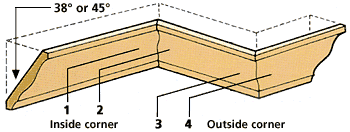
Inside and Outside Moulding Joints
There are moulding joints made to fit inside (1&2) and outside (3&4) corners.
Table B
| | |||
| Moulding position in illustration | Moulding edge against guide fence | Finished piece | |
| | |||
| For inside corner | 1 | Ceiling contact edge should be against guide fence. | Finished piece will be on the left side of blade. |
| | |||
| 2 | Wall contact edge should be against guide fence. | ||
| | |||
| | |||
| Finished piece will be on the right side of blade. | |||
| For outside corner | 3 | ||
| | |||
| 4 | Ceiling contact edge should be against guide fence. | ||
| | |||
Figure Corners and Measure Wall Angles -- Determine the number of inside and outside corners to identify the cuts you'll need to make (see illustration above). Also, walls are not always squared and true. Each corner will require you to measure the wall angles and figure the proper cutting angle. To do this, place a piece of moulding against the wall at each corner. Work with a small piece of moulding to easily see the angle and measure using a protractor. All angles will have a corresponding setting on your miter saw and the most common angles are detailed above (Tables A and B).
Cutting Angles
As shown in Tables A and B, there are two primary miter and bevel angle styles if the wall is a true 90-degree angle. Your installation angle is dependent on the size and shape of the moulding.
It is easiest to cut all mouldings on a sliding compound miter saw, placing the crown moulding with the broad back surface down on the turn base and setting the saw to the proper angle. If you use a standard miter saw, turn the moulding upside down and set it at an angle between the fence and the table.
Finishing and Installation
Mouldings and all other millwork can be ordered pre-finished or you may choose to site-finish before installation. Finishing details are offered in Pre-Finished or Site-Finished? Examining the Options.
Once properly cut and finished, the millwork is ready for installation. Pre-drill nail holes in all mouldings to avoid injuring the finish. Before nailing, apply construction adhesive to the mouldings where they will meet the wall and use wood glue in the mitered corners. Immediately wipe clean any glue that has seeped onto the finished moulding, wall or ceiling. Hold the moulding in place to give adhesives time to set. Then complete the installation by nailing the mouldings securely to the studs with a nail gun.
QuickTips
Pre-Installation Care
Proper preparation of the moulding and the worksite will prevent warpage and expansion/contraction damage:
--Store the millwork inside the house and off the floor to keep it dry.
--Run the heating/ventilation/air conditioning to bring the house to the normal relative humidity (normal conditions for your region) before and during moulding finishing and installation. Allow mouldings to acclimate for 3 to 5 days.
For more information, see Installing Hardwood Floors Over Concrete Slabs.
Saw Operation Caution
When making a cut, make sure the blade has stopped rotating before lifting it from the sawn millwork. Do not raise the blade while it is still rotating or the moulding will catch in the blade and be damaged.
In addition, when pressing down the handle, apply pressure parallel with the blade. A force perpendicular to the turn base or a change in the pressure direction during a cut will impair the precision of that cut.
Cutting Wide Miters
For installation of larger architectural mouldings (4 1/2" and wider), the compound sliding miter saw is particularly effective. This tool permits long, precise miters and allows you to work with the wood laid down instead of at an awkward angle.
Eliminating Miter Cuts
Beautiful miters accent the details of hardwood moulding, but crown blocks and other alternatives can eliminate the need to miter while still adding character to the trim. Crown blocks come as perfectly finished corners and make it easy to work on ceilings that have uneven lines.
Use rosettes and plinth blocks around door and window frames, and base blocks to finish the inside and outside corners of baseboards.
Installing Dentil Mouldings
Technical assistance and/or photos provided by: Ornamental Mouldings, Archdale, N.C.; White River Woodworks, Fayetteville, Ark.
? 1999 The Hardwood Council
Reprinted with permission from The Hardwood Council website.