Message Thread:
180� Curved Staircase
3/25/17

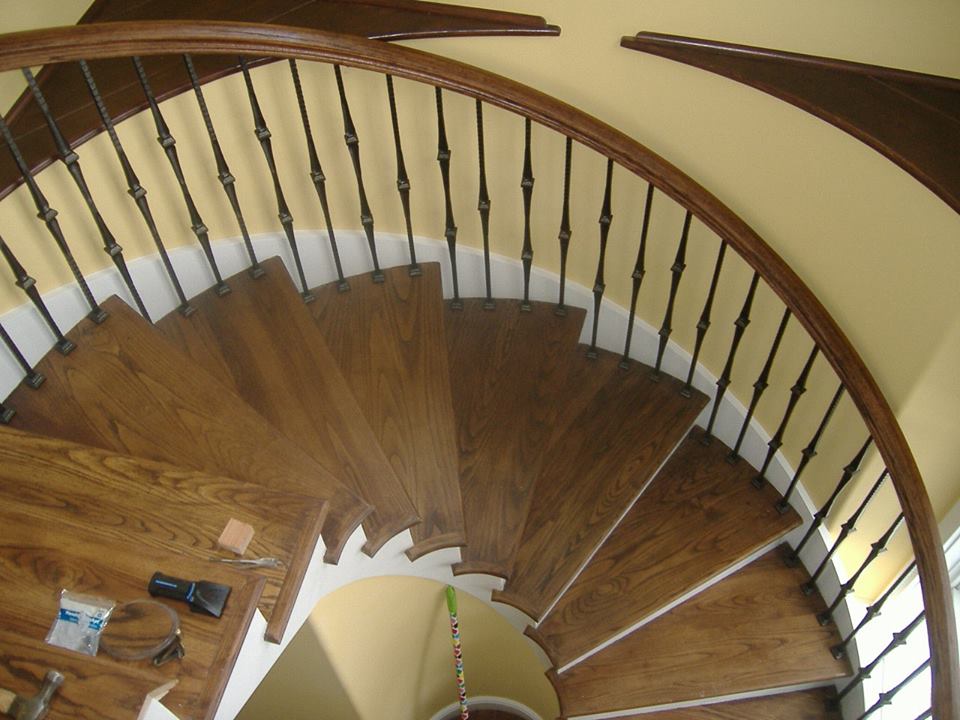
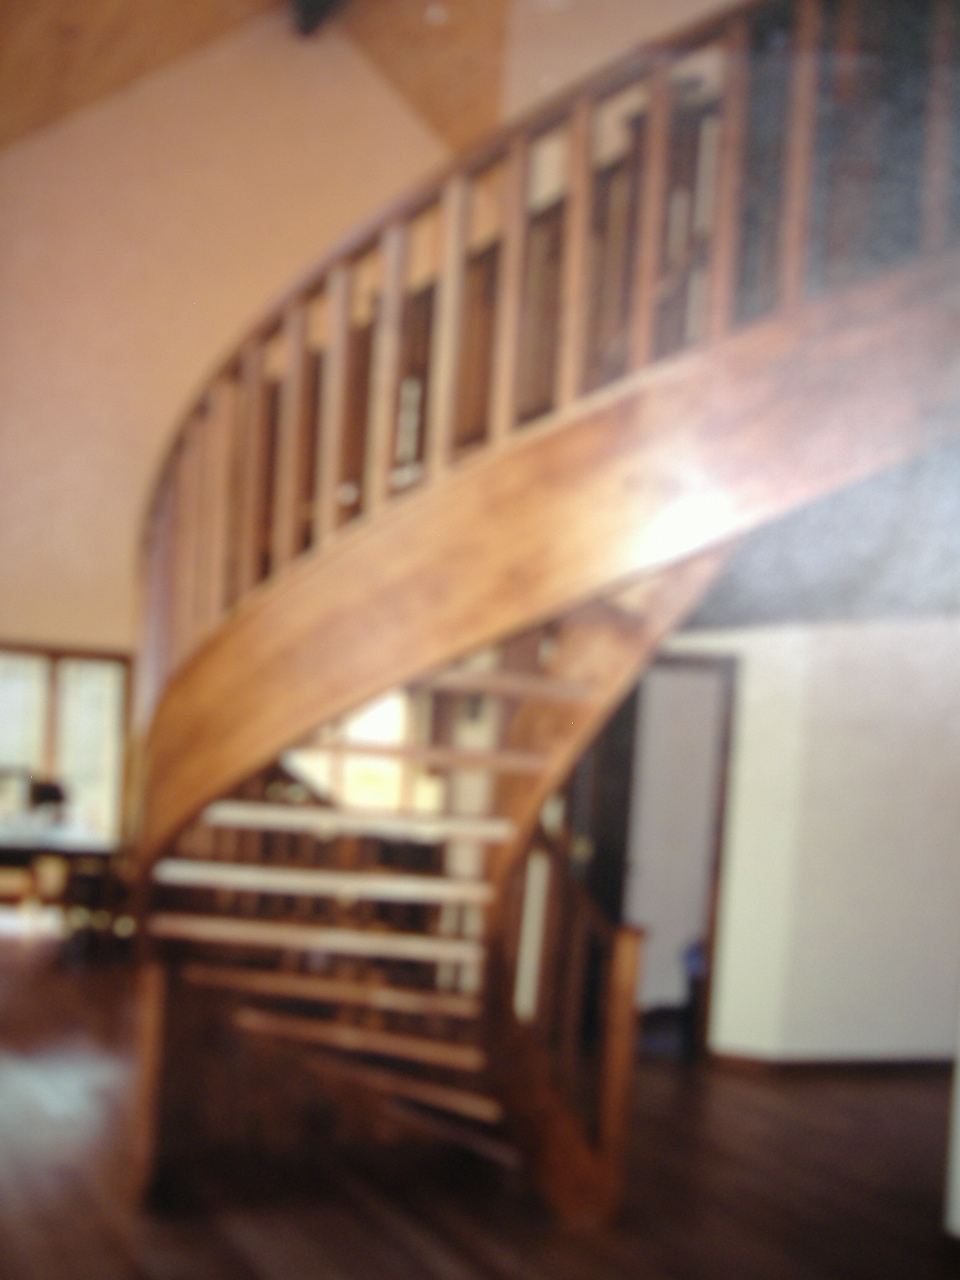
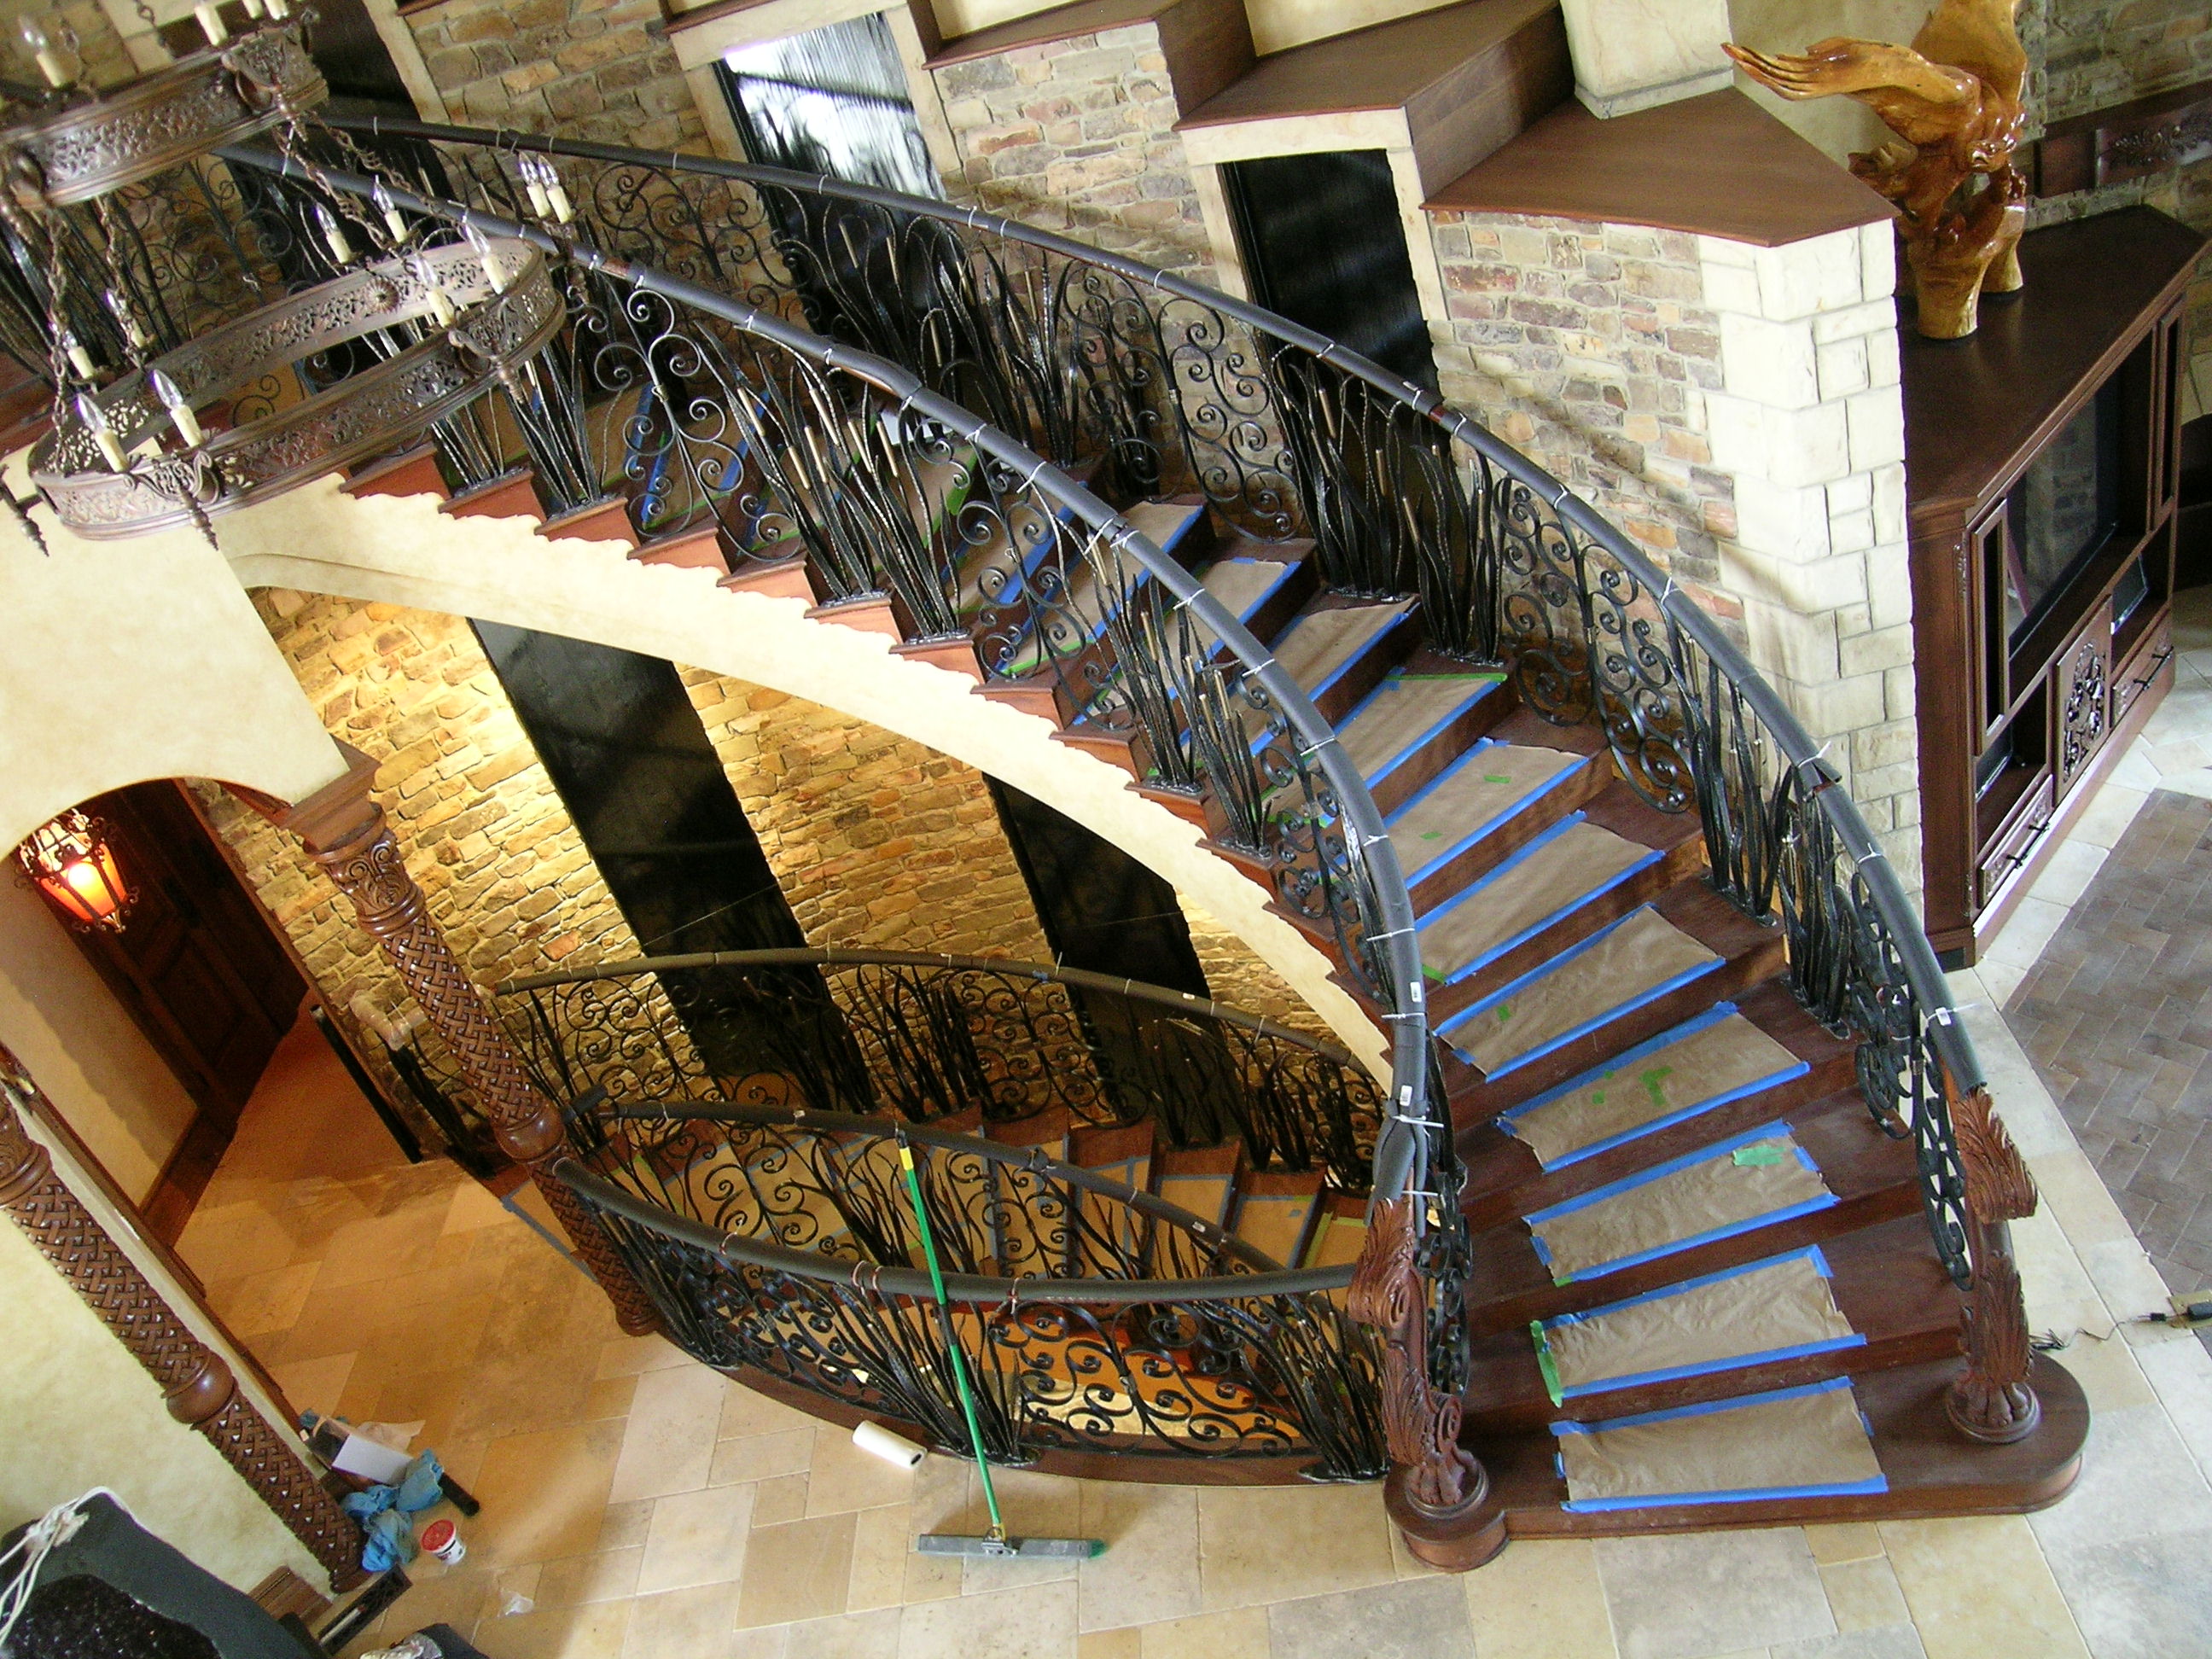
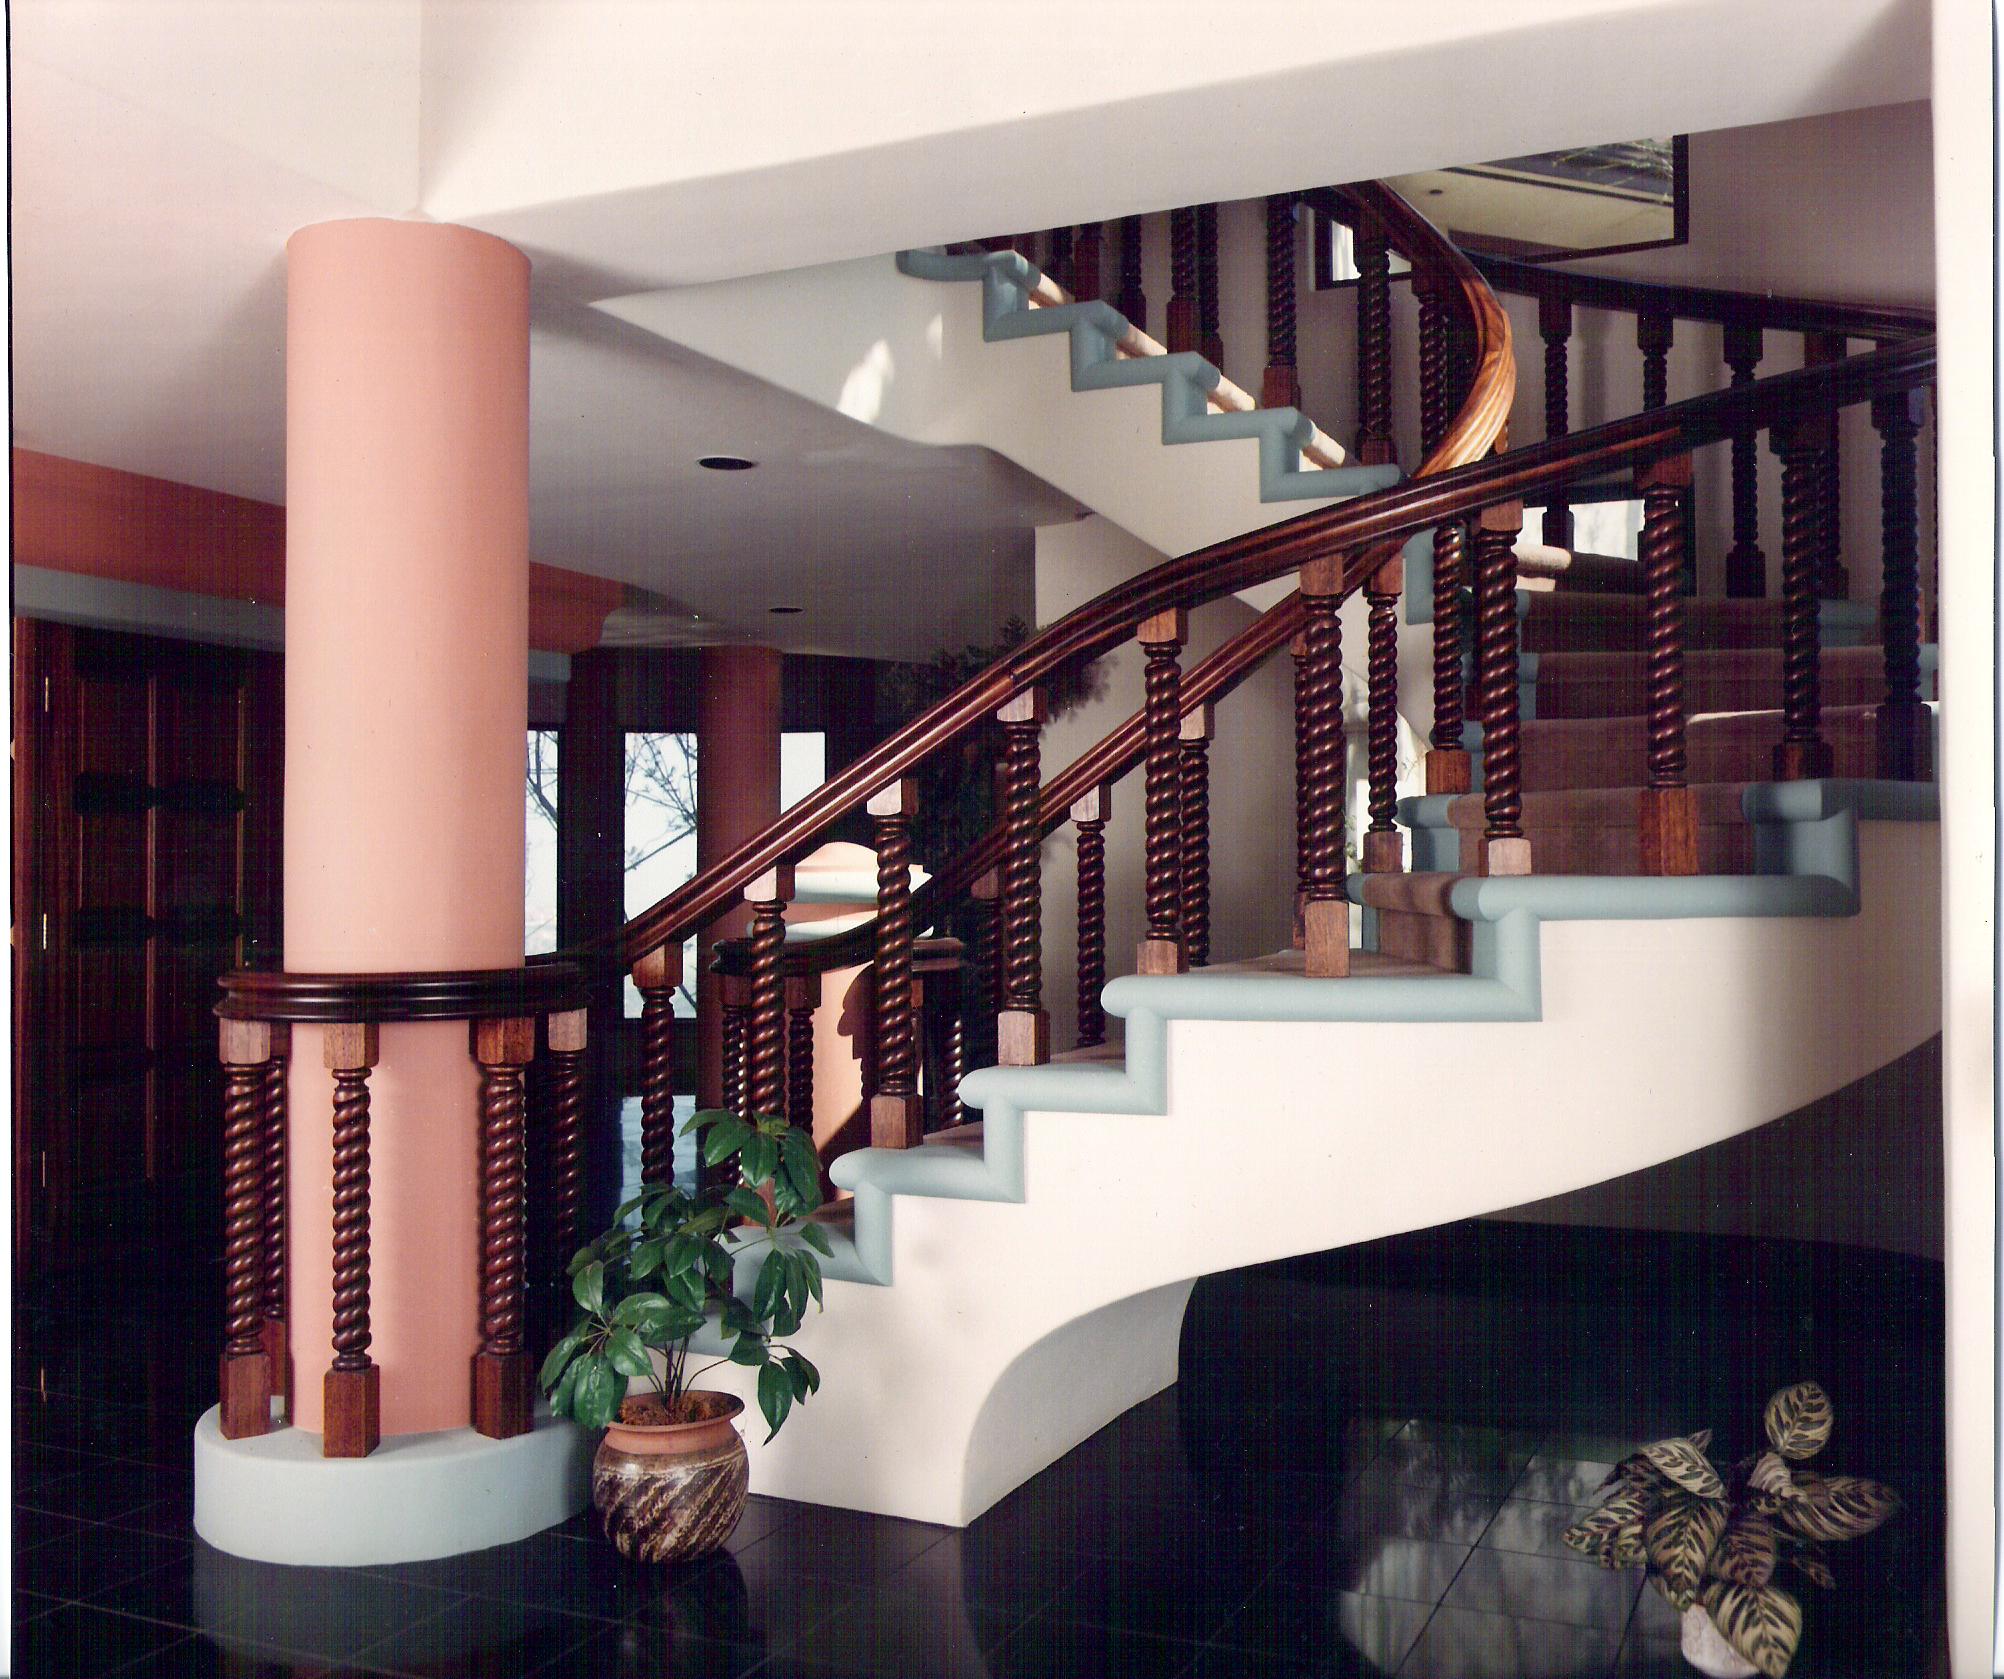
I'd like to share my experience working on a recent staircase we put together, and invite critique and discussion about this particular stair. I've been building staircases for about 8 years now and am self taught in the art. The first curved stringer I ever built literally broke in half when I removed it from the jig. I've gotten better since then. A bit.
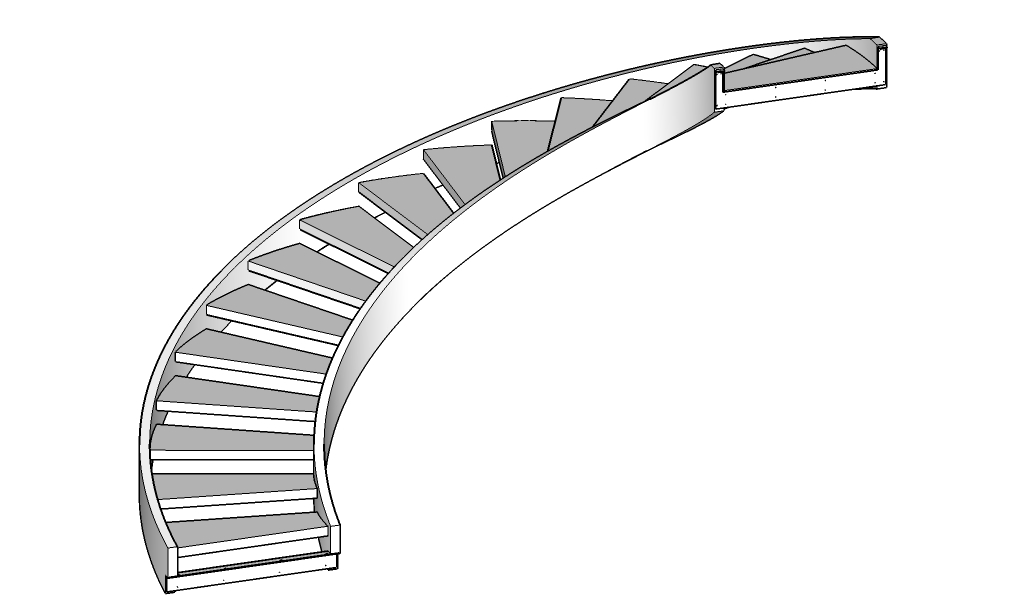
The customer wanted two 180� curved stairs, one is slightly larger than the other, but they share the same inside radius. There were to be no flared feet on either stair, and the upper staircase was not to run past the 180� mark, meaning it was entirely above the hole underneath it.
You can find the sketchup file with the upper staircase attached, if you want to look at it and not depend on my descriptions. We'll be discussing the upper staircase here, and again, I invite critique.
I'm searching for ideas because this stair didn't turn out the way I wanted. It is definitely the largest curve I've ever built.
We used 3/8" plywood cut on bias, applied to a vertical jig. 1/8" MDF provides the smooth faired backing for the polyback veneer applied to the stringer with contact cement. 1/8" wood caps the top and bottom of the stringer.
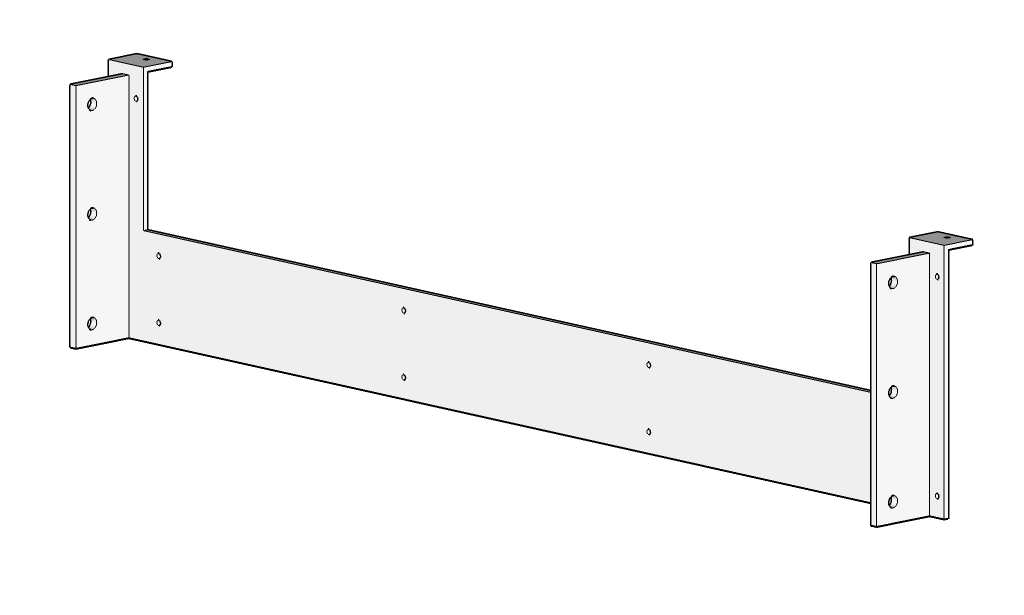
The size of the stair necessitated on site assembly. It was open rise, so we had to find a way make a good mechanical connection at the top and bottom of the stair. We weren't going to rely on screws to hold it in place.
Steel brackets were fabricated to provide structural support for the top and bottom of the stair. The brackets had vertical supports that were mortised into the stringer and dry fit in the shop. They fit wonderfully. Nuts were embedded in the outside faces of the stringers and were covered by the veneer (hint: bondo is not strong enough). Veneer was left off on the inside of the stringer so bolts could be inserted during installation and then covered up.
On site, we measured off the centre point, positioned our top bracket, and screwed it in place. We the lifted the outside stringer up and attempted to bolt it onto the bracket. Things start going badly from this moment.
The stringer is difficult to get onto the bracket. It doesn't want to go all the way onto the bracket. We eventually get it in place, but the holes in the vertical steel members don't line up with the drilled holes in the stringer anymore. The holes in the stringer are half inch, the holes in the steel are 5/8". Gettings things to line up is difficult when you have 6 people trying to hold the stringer in place. In the end I manage to get two out of 3 bolts for each stringer in place and leave it at that. What took 3 minutes in the shop during dry fit took 6 people one hour to perform on site.
The bottom steel bracket is then inserted into the mortise on the bottom of the stringer and moved into position. The inside stringer is easy to move and quickly in place, but the problems with getting alignment of the holes and the bracket remain. I need to think of a different way of doing this.
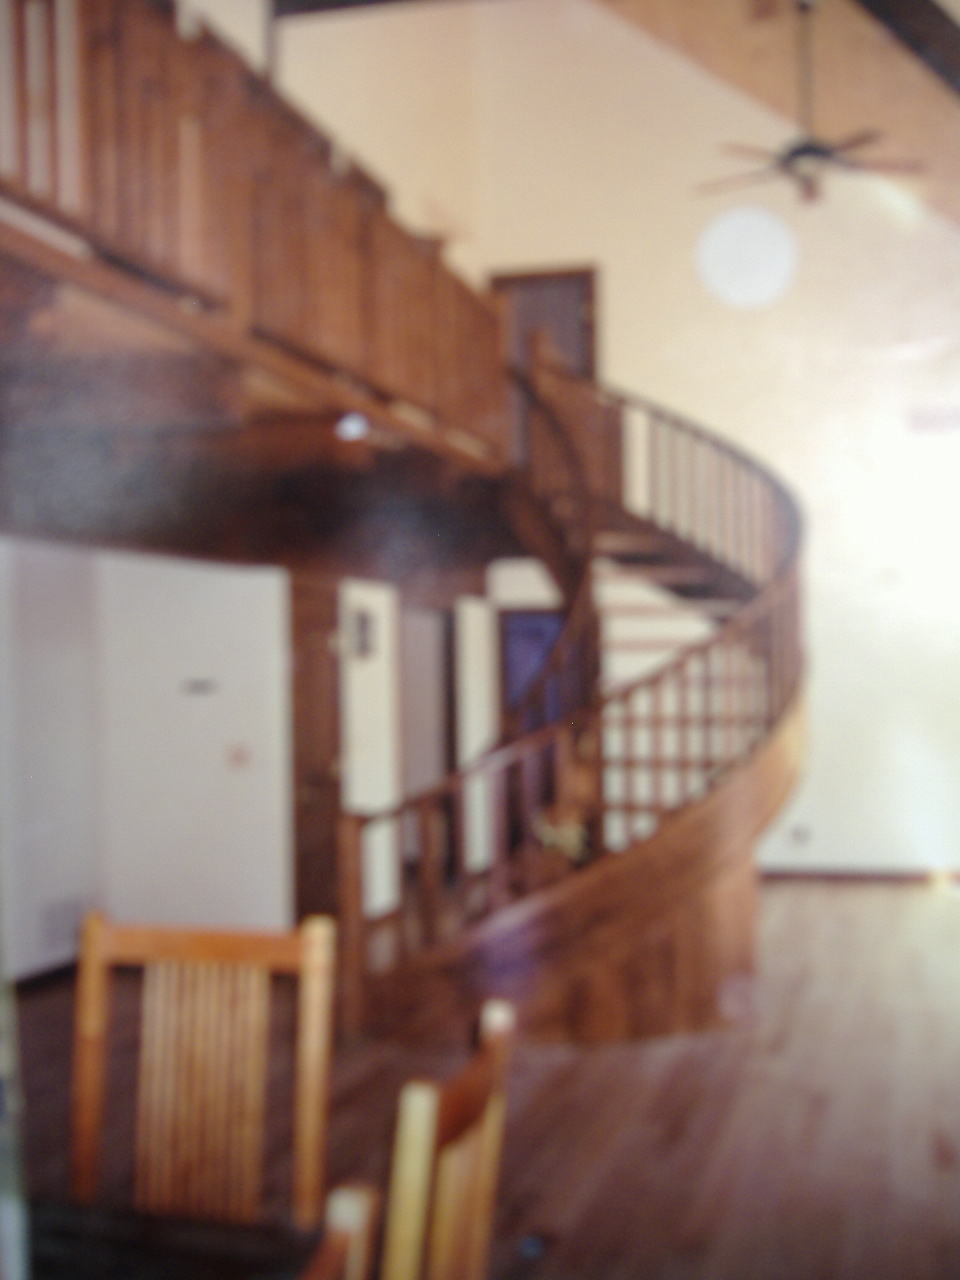
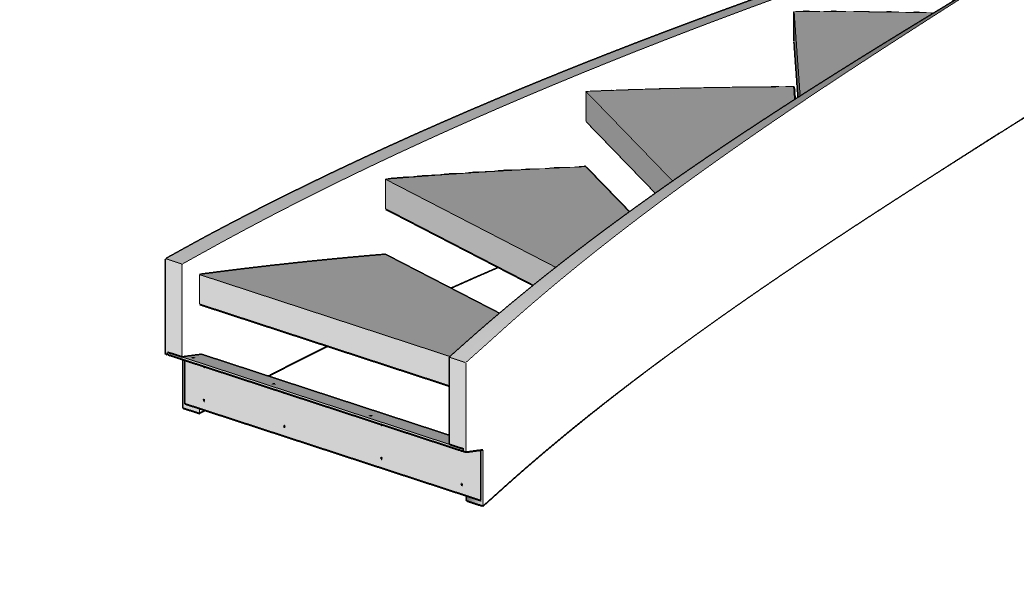
We had worked with the customer during the initial framing of the house to make sure that a steel bracket was installed in the wall so that the stair would have some support. Unfortunately, windows in the wall meant that instead of 90� through the turn, the bracket was instead about 110� through the turn. We thought this was sufficient. It wasn't. We should have used two. The stair bounces badly towards the bottom.
At the same time, the curve is wrong. The steel brackets are positioned correctly, but the stringers are held too open. My half circle is squashed. This becomes obvious when we start putting treads in, and the geometry of the treads no longer works.
So finally, after all this frustration, after scribing each tread to fit, after all the hours spent trying to get those bolts in place, and after pondering how to stabilize the bounce of the stair, the veneer on the inside of the inside stringer lets go and bubbles.
So, I'm sure many of you have experienced frustrations like mine. I'm wondering what you would have done differently? What processes have you developed that work for you in a situation like this? Please ask questions, ask for my rational or for more info. I'm here to learn.
Click the link below to download the file included with this post.
Curved_Stair.skp
3/26/17 #2: 180� Curved Staircase ...
Just from reading the post I can offer the following . I've been making curved helical and spiral wood stairs for 30+ years and have never used veneer on a stringer. I can see why it bubbled. Contact cement creeps. When the stringer is not held in place by the treads and the opposing stringer it will have spring back even with most glues. . My stringers are made of several layers of glued up solid wood lamination. sometimes as many as 8 layers to get a 2 " thick stringer. The treads are never mounted with steel brackets they are mortised into the stringer if its cased or screwed and plugged if its open. The stair bounces at the bottom? Did you have a jib in the bottom of the stringer? Was the stair bolted to the floor? Perhaps the stringer was not wide enough or thick enough. Some spring is acceptable but very little.
View higher quality, full size image (960 X 720)
View higher quality, full size image (960 X 1280)
View higher quality, full size image (960 X 1280)
3/26/17 #3: 180� Curved Staircase ...
And I believe besides the veneer and contact cement issue your biggest error was when you started scribing the treads to fit on site. If they fit good in the shop they were to fit good on site. I lay my treads out full size in plywood templates and do not deviate from it. Regards and good luck with the rail. Now that the stair has changed you likley will have issues with the railing install.
3/26/17 #4: 180� Curved Staircase ...
Chris, You stated , then on down mentioned that you used 3/8" ply on this one. Could you be more specific, there are lots of 3/8 plys? Since you mentioned cutting on the bias, was this bending ply?
3/26/17 #5: 180� Curved Staircase ...
I would agree with what Harry said. I too use only thin solid lumber for stringers. I use a plastic resin glue to laminate, like CP -0503. I use a vacuum bag on an EXACT form based on site conditions. I form the rail on the staircase, while it is on the form. Other than balusters, everything that can be fit, is fit in the shop. You cannot deviate from that, without incurring big problems on site. It does seem like you were dealing with some level of springback.
Also, veneer and contact cement do not play well, as you found out.
I am self taught as well, and
I learned to err on the larger/stronger side of things, regardless of what might be drawn or spec'ed. Stringers that bounce indicate too small, or weak of a carriage.
Hard lessons, but that is why it is important to assemble everything in shop to avoid the issues/embarrassment, and liabilities before they get out in the field.
Once you start deviating from your build form, it is really hard to stop chasing your tail.
When I do build in form, after I pull the vac bag off, the stringer goes right back on the form, and stays clamped to the form for the entire time it takes me to cut and fabricate all the other parts for the job- risers, treads, returns, rail. This means it can be in the form for weeks. That allows all the moisture from the glueup to equalize and hopefully escape , negating a bunch of the springback issue
3/26/17 #6: 180� Curved Staircase ...
Let me try again, You stated, The first curved stringer I ever built literally broke in half when I removed it from the jig.
Were you using bending ply?
3/26/17 #7: 180� Curved Staircase ...
They are bouncy because at least 50% of the wood fiber is doing nothing but taking up space. The wood that is doing something isn't doing much because its really poor wood to start.
I've got a ton of experience with composites(fiberglass, carbon). It is very common to use bias cut cloth on boats. We use them for tabing, curves, hulls, and some other places where the load paths are unknown.
At no time would you use biaxial fabric for a beam. The stair stringer is a beam. The load path is known and obvious.
Imagine if you replaced a 2x10 floor joist with layers of plywood that was cut at 45 degrees . All of the fibers are going in the wrong direction.
As Harry pointed out. Contact adhesive is a really poor adhesive for anything but stable generally flat surfaces. It can be used with materials like laminate(formica) on curved surfaces. It works because the laminate is highly resistant to movement by its nature.
3/26/17 #8: 180� Curved Staircase ...
Website: kalawood.com
Thanks for the responses.
@Harry: Do you make the solid wood yourself or buy it at the 1/8" thickness? I've read people use 1/4" Luan as well, but I've never used anything other than 3/8" spruce plywood as the core of my stringers. I've always wanted something better but haven't found a replacement yet. For the most part that's always just what I've been given to work with. Now that I do this myself I'm looking for alternatives. The stringer was built up with 8 layers of 3/8" ply plus 2 layers of 1/8 MDF on the outside for a total width of 3-1/4".
What do you mean by jib? I'm not familiar with this term outside of sailing, we probably call it something different here.
We tried to get the customer to go with solid wood on the outside of the stringer but they didn't like the cost.
Luckily the rail is not my concern on this one and hasn't been formed yet.
@Keith: 3/8" spruce plywood has 3 layers, two of which the grain runs in the same direction. It's easier to bend the ply in the direction of the 2 layers. That's what I mean by bias. I mark out the angle of each stringer on the plywood, then cut all my pieces on that angle. I used bending ply once to build a stair. Never again. I then stagger all the joints within the stringer so none of them line up and form a weak spot (you can guess how I learnt that lesson).
@Peter: Who provides your vacuum bag and what kind of pump are you using, if you don't mind my asking? We have two pumps in the shop, and we recently bought some 'vacuum film' and some other items from a composites shop, but we have no expertise or experience using vacuum bags to build stairs. I've always wanted to learn, hence the purchase, but we haven't developed the skills to do so yet.
@Adam: This makes sense. Thanks for that explanation.
At the moment my thought to fix the bounce issue is to drill holes at a 45� angle through the stringers into the walls behind the stringer. I then need to find a bolt/rod of some sort to screw into the wall, and then use that to stabilise the stringer. Not ideal.
You learn something new every day.
View higher quality, full size image (1024 X 615)
View higher quality, full size image (1024 X 615)
View higher quality, full size image (1024 X 615)
3/26/17 #9: 180� Curved Staircase ...
Fixing the outside stringer to the wall is a great way to shorten the span in half. However, that is the outside. What about the inside?
Most people make their own 1/8+ veneers. So its a solid wood laminated beam. Plywood is simply not stiff enough.
I'm surprised that you would have predrilled all of your connection points in the shop. Personally, I would not trust the site to be accurate after all the stuff that happens on jobsites. The reality is the house framing might shrink in height from the framing lumber drying. Between the time you measure and install(months?).
If I were you I would practice in the shop on a mock stair stringer. Make up your veneers out of poplar and figure out how to use a vacuum bag or properly use your clamps.
If you have room to work. Rip the mdf off the inside stringer and replace it with a couple of real wood veneers. The mdf was just weight. It has very little strength. That should stiffen up the inside and you can fasten the outside to the wall.
3/26/17 #10: 180� Curved Staircase ...
Nobody uses luan for anything structural. It is junk. We use it only to draw on. Its now so bad, I question why I still use it.
3/27/17 #11: 180� Curved Staircase ...
I get my vac bags from Ed Ferri @ qualityvak.com here in MA. Nice to deal with, fair prices, and pretty much he will make whatever size bag you need.
I bought a 20" x 26' bag for 3 stacked staircases.
My vac setup is nothing special. I bought most of it used from a retiring curved stair builder. I have the little air operated venturi from Ed for quick evacuation of the bag, then a converted old freezer compressor that just idles away with constant vac on the bag, for about 24 hours before we remove.
I actually purchase my logs if need be for the curved stair, saw and dry in my in-house kiln. Last 3 staircases had stringers out of 7 layers of 1/4" Ash, with 1 face layer of 1/4" Cherry. The pieces were 15" wide x 24' long- all one piece lenght and width
View higher quality, full size image (1600 X 1200)
3/27/17 #12: 180� Curved Staircase ...
I'm no expert curved stair builder by any means but I have made three so far in my life and they turned out pretty well. On the first one we used solid wood core stock and solid wood skins. The next two we tried 1/4" okomue plywood(5 thin plus and no voids) and that worked well. We just did a brick lay and used epoxy on the glue up. Stringers in both were 2 1/2" I believe and quite strong. Just a thought for you. Just wondering, if your customer didn't want to pay for the additional cost of real wood skins, do they want to pay to fix the venner skins?
3/27/17 #13: 180� Curved Staircase ...
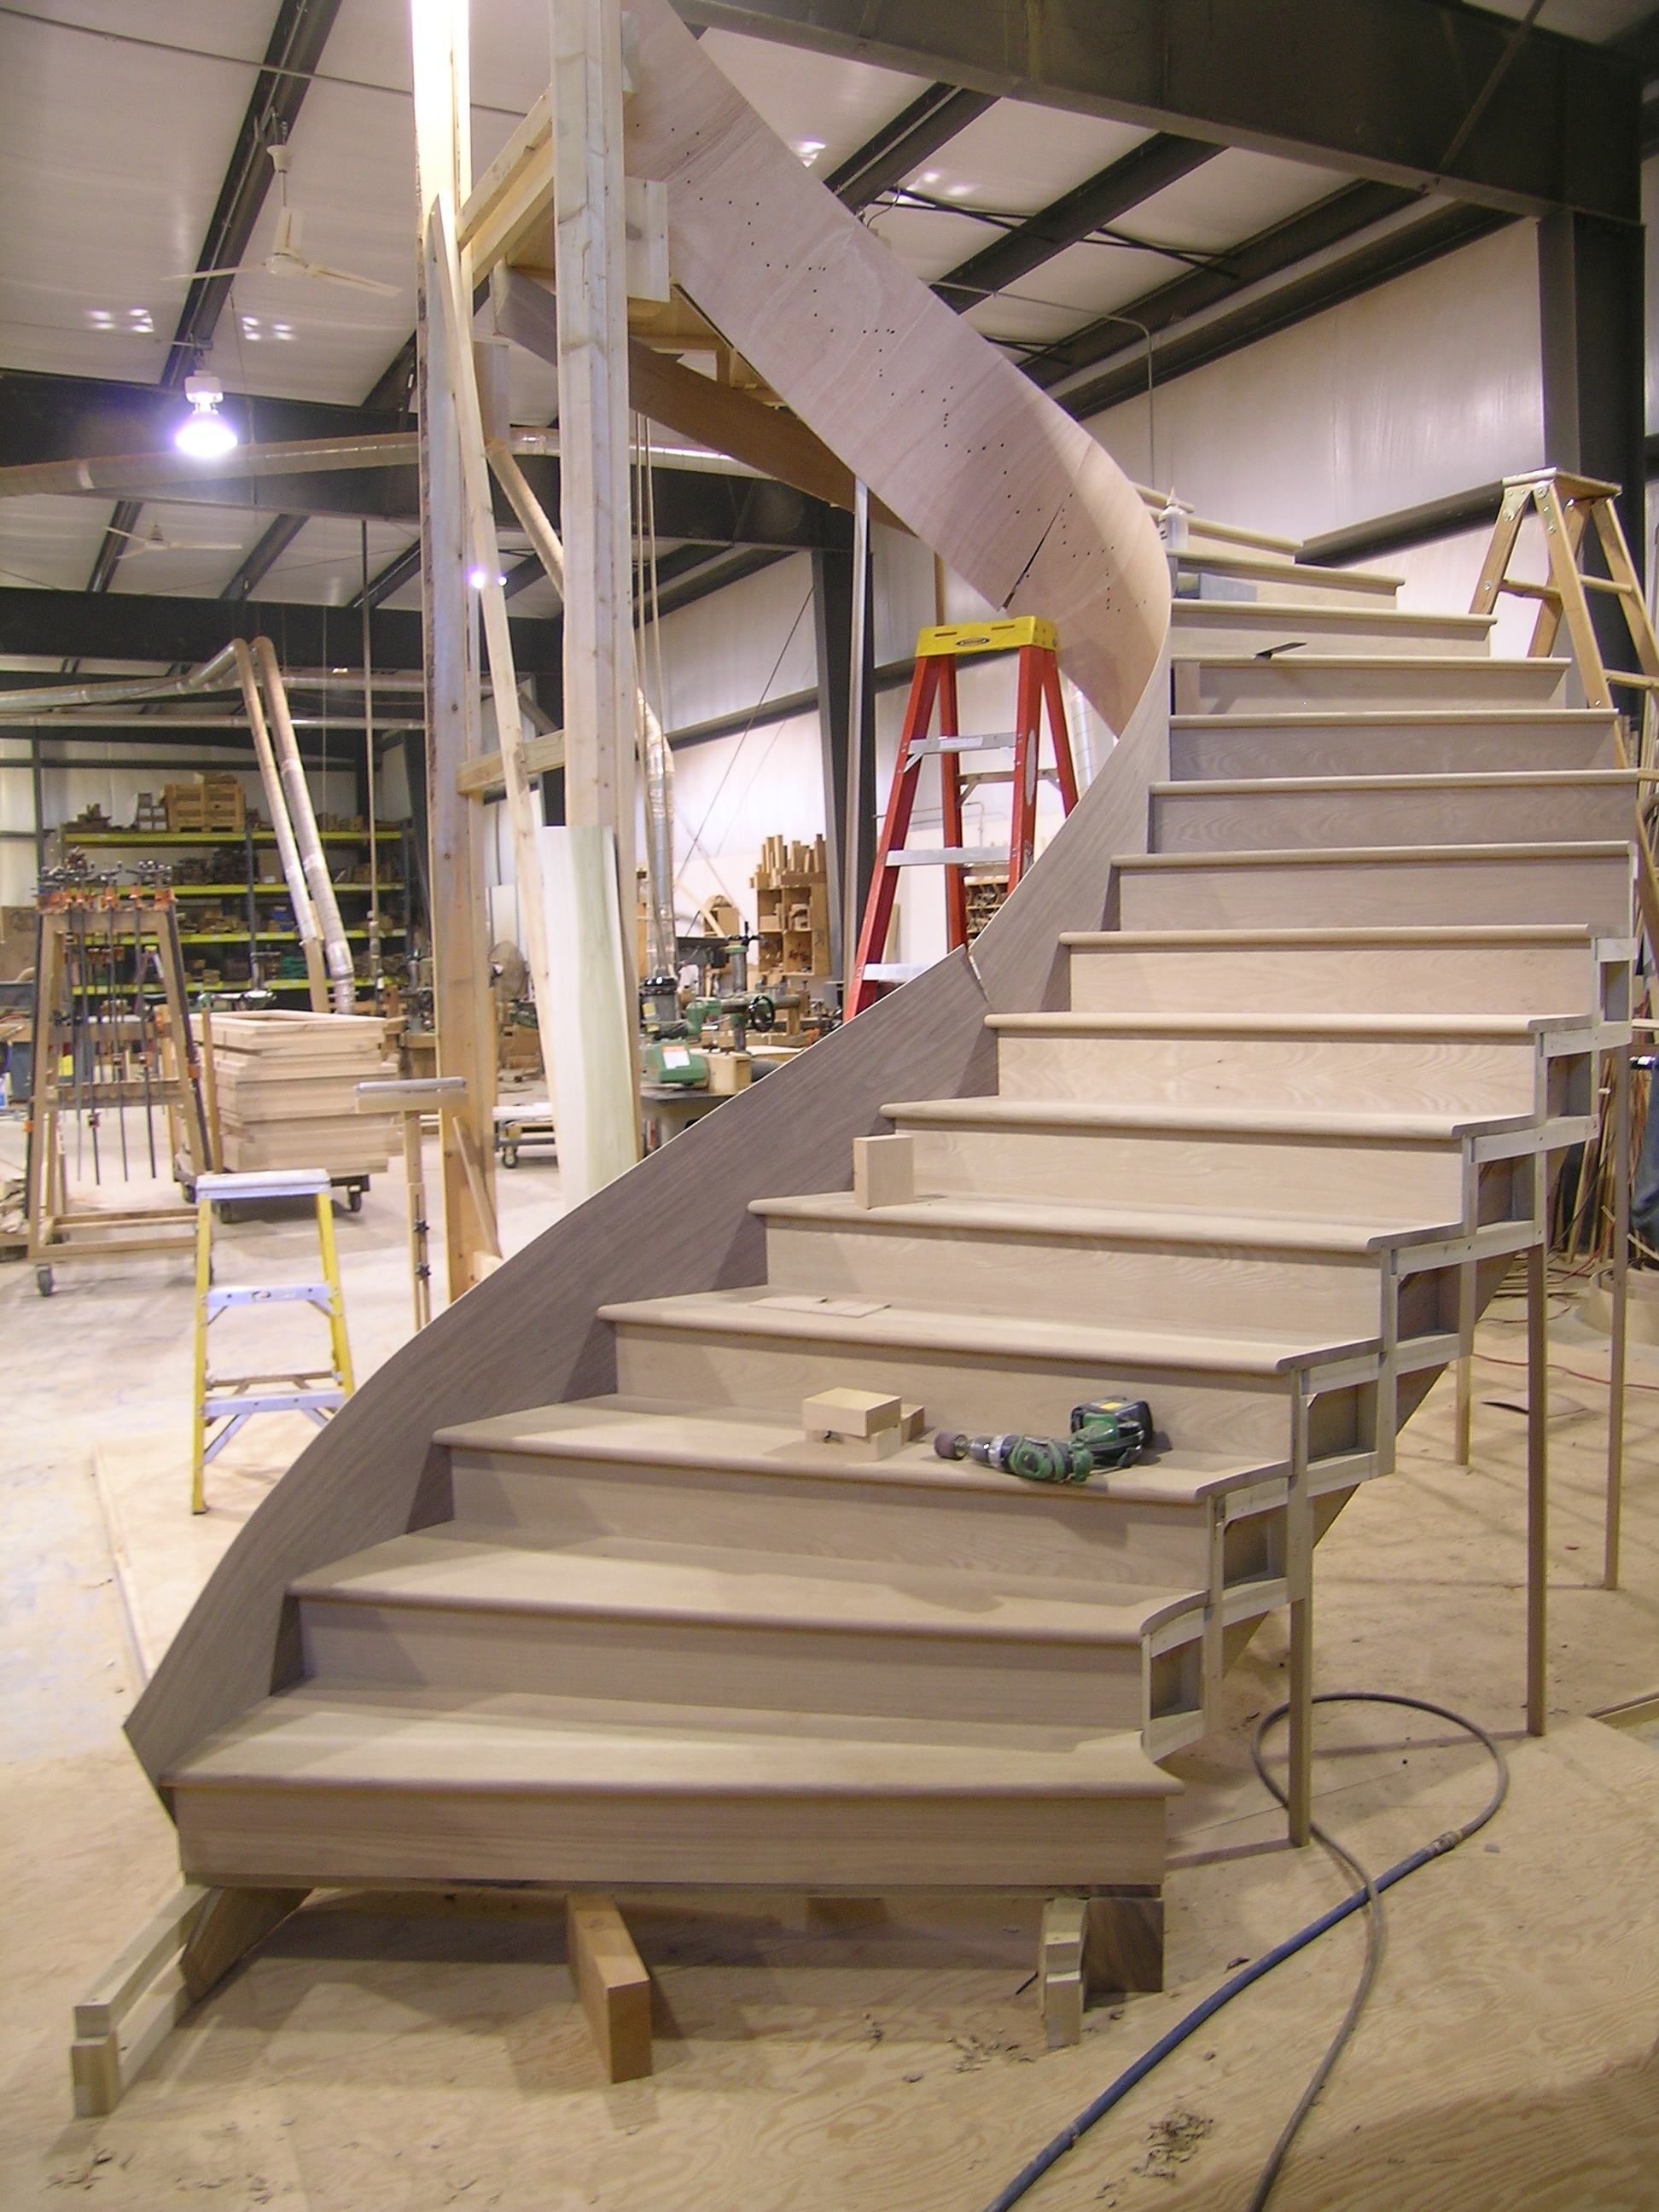
I build my stairs quite differently, but the outcome is very good. I learned this method from some old guys in a shop that had been building them for 30 years before I learned in the early 1970's. As I know it, none of these stairs ever developed any sort of a problem and nearly 40 yrs on, there aren't even squeaks in the 3 I have visited.
I'll post some pictures and see if you have questions.
View higher quality, full size image (2592 X 1944)
View higher quality, full size image (2592 X 1944)
View higher quality, full size image (1944 X 2592)
3/27/17 #14: 180� Curved Staircase ...
David, it looks like you are applying a thick skin to your stringer frame work. What do you use to skin with and how does that not want to cause the stringer to deflect? Very interesting and I've never seen anything like that before.
3/27/17 #15: 180� Curved Staircase ...
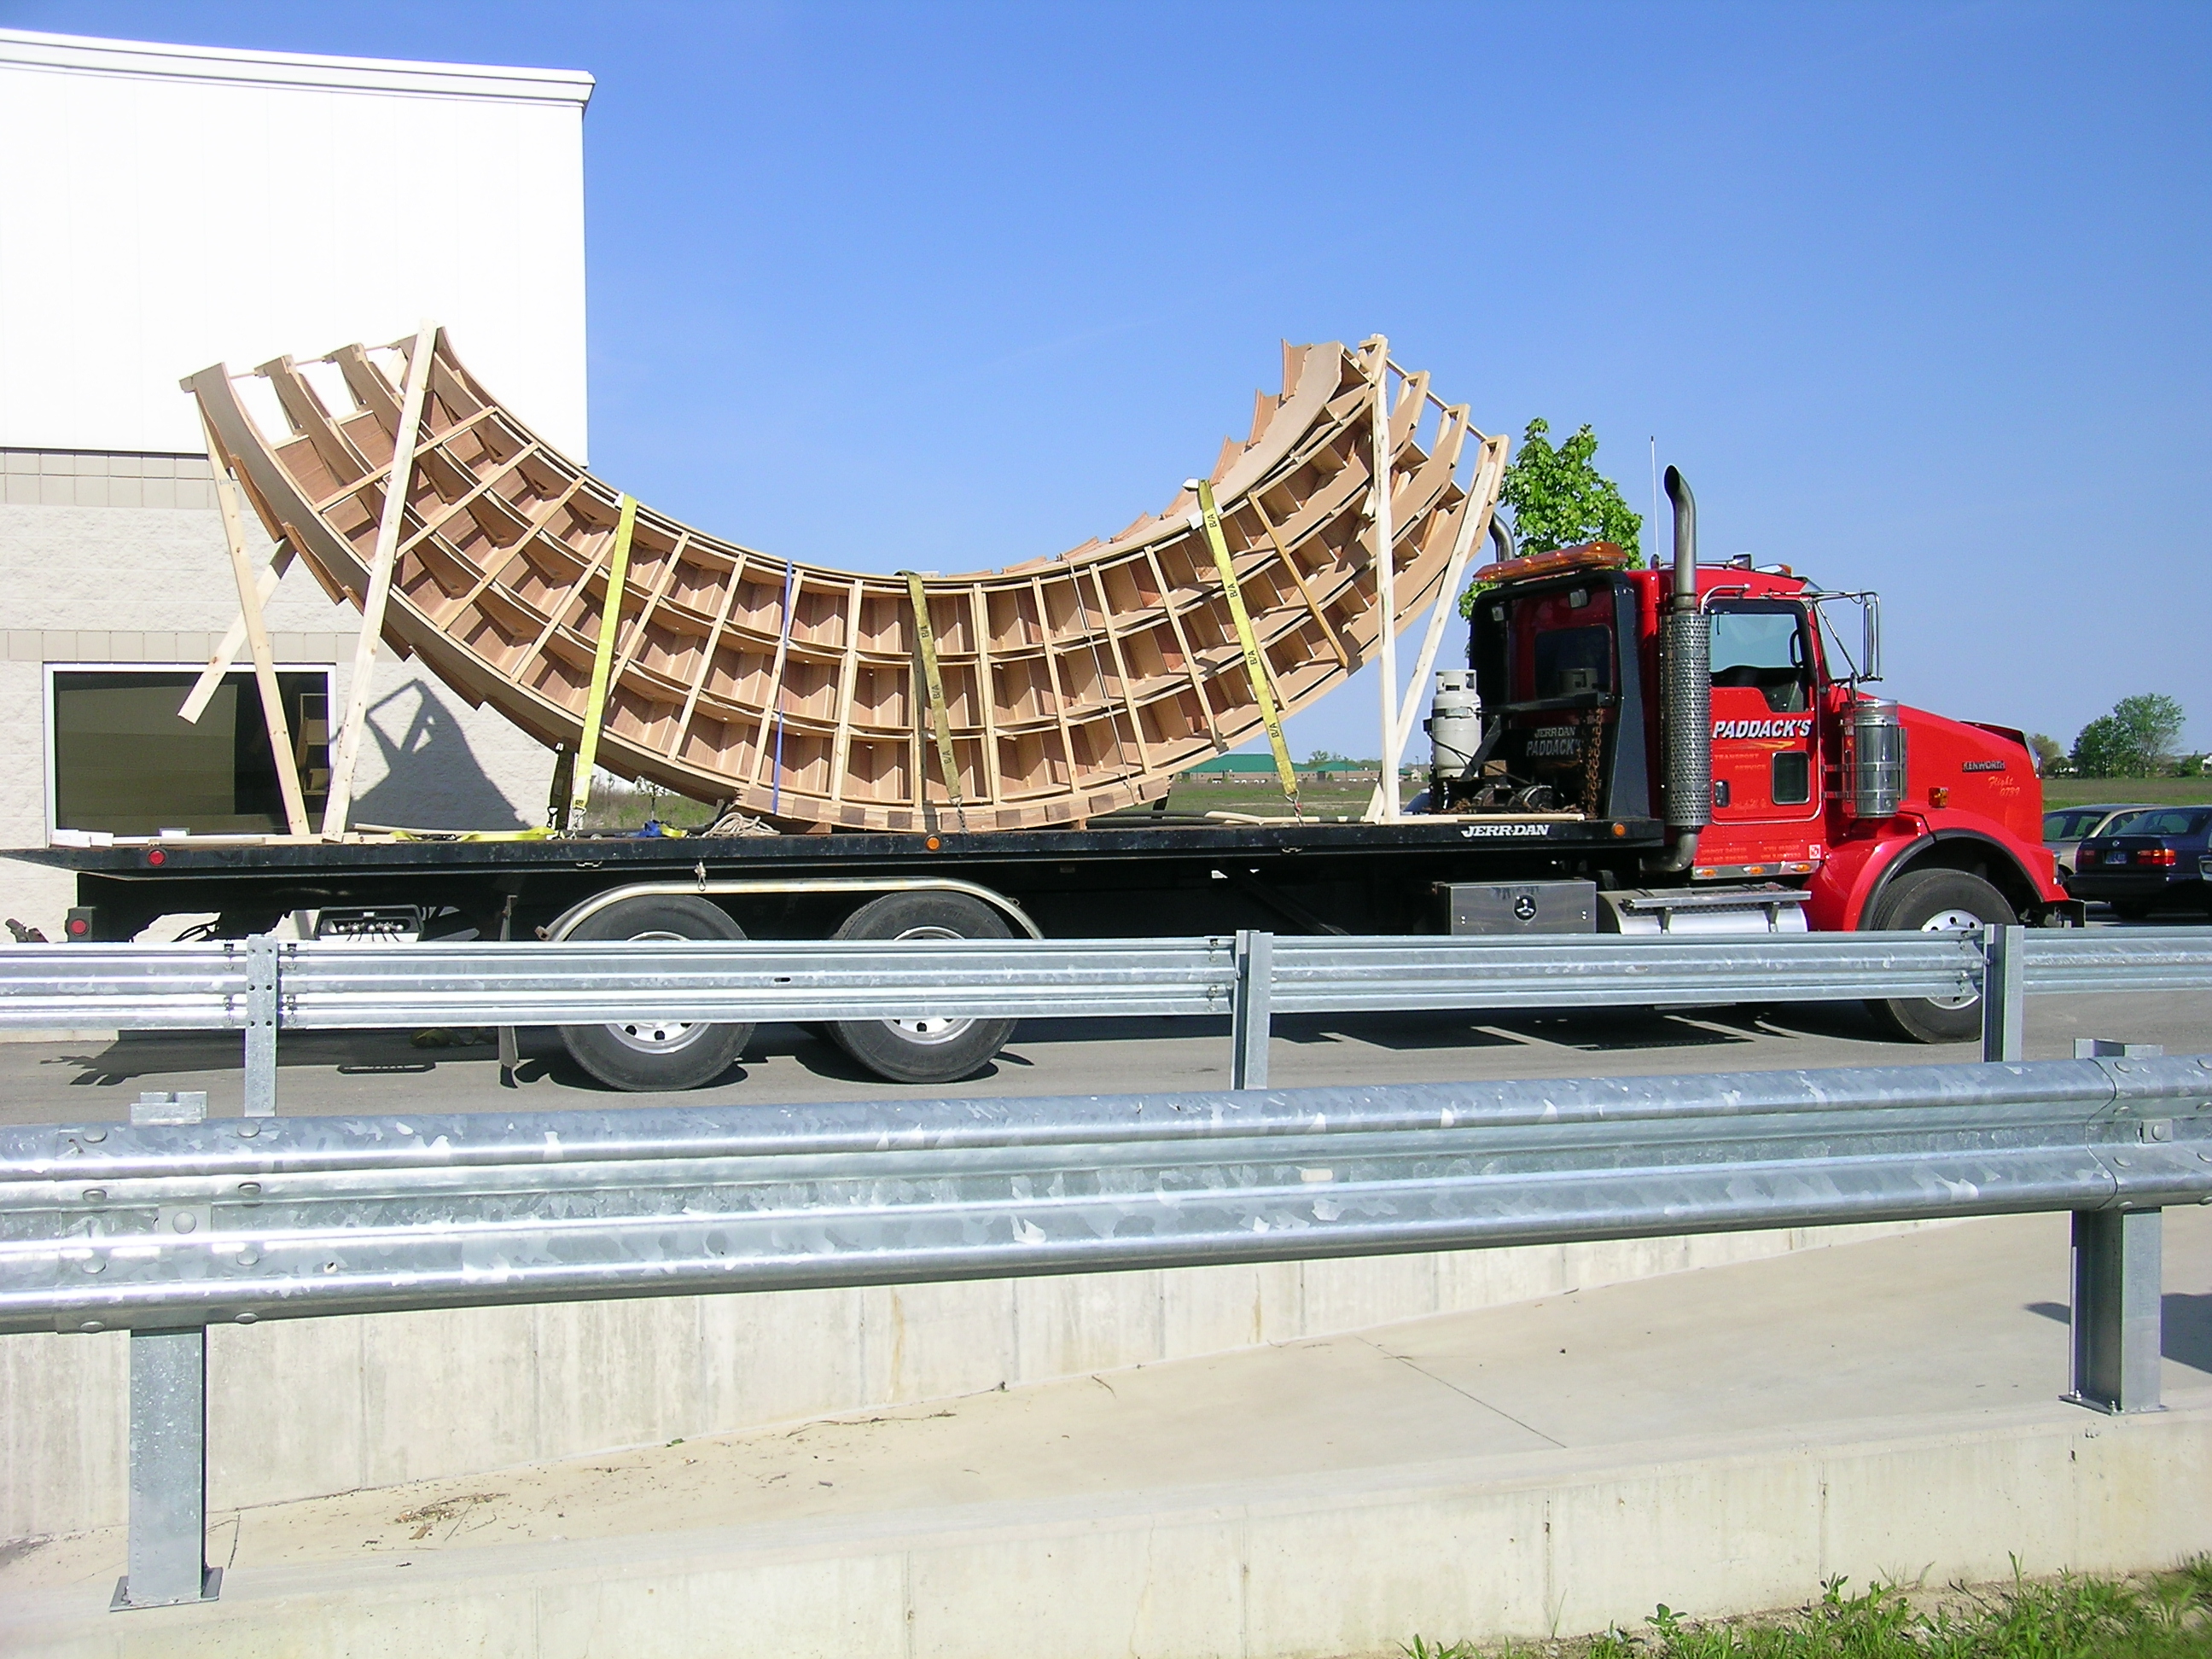
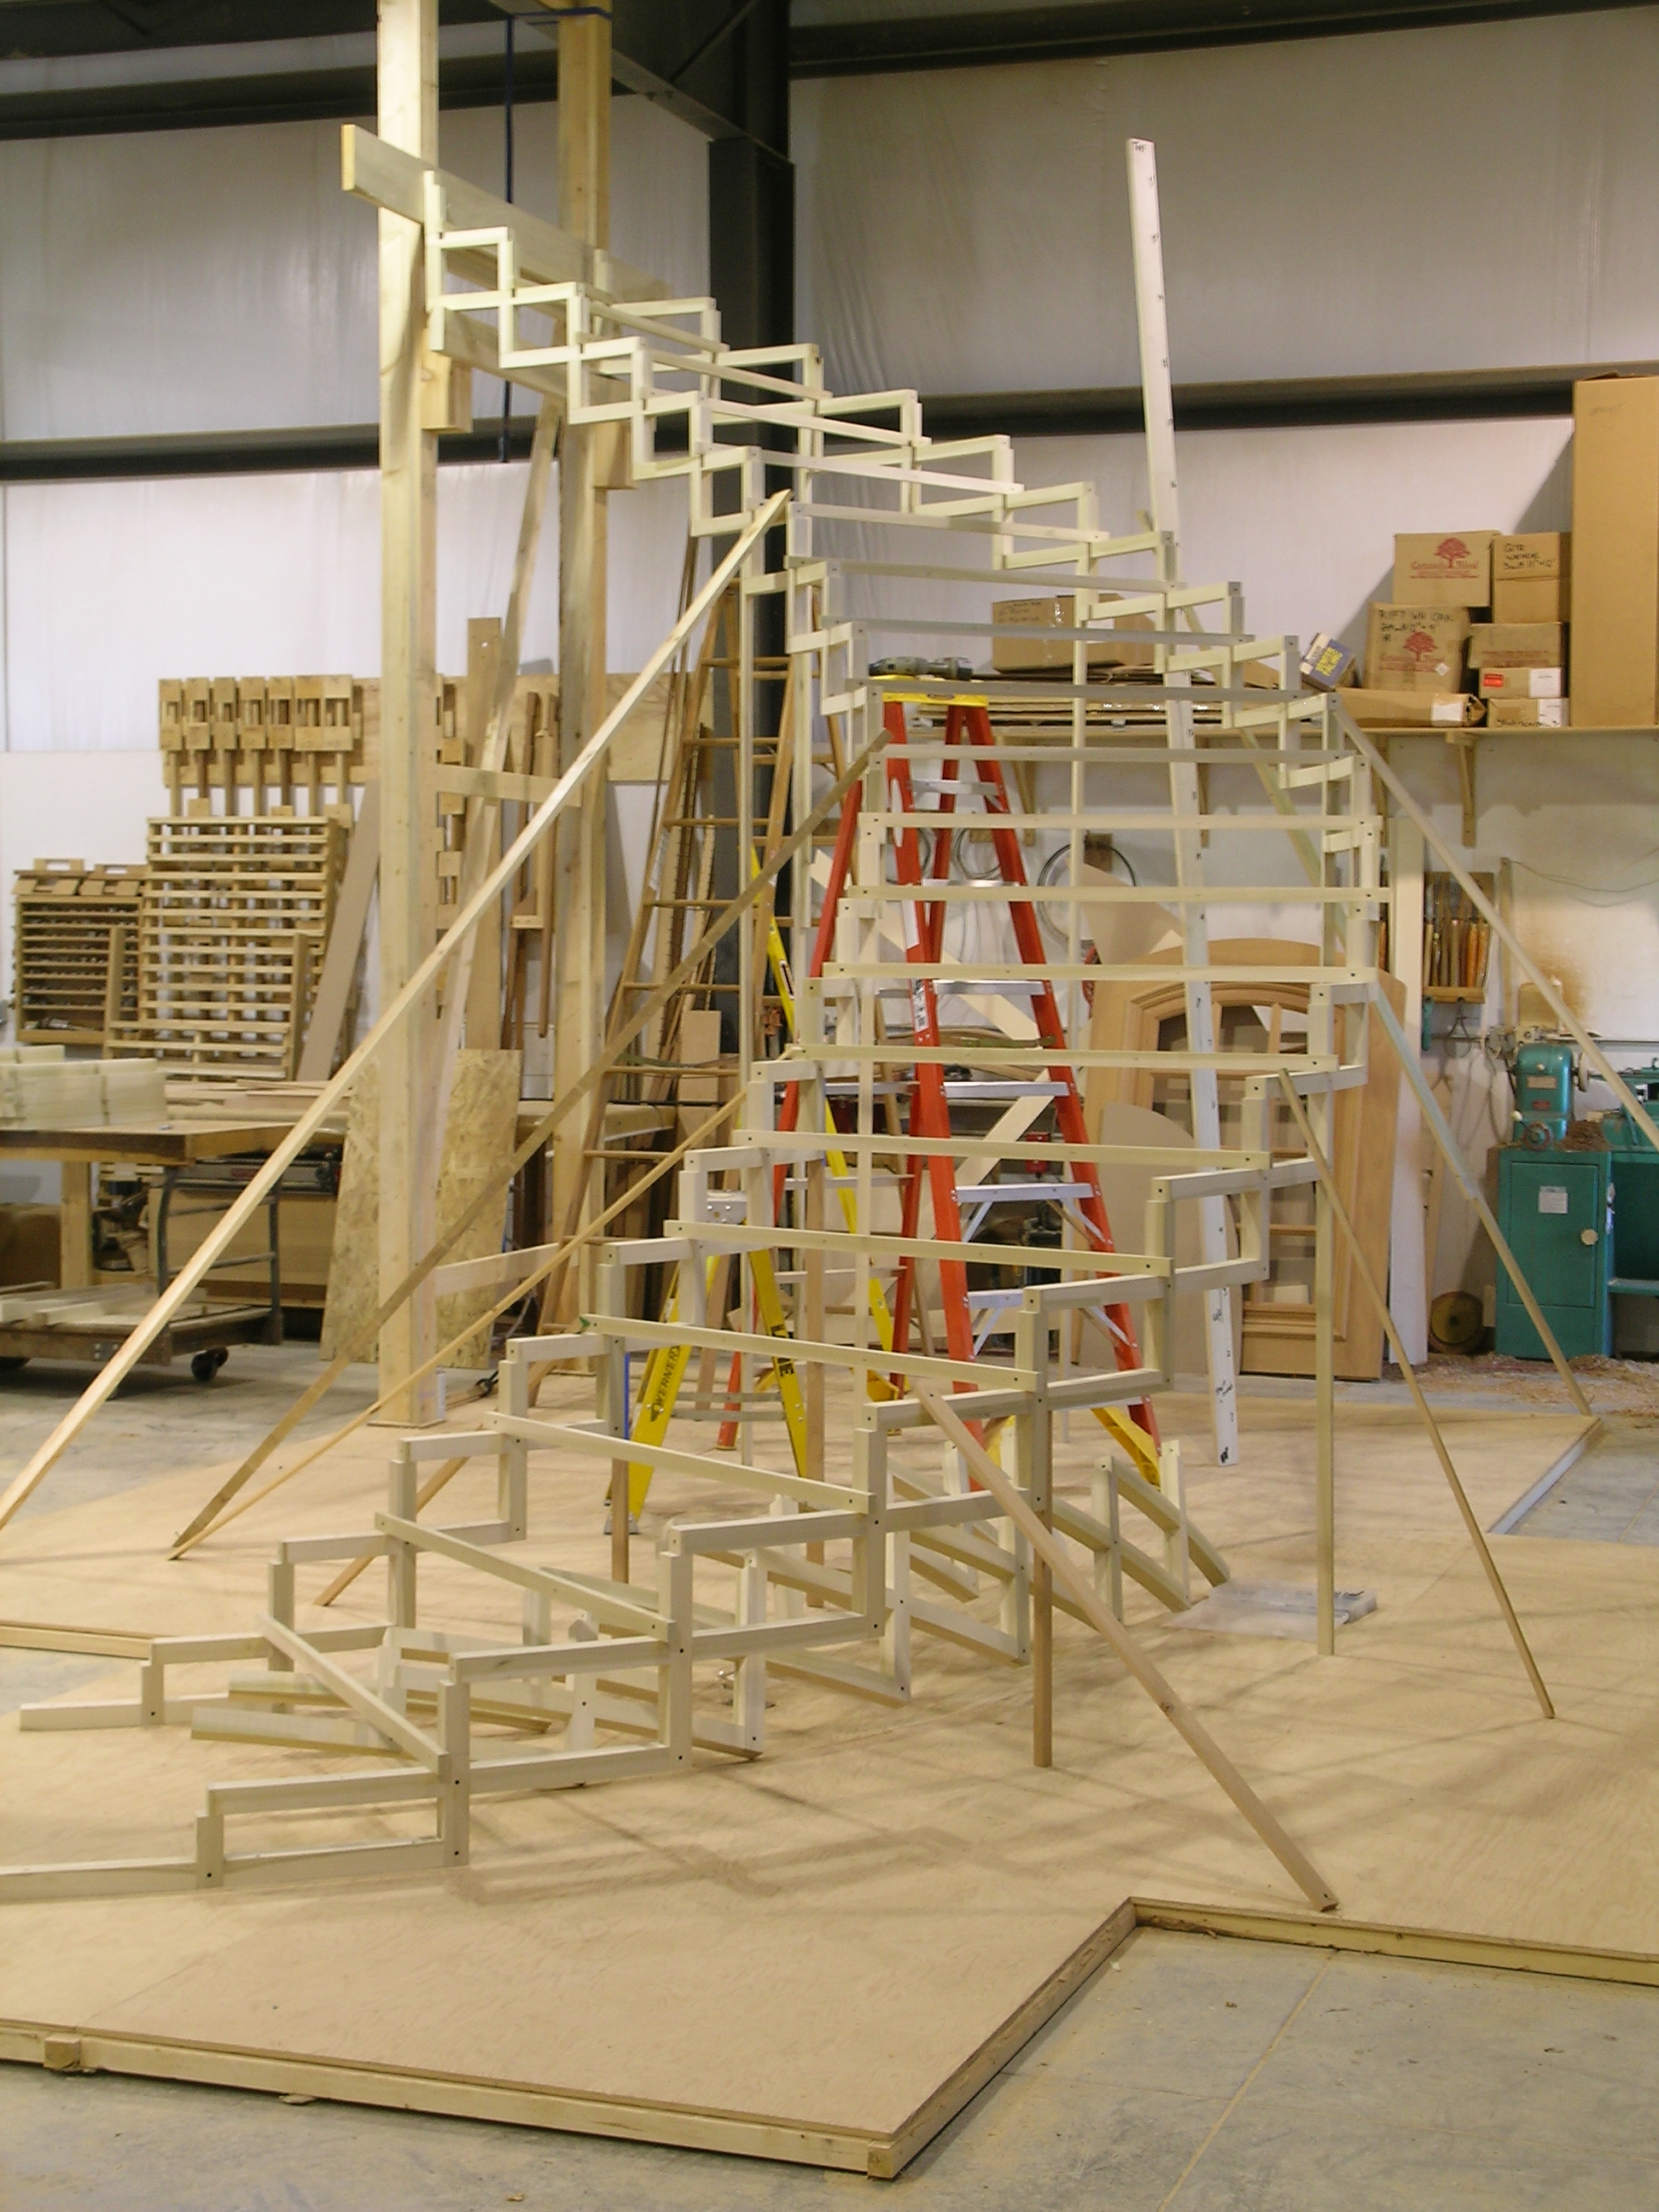
The stick work in the last photo is the heart of the curved stairs, with 1-1/2" sq Poplar or Maple stock half lapped together. This is lifted/lofted from the full size drawing on the floor. Then 1/4" birch shop grade is ripped to width, and cut to fit onto the faces of the sticks, inside and outside, with joints falling on the vertical sticks, staggered and butted. 3 ply on each face of stringers, for 18 plies, all glued and clamped, with large staples into the sticks. Finish ply or solid can be applied to the inside curve and the outside skirt.
This makes the stretchers very strong and stable, as the photo of the stair on a truck shows. We made two of these, and had to store one for a few months while the builder scratched his head. Before we took it down, we carefully measured from one point to another, across the arch. When we loaded onto the truck and strapped it down we measured again. We think it opened up 1/8" from when it was built.
I would love to teach this method to a group of stair builders. I need to retire in the coming years, and I'm afraid this system will be lost. One other guy, my age also, has made a nice living making stairs this way. He taught me the method when we made them in the 70's. It's simplicity lies in the fact that there is no form wall to build, no heavy horses to notch. It can be flared easily, even change direction as the photo shows.
View higher quality, full size image (1944 X 2592)
3/27/17 #16: 180� Curved Staircase ...
David, those look like they are half lapped poplar frames? With a plywood reinforcing skin on either side?
Very interesting technique, looks like it might be a labor, and material saver.
Install day has to be carefully planned, and have plenty of bodies available,but I can see you get to control everything prior to loading.
The little I know, I taught myself with books from around the turn of the last century.
I like your system a lot.
3/27/17 #17: 180� Curved Staircase ...
I think this system is a labor, material, weight and fuss saver over other methods, but then it is the only one I know. The sticks define a rectangle, and the ply makes each a triangle, hence the stiffness.
After a day of drawing on plywood on the floor, a day is spent making the straight and curved radius sticks. Notching is easy, per a vertical story pole that records the third dimension and rise info. These are sub assembled and then prop sticks are made from rippings, again per the story pole.
These props go under as the sticks go together. A level keeps you on line vertically. A side prop may be required to push or pull the frame on line as it rises. At the end of the day, the stair has risen.
If you attach the rise sticks to risers before you assemble, it is possible to climb the stairs as all the sticks go up. Two of us would build a complete stair in a week, using premade tread stock and LJ Smith parts.
3/27/17 #18: 180� Curved Staircase ...
@Adam: I'm at the point where I'm experimenting with my methods. The basement stair for this project we put in and everything except the drilling and fitting up of the steel brackets to the stringers went well. After we got passed that the stair came together wonderfully. Probably the best I'd every seen. So I tried lots of pre-drilling on this one, and I still didn't get the result I would have liked. On to the next idea!
@Peter: Must be nice to have the a kiln! Or the space to put it, ha! Wouldn't fit in my small shop. We've been thinking about a horizontal resaw, I now have another excuse to get one I think. I was thinking a 12" would be good, but now I think I need a bigger one!
Have you had any issues with using two hardwoods for your stringers? Which woods would you consider combining, and which ones wouldn't you? Does ash make a good core material, or was that just what you had on hand?
@Matt: Okomue as in marine plywood? Never thought of that. The decision to go with the veneer is one I will be miffed about for quite some time. After they decided that they then came back and told us they wanted the stringers distressed! We were kinda, um, like, really!? Ever try distressing MDF backed veneer?
Yes, I'll fix it at my cost. Don't really care about the customer, but the builder, on the other hand! I wanna keep him happy.
@David: That is kinda amazing. I would love to visit your shop and pick your brain. How do you deal with spaces that you can't fit a complete stair into? Do you use another method, or does that method lend itself to assembly on site as well?
It always amazes me the vast array of talent and techniques that are used to make these types of stairs, and how much I still have to learn.
@Peter: Which books? Do you know how hard it is to find written material on stair building!?
3/28/17 #19: 180� Curved Staircase ...
Look up "A Treatise on Stairbuilding and Handrailing by W & A Mowat"
Also, anything by George Collings is great too- Circular Work in Carpentry and Joinery is what I have.
I have done some very nice projects with just those 2 texts.
David, I wish I had been near to people with the knowledge to teach this sort of stuff.
3/28/17 #20: 180� Curved Staircase ...
David as good as you are you should write a book.
As long as you leave politics out of it.
3/28/17 #21: 180� Curved Staircase ...
Chris:I glue up 1/2" stock to width needed and surface it down to the thickness I need. the tighter the curve the thinner. What extra expense for solid wood? Labor is labor whether you use plywood or solid wood . The difference in price is negligible. And your bounce would be practically non existent. I too do as others here and after my stringer is bent sized and routed it goes right back on the form. One it doesn't creep and two its out of the way. being solid it also need no cap to be bent to cover less wood cores.
A jib is just that shaped like a jib sail on a ship. A wedge part of the stringers that give the stair a "foot" to sit on. If the stair is oak then all my cores are Oak etc.
Regards .
3/31/17 #22: 180� Curved Staircase ...
We've been building stairs for at least, 300 years now, with tens of thousands of units all over the country. It's a shame there still seems to be no consensus on how to do it.
Everyone seems to be self-taught. Each guy believes his "new ideas" are completely new and the only way to go.
A few questions:
How does a person with admittedly, no formal training and no real credentials, considers himself qualified to construct some of the most difficult geometric stairs in the country?
How does he convince clients to part with money and allow him to experiment?
Where are the architect's along with their approved drawings and engineering calculations?
Lots more questions, no answers.
____________________________
If I were starting from scratch, I think I'd start by reading every old book on the subject first, before attempting to re-invent the wheel. Certainly before asking for random , silly, internet comments like this one.
After 40 years, I've retired from stair building but still have little advice for anyone. I do believe we all must be very bold or very crazy. The day we do it half as good as it was done 150 years ago, we'll definitely have something to brag about.
Interesting thread...
4/3/17 #23: 180� Curved Staircase ...
I went to a site today that has a curved stair going up. I priced it twice months ago, but the builder would not allow me to talk to the homeowner, and the designer is ashamed to have to tell the homeowner he knows little about building curved stairs. The builder just did not want to appear to not know what was up with the stairs. He moved up market a lot with this house, and there are lots of signs of missed opportunities and lost advantages around the place. I hit a brick wall with him, even though we are doing a large and significant entry. House is probably about 2-3M, 10,000s/f.
The stair is about 10 straight rise, then 90 degrees on the following 10 rise, with support at the outer walls and the header.
So the carpenter is on his second set of horses after the owner decided 7-1/2" was too much rise, and wanted it changed. He has the one horse on the wall and is bending 1/4" plywood for the outer curve. Things are going slow. The few clamps still have the price tags on them.
He confesses he has no idea of what he is doing, but he has to get it built. He was intrigued that there is a 9" minimum run line on the treads, among other things. He also confessed he knew nothing about making handrail for the two twisted curves (one at 30" radius and 10 rise!) or even flat curves for the balcony.
The builder was mostly non-communicative. In frustration, I sent him an estimate with a rough sketch of some changes and photos of completed work. I spent some time explaining the futility of ignoring professional, experienced help with a long track record of successful projects. I mentioned how I had seen before the lone carpenter ripping plywood, sweating (or worse, not sweating), and moving real slow. Eating up the clock and material, long before the expensive material arrives on site.
So today was a bit of an affirmation, though it is a bittersweet one. I'll continue to visit and perhaps even do a cost rundown once the chatty carpenter (he was glad for company) gets near the end.
I see a bouncy stair, questionable code compliance, and more expense for less stair than I - or any other professional- could have provided.
4/6/17 #24: 180� Curved Staircase ...
David,
I feel your frustration. I once met a potential customer who needed a quote on a complex stair. The plan called for a u-shaped, completely self-supporting unit with continuous handrail. I told them I thought the stair needed structural steel reinforcement or perhaps moved a bit, closer to a supporting wall.
The customer was put-off by my concerns and told me "the other guy didn't see any problems." I said "maybe you should get the other guy to build your stair." (I was put-off by then)
The other guy did build the stair and it promptly fell down, taking the rim-joist and plaster with it. After that I got called back and we moved the stair against the wall and furnished the handrail.
This was a 30,000 SF estate and the owners (eventually) weren't interested in excuses or anything other than facts.
Your clients may yet come to see things your way. If not, it's their loss.
View higher quality, full size image (2004 X 1679)
6/9/17 #25: 180� Curved Staircase ...
Which way of building curved stairs is more efficient?
The one discussed on this thread or this one?
This one
6/9/17 #26: 180� Curved Staircase ...
Pat - Apples vs orange kayaks. They don't compare well.
The stairs in the Katz article typify the site built stair that gets support from both an inner and outer wall. It needs little inherent strength since it gets support from the walls under it. The framer may well build the 'rough' stairs, and then the trim guy is expected to trim out the stairs to finish. These are 'carpenter' stairs.
The stairs in this thread are supported by an outer wall, or no wall, and have to be made to be self supporting from land to land. This is a much higher level of skill and joinery to make than the site built curves. These are 'millwork' stairs.
6/9/17 #27: 180� Curved Staircase ...
Thanks, good point.
|