Message Thread:
Alcohol dye stain spraying.. use a retarder?
5/8/17

My Sherwin Williams rep gave me straight denatured alcohol as a base for the SW dye concentrates. After experimenting with both alcohol and water as bases, I like alcohol more for both dry time, and a rich look.
Schedule:
-Sand hard maple to 150 grit
-10 grams of dye to 6 oz alcohol sprayed on as listed below
-vinyl sealer at medium 20% solids wet coat
-Lightly scuff
-Toner: vinyl sealer at 6% solids with tint (2) light coats
-After toner flashes, topcoat CV
-Scuff
-Topcoat CV
I do like the results I am getting, but there is still what might be a very slight "sprayed" effect present. It is totally passable, but I am curious if it can be completely eliminated.
I am interested in getting the clearest, deepest look possible, not necessarily production speed.
I spray the panels not straight on, but at about 30 degrees from straight, with a nearly round pattern, using just enough pressure for good atomization. Fluid flow is set to barely wet the wood on a pass. The gun is further away than normal, maybe 12-14".
Is it all technique, or would a retarder help things to blend together in the dye stage even better?
View higher quality, full size image (1200 X 1584)
View higher quality, full size image (1188 X 1584)
5/8/17 #2: Alcohol dye stain spraying.. use a ...
Maybe this angle shows it better.
View higher quality, full size image (1152 X 860)
5/8/17 #3: Alcohol dye stain spraying.. use a ...
Vince,
try adding small amounts of water to the dye stain you mixed with denatured alcohol. it will slow the dry time down and lets it flow a little better. also, you could put less dye in your mix so you have to spray it wetter which gives it a saturated/deep look
5/8/17 #4: Alcohol dye stain spraying.. use a ...
Kevin,
I will give the water reduction a try. Start at 10%?
I think I am spraying as wet as is possible. Any more wet, and it was blowing around, giving faint spots on the surface..
5/8/17 #5: Alcohol dye stain spraying.. use a ...
Try 5% first. Then work your way up if needed. I dont like alot of water in my dye. It makes it wick to the corners.
for what its worth i use acetone. i find it a much better vehicle than water or denatured alcohol.
5/8/17 #6: Alcohol dye stain spraying.. use a ...
Any water in your acetone?
(going to pick some up now.)
5/8/17 #7: Alcohol dye stain spraying.. use a ...
Toning well is almost art. I try and stay away from it. I can't help you with solvent ratios (i use wb dyes/finish) but from what I see you've got the "big box" cabinet look down or as you say the sprayed look. And that's a small piece. How would you feel doing a floor to ceiling end panel? I would think after sealing/toning 2 coats you could put on a real wet almost straight dye with a retarder (bite is not your friend) and wipe it clean to build your color more evenly and not get the "big box" look.
my2cts
good luck
5/8/17 #8: Alcohol dye stain spraying.. use a ...
Bart,
So you are suggesting using the dye as a wipe stain just before top-coating?
I will give it a try..
Should I worry about adding a binder when I do that?
5/8/17 #9: Alcohol dye stain spraying.. use a ...
The old water in the alcohol trick. In my book, it's called gin and tonic!
5/8/17 #10: Alcohol dye stain spraying.. use a ...
Rich,
I guess drink enough of them and the finish will look perfect finally.
I'll try that next.
5/9/17 #11: Alcohol dye stain spraying.. use a ...
Bart is right, toning is a difficult thing to do well, over and over, consistently. In the right hands, perhaps it's profitable, but I've utterly despised every spray-on stain I've ever been forced to use. And, I consider myself pretty dang good with the gun.
Either way, the effect you may be seeing that you don't like is what my rep calls "floculating", all the dye tends to flow together into little minute speckles that give it a tiny bit of a gritty look. Some are worse than others.
The only way I'm aware of eliminating that is to add colorant to your clearcoat instead of directly to the wood. It flows out much more clear without the little speckles.
It's just a challenging thing to do well.
5/9/17 #12: Alcohol dye stain spraying.. use a ...
I have been experimenting all day.
A washcoat before the dye seems promising..
I don't have much trouble with toning. I just make sure it is in 6% solids sealer and very dilute in color. It all blends real well. My problem is that the dye is causing very faint blotching. Nothing extreme. More like some areas go from yellow to reddish where the wood grain turns up.
5/9/17 #13: Alcohol dye stain spraying.. use a ...
Try pre-raising the grain. Spray the raw wood with water, let it evaporate, sand with #220, then tone/stain.
5/10/17 #14: Alcohol dye stain spraying.. use a ...
Well you did pick a tough nut to crack :-) Not light and not dark on maple is a challenge. One mans blotching is another mans chatoyance/figuring. I think you got it surrounded. My thought would be a tinted washcoat or two (not sure of your thickness) followed by a dye or wiping stain, sealer (possibly tinted), check for color, tone if necessary, clear top coat/s. Medium-even colors without the "sprayed look" on maple are a bit of a unicorn. More steps are your friend.
good luck
5/10/17 #15: Alcohol dye stain spraying.. use a ...
Bart,
Thank you for the time..
I still have wash coated samples under way, and will know a lot more once they are finished.
I already have added a wipe stain step to the schedule that helps a lot with the grain and also allows a bit lighter dye coat.
I will post some pictures and explanation of what I have found once I get further.
I think you might be right on the medium colors being difficult on maple. I went to a local showroom and saw many samples that I really did not like. They just looked .like some dye and then a bunch of toner.. very subdued. I want it to be alive!
5/11/17 #16: Alcohol dye stain spraying.. use a ...
I use Transtint dyes, soluble in water, DNA, and a few other solvents. I get the best clarity using water. I did a paneled wall and built-ins that way. You be the judge if you like the look.
I use my normal HVLP gun with a 1.4 mm N/N, with the fan wide open, and hold the gun about 8 - 10" off the work. I move the gun so that the spray just wets the wood but not so much that there is any excess dye that can pool. One coat, never more or it starts to give that muddled, commercial look, as you described. IIRC, this finish was Transtint Brown Mahogany in water on cherry veneer, followed by General Finishes EnduroVar SG.
John
5/11/17 #17: Alcohol dye stain spraying.. use a ...
John,
Did you try to post a photo of the project you described?
I do have some transtint colors, but and using the SW concentrates for this one.
I am finding that the most even results are coming after doing (2) coats of vinyl sealer
on the bare wood, effectively sealing the grain completely. While doing this before any coloring has dramatically improved the results, I still see spots that appear "sprayed" and am next doing to experiment with a spray\wipe application for the dye stain.
So the new schedule is:
-Sand hard maple to 150
-(2) coats vinyl sealer 20% solids, scuffing in between
-Spray dye\wipe (water added to the alcohol to help with staying wet before the wipe
-Sealer, scuff
-Wiping stain
-Clear
-Toner if needed (I am thinking to much toner has been subduing the grain,so I plan to dilute the toner quite a bit on the next round, getting more color out of the dye and wiping stains
5/11/17 #18: Alcohol dye stain spraying.. use a ...
Hi Vince,
Yes, I did try to post a photo. I'll try again. Not sure why you are starting with the vinyl sealer when you want to highlight the grain. That may make the color more even, but it will reduce how much the dye can highlight the grain; it will look subdued. You'll get the most pop by applying dye directly to the wood. To prevent blotching you spray only enough to wet the wood, not so much that there is any excess liquid that can move laterally and soak into the thirsty areas, or pool up in the less thirsty areas and form spots. At least that's my experience. For what it's worth, I've never found a wiping stain that gives the clarity of a dye. I use them, but for different reasons.
John
5/11/17 #19: Alcohol dye stain spraying.. use a ...
Well, pre-sealing seems to eliminate thirsty areas for sure.. while it does push the effect of the grain a bit more to the backround, you can still see it clear as a bell. (not like a heavy pigment toner, which muddies it). Really, it's just not "shimmering" anymore.
Dye applied to bare wood sets off certain areas where the grain turns up for sure. But then you look down the board, and can almost see that the dye was absorbed more in frequent, faint blotches. This color goes from yellow to red, the darker you apply it, and the blotchy areas are red. I would like to be able to eliminate this when needed.
I am able to spray just wet enough that it does not puddle, with same results. It always ends up loading one area more than another. Maple seems to be very prone to this.I guess I will just try literally fogging it on as well before giving up on getting zero blotch with dye applied to directly to unsealed wood. I looked at tons more samples today, including Cambria, Kraftmaid, and Thomasville, and they all had some maple examples with noticable blotch. Very few were pulled off without this effect. The point is, if it is possible to get hard maple to take a decent color without botching at all, I want to know how.
It may seem that I am being overly picky or worried regarding this, but this is how I learn. I want to see what causes what. I am not, nor will ever be a production shop. So rather than learn one way that works, I want the knowledge to apply to each particular project, hopefully realizing the clients highest expectations. Most clients do not understand one bit of this, but isn't that our job? (In a production setting, I would guess no. In that case, having a set of samples to reproduce from every time seems more realistic; not my interest).
5/11/17 #20: Alcohol dye stain spraying.. use a ...
Well clearly I don't know how to post a picture here. Anyway, if you absolutely want no blotching nor color variance, then just spray toner as someone already said. I use Transtint in Sealcoat shellac, but you can put dye in your finish, too. You won't get quite the grain pop as with dye, but the color will be uniform and it's a straight forward process. In my corporate R&D days, processes got complicated when we didn't really understand the key parameters well enough. After we did, the processes got very simple. The take away is, if your finishing schedule has a lot of steps, there likely is a much simpler way to get the same effect.
John
5/11/17 #21: Alcohol dye stain spraying.. use a ...
John,
Thank you for your time on this.
you may not be scaling the photos down enough for Woodweb's file size limit. I would love to see the project you tried showing..
I do want color variance. I want it to look a little antique; even, yet with a subtle backround variance from pale to medium yellow\amber.
I am not interested in a straight toner finish. While that can look nice and clean, it has an unnatural element to it.
I am thinking, judging from looking at other finishers step boards, that regardless of how I apply it, I am apply to much dye stain. I may need to go lighter on the dye, sprayed on bare wood, then seal, then get the rest of the color from wipe stain, then toner if still not dark enough. I had been getting 75% color out of the dye.. this may be more than maple can handle without blotching for this color\saturation.
5/11/17 #22: Alcohol dye stain spraying.. use a ...
Try, try again. If you can see the photo you will see that the color is very clear and pure, but your last posts suggests you want a more complicated look. I recently matched the color on a piece of commercial furniture. To get there I started with yellow dye, then sealer, then a wiping dye/stain (SW's BAC wiping stain that I custom blended), more sealer, then a toner, then the topcoats. The link may take you to a photo of that piece. The drawer on the shelf is from the piece I had to match.
https://goo.gl/photos/ttDQn2ZRptNG6YXa9
John
View higher quality, full size image (2272 X 1704)
5/12/17 #23: Alcohol dye stain spraying.. use a ...
John,
Now I see both photos. Very nice work! The panel wall photo is very close to the color I am going for. Was anything other than dye used for color on this one? Did you pre-raise the grain and sand before the dye?
I think that maybe what I am calling "blotching" may be the nature of woods like cherry and maple.
I just did 4 hours of sample experimenting, and I am finding that sealing takes a good bit of clarity away from the look for sure.
Still not 100% on all this, but plenty of learning is taking place!
5/12/17 #24: Alcohol dye stain spraying.. use a ...
Here's a closer view of the drawer fronts on the cherry wall system, better showing the natural variation in the wood grain/color. I was using veneered plywood, so the only prep. was a light hand sand at 320 grit. I sprayed a 1% Transtint Brown Mahogany dye in water, then a coat of EnduroVar satin. Then I scuff sanded with 600 grit to remove any nibs and sprayed another coat, maybe 3 coats total on some surfaces.
As you are seeing, when you first seal the surface the dye won't give you the same depth as when you apply it to bare wood. So you have to decide which is more important to you, highlighting the grain or a more uniform look. I don't think it's possible to have both. I'm not advocating one over the other; the circumstances of the application are what drive which way I go. You can increase the depth of the finish and unify the overall color by layering stain over the sealed dye, then toner over that for even more depth and uniformity, but with each added step you lose clarity of the underlying grain.
John
5/12/17 #25: Alcohol dye stain spraying.. use a ...
John,
What you are saying makes total sense. Noted. Thank you again for your help.
This is hard! Much bigger learning curve for this over the pigmented lacquers I am used to spraying.
The photo you last mentioned did not show up though.. can you try again?
I am still tinkering with samples. Once finished, I am going to post about what I ended up going with for the project (which starts in a few weeks) \why\what I learned and so forth.
Thanks to everyone here on Woodweb for being so generous with your knowledge in this craft. I promise to help someone one day when I am more experienced!
5/12/17 #26: Alcohol dye stain spraying.. use a ...
Why is posting photos here so difficult?
Vince, here is that photo - maybe.
John

View higher quality, full size image (3264 X 1836)
5/12/17 #27: Alcohol dye stain spraying.. use a ...
Great, wrong photo. OK, how about now?
John
5/12/17 #28: Alcohol dye stain spraying.. use a ...
Sorry Vince. I give up.
5/12/17 #29: Alcohol dye stain spraying.. use a ...
You can send pictures directly to me and I will add them for you - send them via email to webmaster@woodweb.com
5/12/17 #30: Alcohol dye stain spraying.. use a ...
Thanks, but I'd rather you just made it easier to post pictures. I have no trouble on other sites.
John
5/13/17 #31: Alcohol dye stain spraying.. use a ...
John,
Do you bother pre-wetting the bare wood and sanding before using the water dye?
I did a sample yesterday with water dye that turned out really nice, I did not pre-wet, and I can see that the water did open the grain up quite a bit compared to alcohol, which just kind of lays on the surface..
5/13/17 #32: Alcohol dye stain spraying.. use a ...
Vince, it depends on the wood and how far you sand. On cherry or maple, I almost never raise the grain before dying. There's no harm in doing it, but I don't find it necessary. On some other woods, however, like oak, it's a must if you only sand to 150 grit. However, if you sand to 325 or 400 grit you often can avoid having to raise the grain before dying. But I only sand that high when I'm not going to use a stain in the process because stain doesn't take too well after fine sanding. As always, make samples; they will tell you the answers.
John
5/14/17 #33: Alcohol dye stain spraying.. use a ...
Just a little reminder. Veneers and solid are almost apples to oranges when staining/dying. Veneer is much easier because of the thickness. BTW nice job John. I've used Transtint on many jobs in the past before settling of GF's line of dyes.
5/14/17 #34: Alcohol dye stain spraying.. use a ...
One of my favorite methods dying vs staining is using Transtint in Zinsser Sealcoat shellac. You eliminate quite a few coats of different materials.
Shellac is a fantastic base. It has excellent wetout. Many of us wb guys use it to pop the grain. It seals the wood as well as anything else. The transtint mixes into the alcohol solvent perfectly. Most finishes can be applied over the shellac without lifting.
Adding Transtint to the next clear coats as toners will give deeper coverage with no cloudiness.
I've used this technique with qtr sawn white oak. It maintains the rays & flecks while substantially darkening the surface. No loss of depth of feel.
5/14/17 #35: Alcohol dye stain spraying.. use a ...
Bart, thanks for the heads up. I will be doing this finish on some veneered maple ply for the project. I will check that it comes out matching before starting any finishing.
Adam, I agree that shellac with a bit of tint could match this color really well. That said, I have learned so much about multi-step finishing, plus I can use all Sherwin Williams products in an approved sequence to do this finish, so I will most likely stick with the schedule I came up with. I did once use amber shellac to match some aged oak flooring on a transition piece I had to make. It does work well for amber.
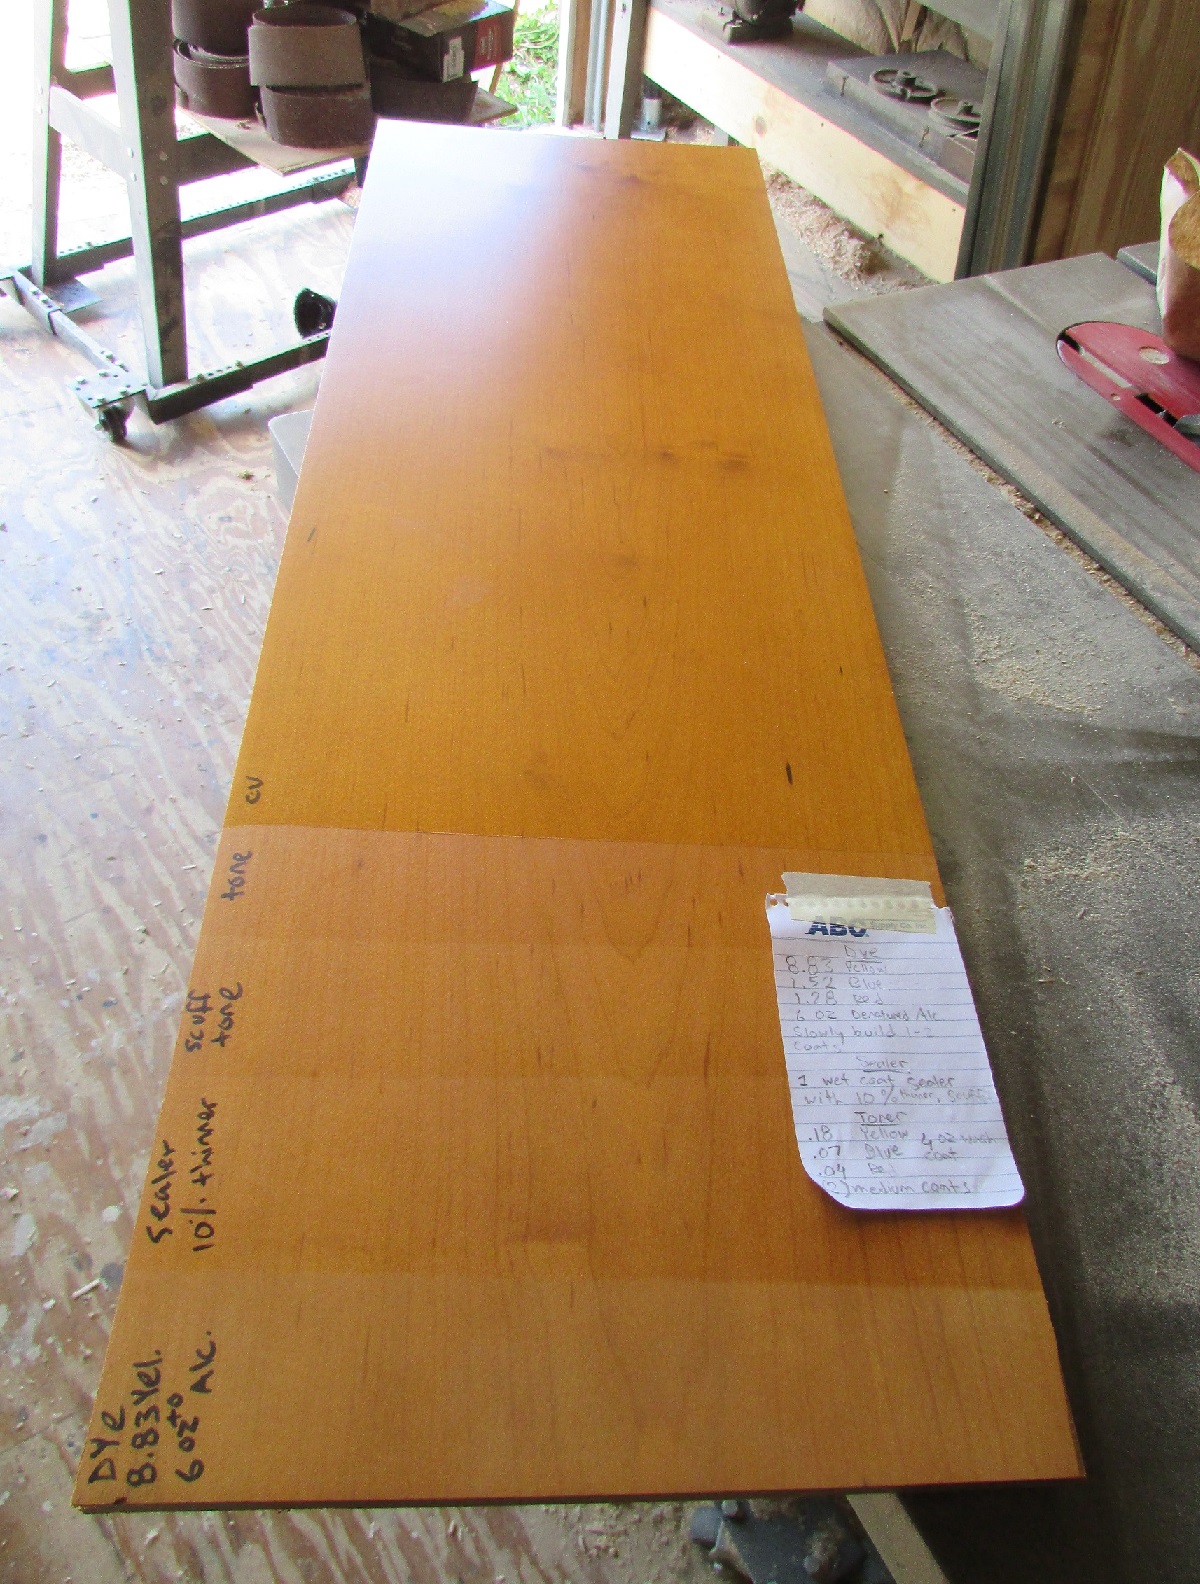
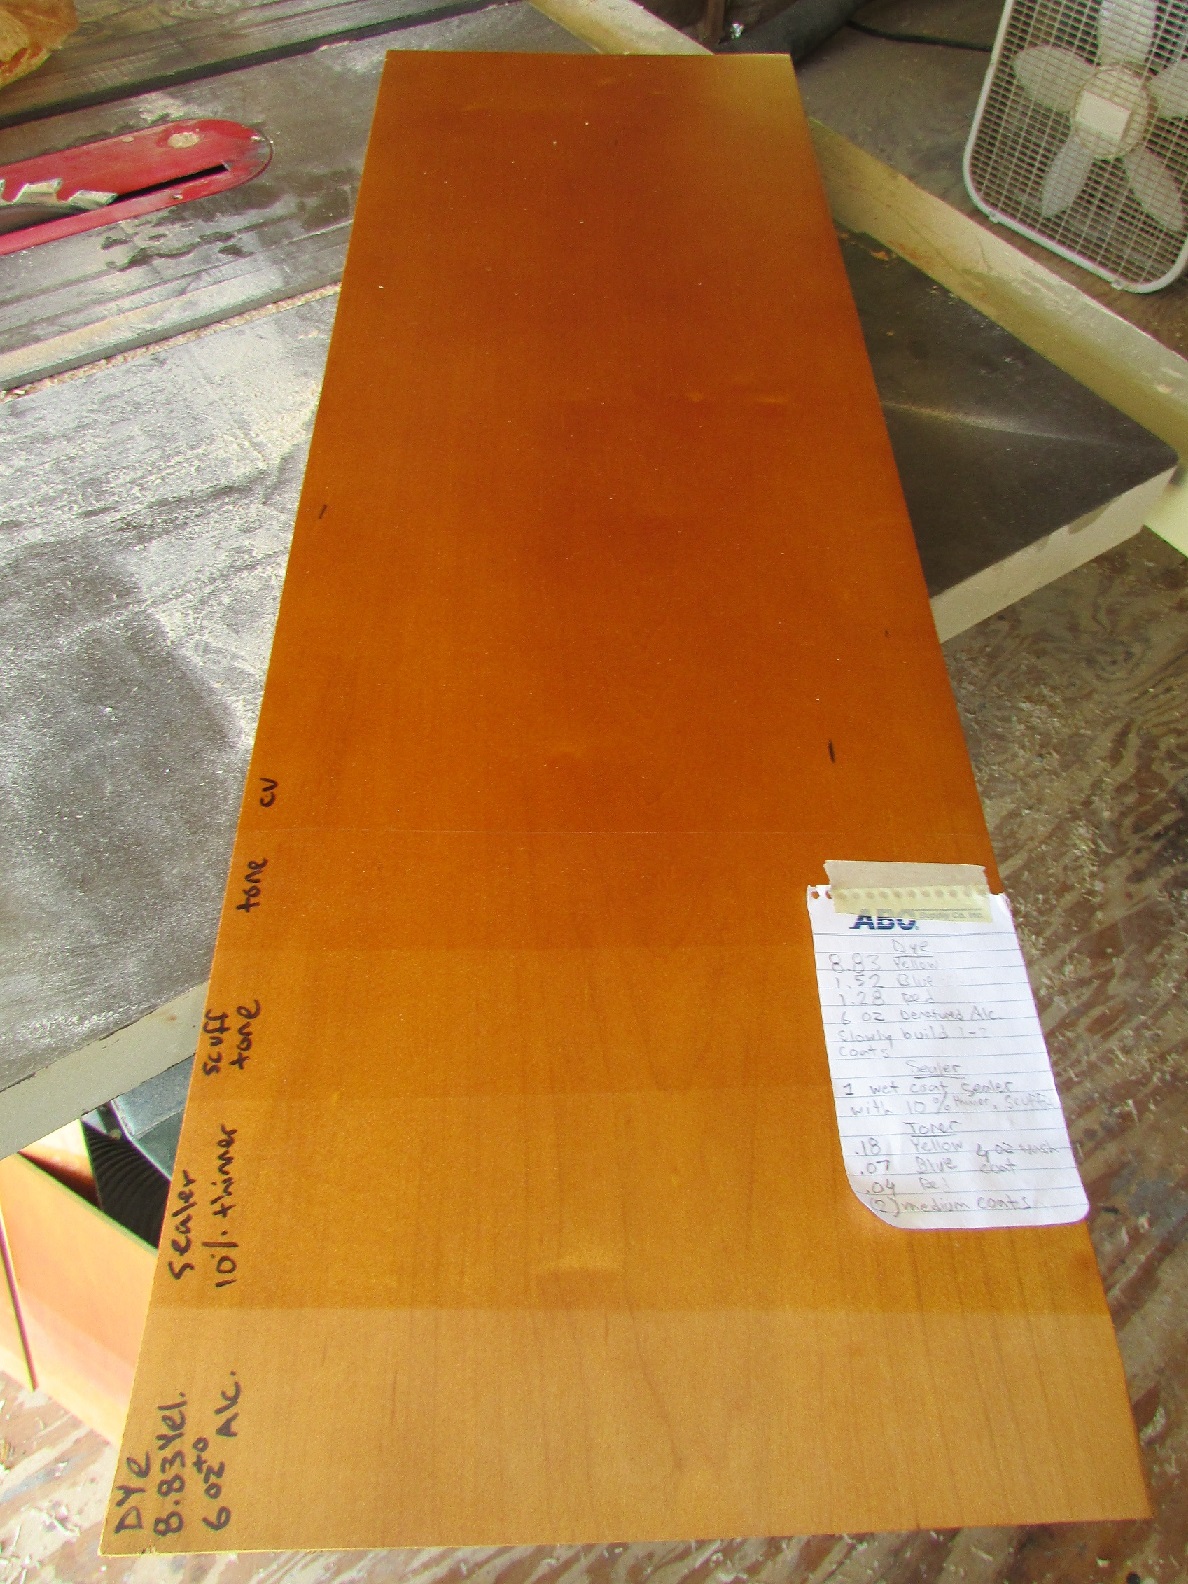
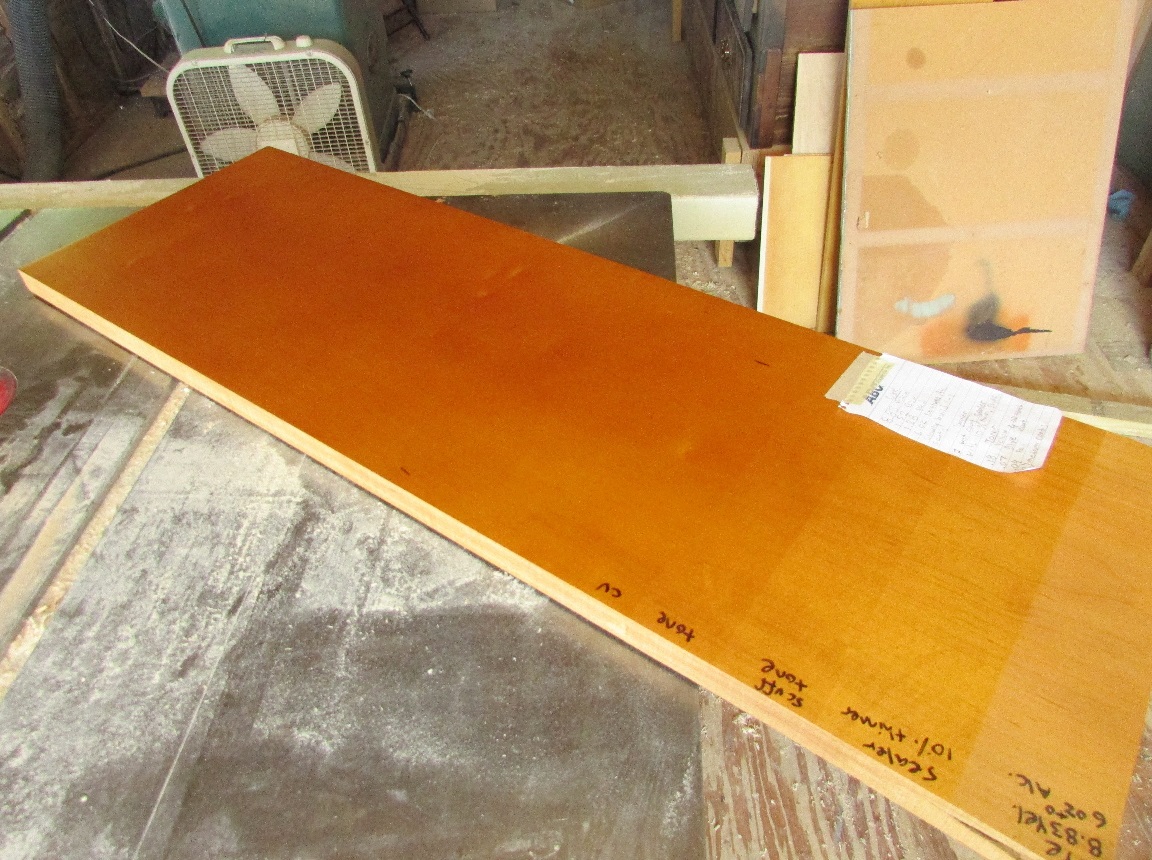
6/10/17 #36: Alcohol dye stain spraying.. use a ...
I am well into the project, and wanted to share what I ended up with for a schedule. Maybe this can help someone who is looking for both clarity of grain and consistency of color in an amber maple finish.
-DA sand bare wood 150 grit
-Fog distilled water reduced dye stain on from about 24" away, building to final color in about 4 passes check with control sample, lightly wiping between passes
-Wash coat 8% solids
-Scuff maroon
-Wash coat 8% solids
-Scuff maroon
-Lightly spray BAC wipe stain, rub in with
"seasoned" rag, wipe off with clean rag
-Vinyl sealer 20% solids
-Sand sealer flat with 320 grit
-Two light coats of dye stain toner 8% solids, light scuff gray after each
-Bright rubbed CV
-Sand 400 grit
-Topcoat dull rubbed CV
I know, it sounds like a lot. I think it is worth it for the look it gives. It is very clear, showing all the drama that maple has going on, with really no blotch to speak of (only if I miss a spot during sanding does the wipe stain blotch.. and it will).
The biggest barrier for me learning this finish was dye spraying technique. What I found, right towards the end, was that the dye has to hit the wood like a mist, only. If it is any heavier, it will subtly stripe, or give a spotty, rattle-can look. Very subtle, but the difference is clear on a finished piece, in person.
I believe that adding the dye concentrate to water, vs. faster drying solvents helps give the mist coat of dye some time to consistently ease-in to the top couple thousandths depth of the wood. I bet there are plenty of finishers who can get it to look amazing in alcohol, acetone, or laq. thinner, just not this one, yet.
I also found that a quick wipe with terry-cloth after about two of the four passes seams to help it "ease-in" more evenly as well.
Another real difficulty with the dye, as many have mentioned, is color consistency. In other words, the amount of dye that goes on one piece compared to another. To deal with this, I ended up keeping my step board with me for any dye spraying. The only problem is that the step board is very dry, while freshly sprayed parts look a bit lighter and brighter until they dry out well. I wish I could say there is a way to learn when to stop adding dye that isn't tons of practice, but it seems to be. For my color in particular, I found that I want the dye on raw wood to look as yellow as possible, without any red appearing - my amber color goes right from yellow to red at one point.. pretty quickly I might add. So to sum it up, it seems the best way to control how deep the dye goes on is a refined and attentive eye, and most importantly, one that knows what signs to look for that it is dark enough. The stuff can look totally different with just an extra light coat.
I also find it very beneficial to lay out certain groups of doors and drawer fronts that will eventually be installed near each other and trying to dye them all at once. This goes a long way towards consistency, and also allows you to see a lot of the color at once, making it a bit easier to decide that all-to-critical moment of quitting adding dye.
As for the wipe stain, I settled on the two wash coats by making sample boards. One coat did pretty well, but two with some good scuffing between really lets the grain show clearly under the wipe stain. Unlike the dye, the approach for this is more decided in the eye of the beholder. Different looks are different looks.
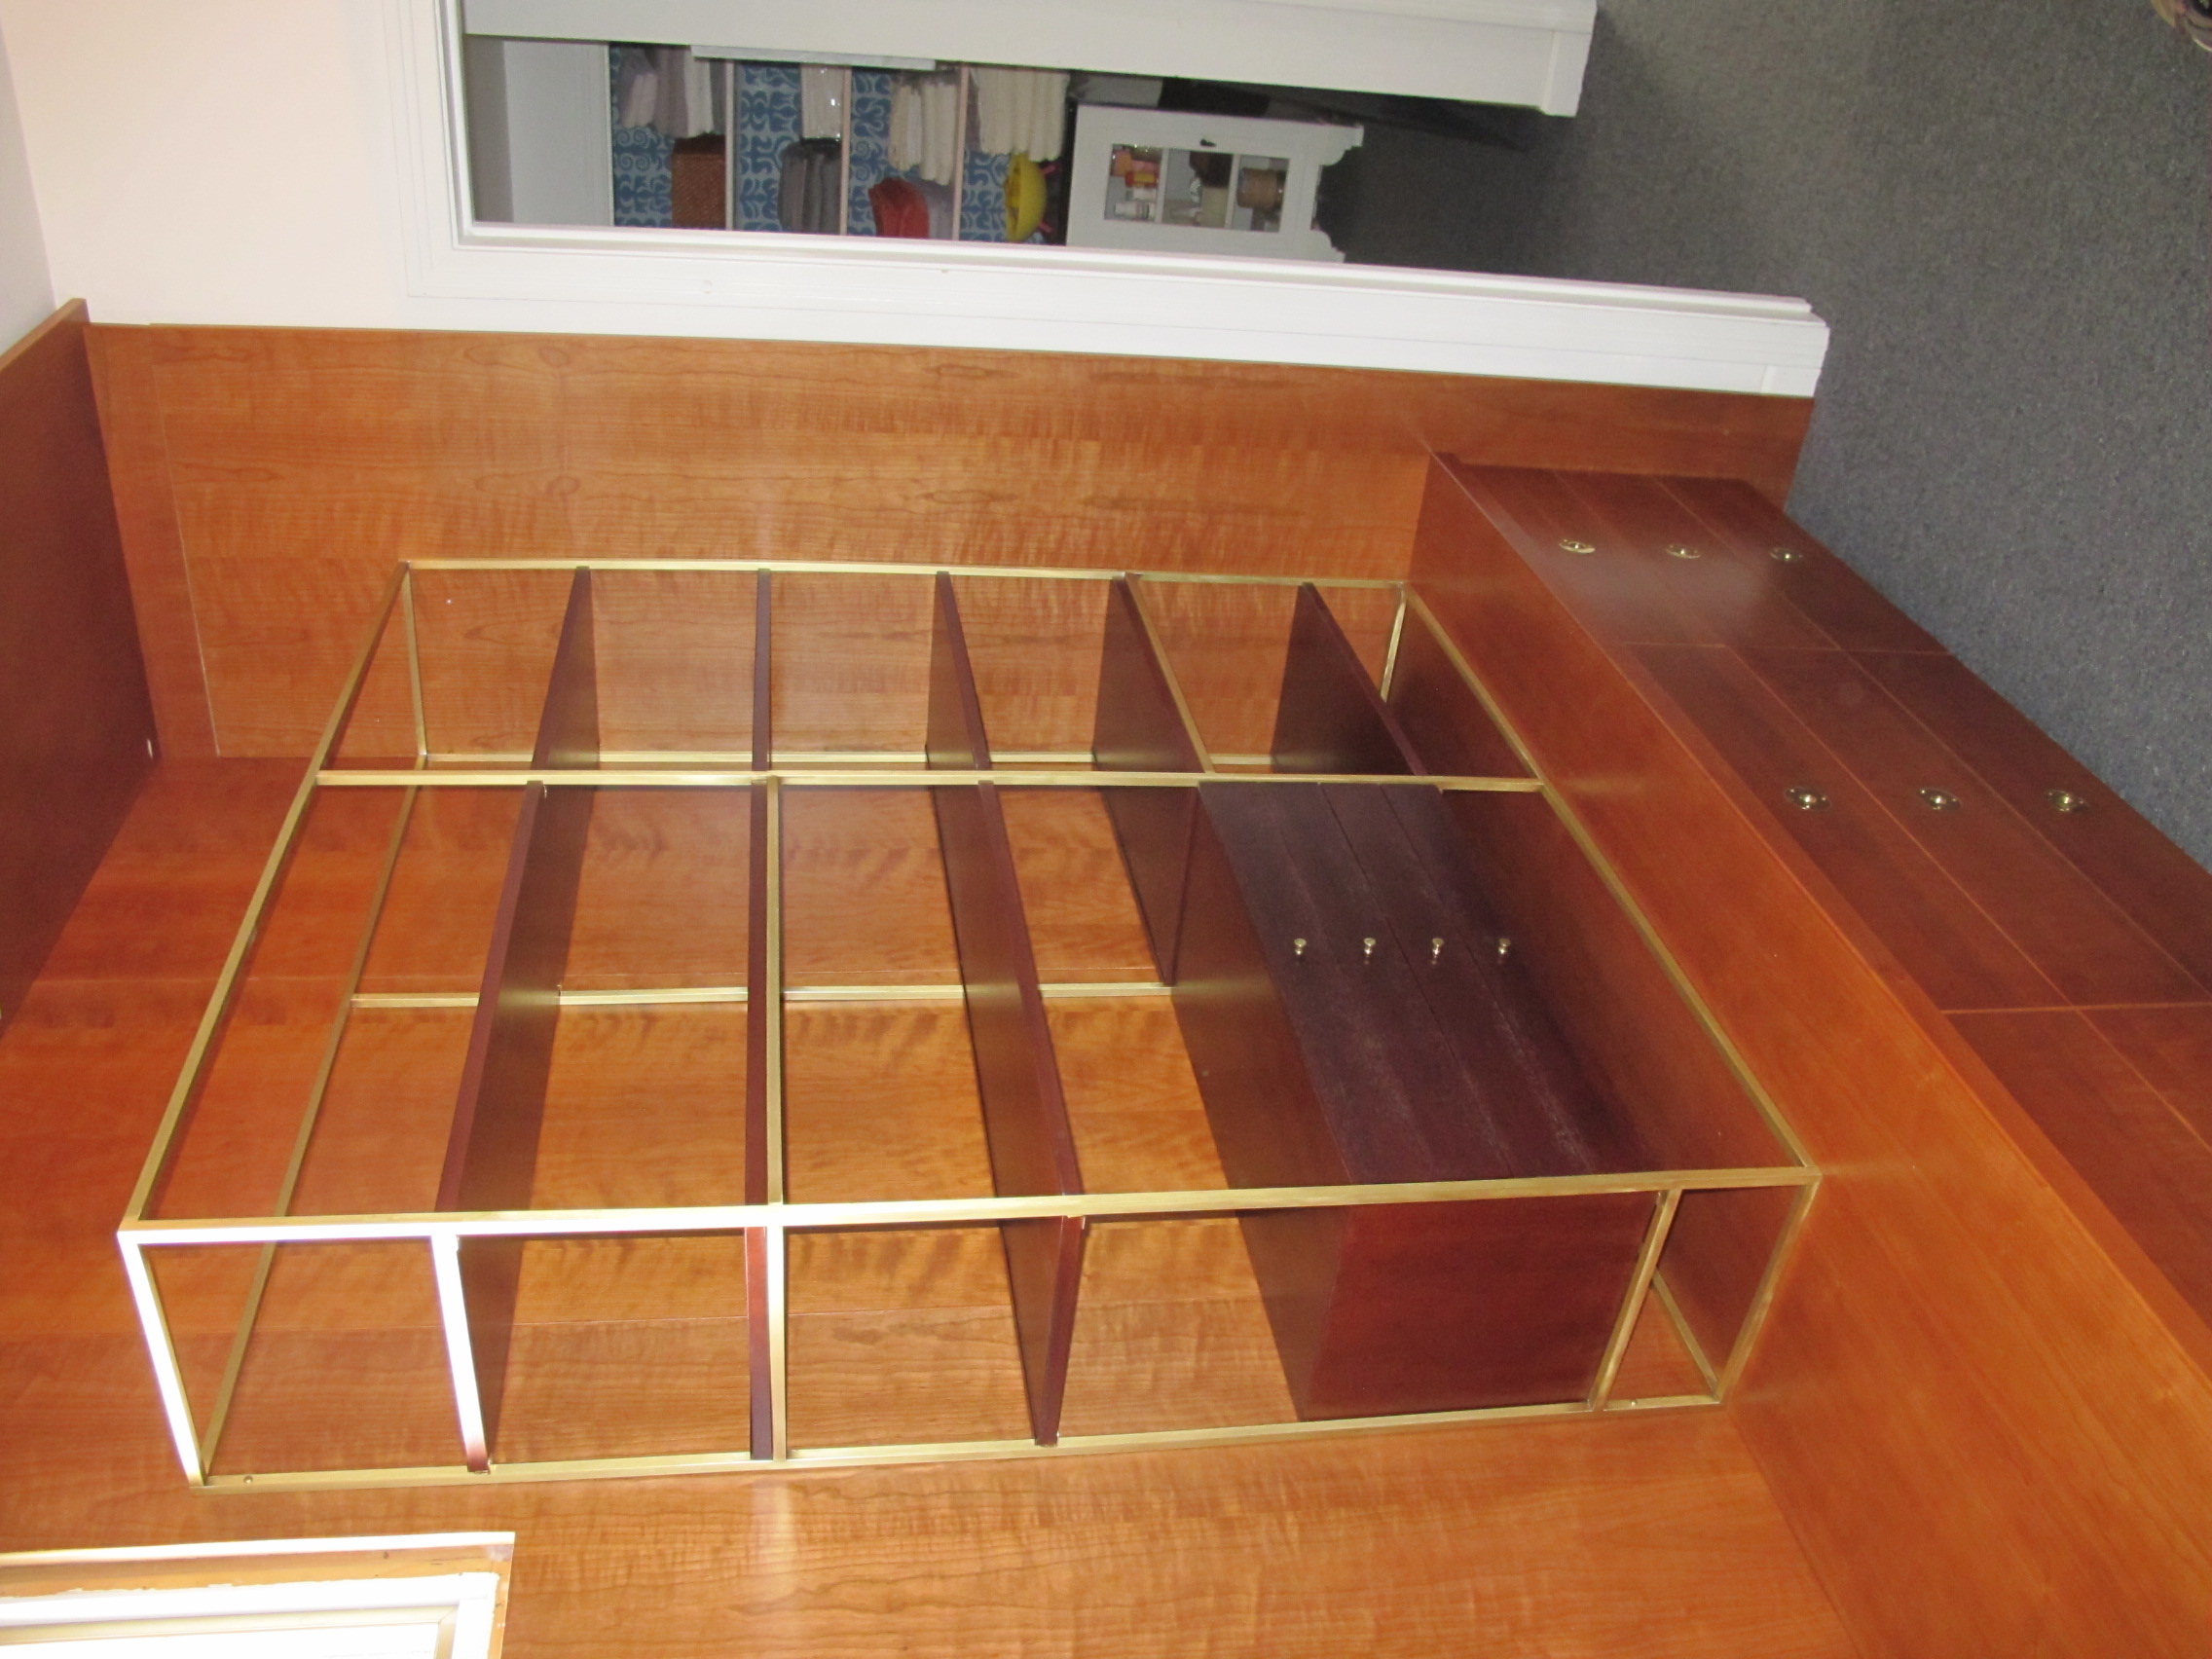
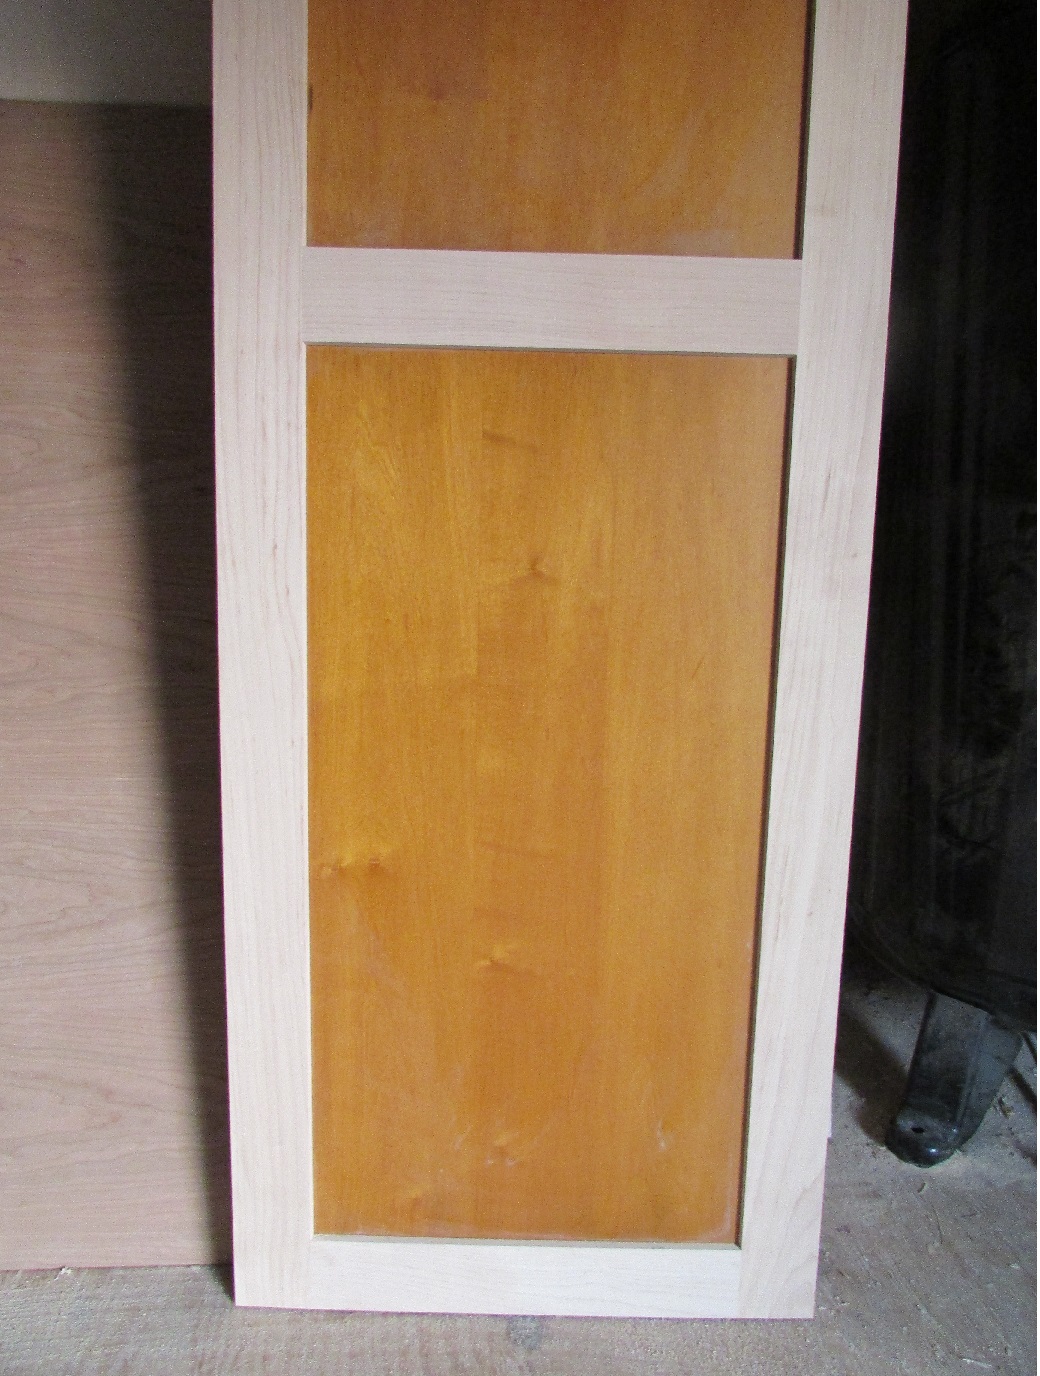
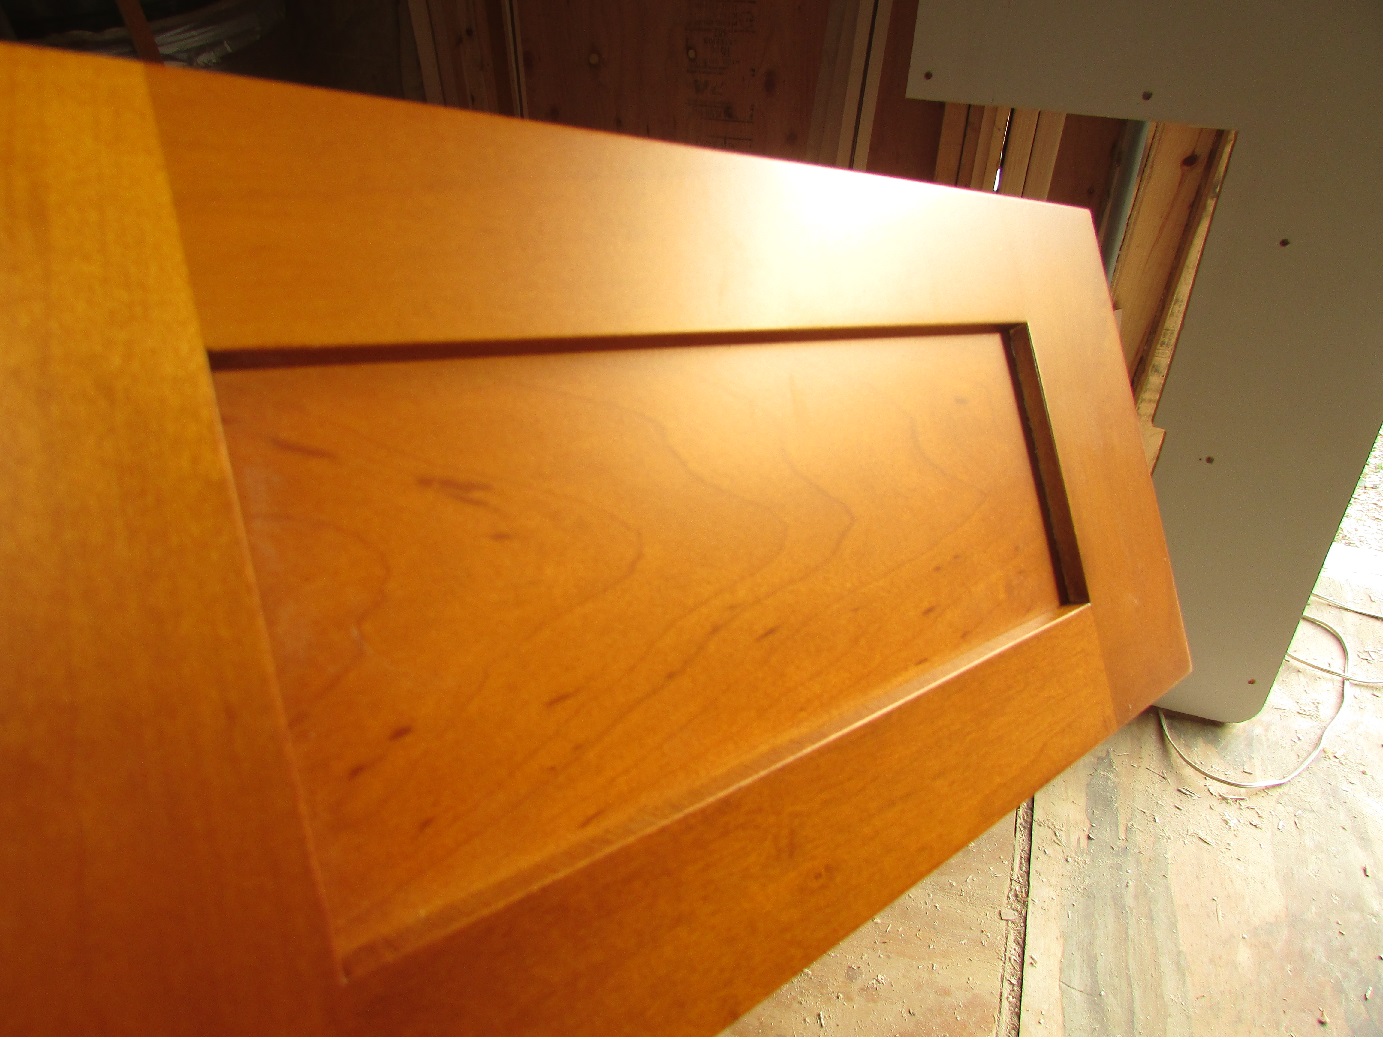
Attached are photos of the final color, now in production. The pantry door panels have the schedule finished up the 20% solids seal coat. The drawer face is finished totally.
Thanks everyone who helped!
View higher quality, full size image (1040 X 1376)
View higher quality, full size image (1392 X 1040)
|

