An Insider's Guide to Specifying Hardwood Flooring, Cabinetry and Decorative Millwork
Reprinted with permission from The Hardwood Council website.
Case #1: Profiles in Creativity: Stacked Mouldings
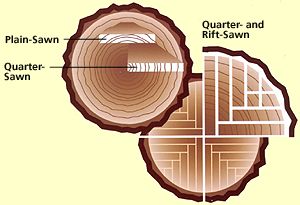
Case #2: A Rift in Specifications: Sawing Methods
Case #3: Custom Floors, Affordably
Case #4: Smart Use of Materials: The Choices are More Than Clear
Case #1: Profiles in Creativity: Stacked Mouldings
The Challenge
The Solution
What You Need To Know
Lumber Dimensions
A hardwood tree may be 55 feet tall and 24 inches in diameter, but it will yield boards that are no more than 12 inches wide. Mouldings, then, will necessarily be narrower than that. Larger trees may yield wider lumber, yet wide boards are more difficult to work with because of hardwood's natural expansion and contraction characteristics. Since standard minimums are 5-inch widths for upper grade hardwood lumber, an alternative is to build a custom moulding from multiple stock profiles -- a process called stacking.
Stacked Mouldings
Species Substitution
Species substitution works especially well in decorative applications above eye-level -- crown mouldings and recessed ceiling panels, for instance. More functional millwork applications, such as railings, door and window trim, also present good opportunities to specify a lower-cost hardwood species.
Building Your Hardwood Knowledge
How Hard Are Hardwoods?
Solid Advice
-- Stack standard mouldings to create custom millwork while reducing material costs.
-- When budgets are tight, one hardwood can be stained to resemble another. Several abundant light-colored species can look like darker hardwoods.
-- The cost of hardwood products varies from region to region. Be creative with species that are abundant in your part of the country. This may significantly lower the price of a project.
-- For more information about installing and finishing hardwood millwork, see Hardwood Flooring and Millwork Finishing Options: Pre-Finished or Site-Finished? and Working On-Site with Hardwood Millwork.
Create an ornate, custom 14-inch crown moulding for a conference room and hallway. The client wants cherry, but has a limited budget.
Design the crown moulding by stacking a combination of stock moulding profiles. Use poplar with a cherry stain to achieve the desired appearance. Specifying stock profiles and a more abundant hardwood species can reduce material costs by more than 60 percent.
Why You Can't Get 14-Inch Mouldings from a 24-Inch Diameter Tree
Nature pre-selects the color, grain pattern and character of each hardwood species. It also determines the available dimensions for North American hardwood lumber.

An intricate moulding design can be created by combining individual profiles through "stacking."
Through stacking, several complementary stock profiles are joined to create moulding with a custom look. More than 350 standard moulding profiles are produced in the United States and each typically costs $200 - $300 less than a custom profile. If that doesn't sound like much for a custom appearance, consider that an elaborate crown moulding can combine up to 10 separate profiles. Creating one-of-a-kind profiles can boost project costs by several thousand dollars -- and that's before the lumber in purchased.
With more than 350 stock profiles available, custom profiles often are an unnecessary expense.
The Right Look at the Right Price
Another way to manage cost is to let the finish make the presentation over the natural grain or color. Some lighter-hued, close-grained hardwoods, such as poplar or basswood, often are stained to resemble other species.
The Relative Abundance of North American Hardwoods
*Includes Sap Gum, Basswood, Cottonwood, Hackberry, Hickory, Pecan, Birch, Beech, Tupelo, Elm, Walnut and other Hardwoods. Source: United States Department of Agriculture (USDA) Forest Service
Each North American hardwood species has unique physical properties and there are wide variations in their relative hardness. The hardest species are well-suited for commercial and residential applications with high traffic and heavy wear.
-- Specify hardwood lumber in widely available dimensions to control costs. Generally, in any species, hardwood lumber that exceeds 10 inches in width commands a premium.
| | |
| Total Pounds of Pressure Applied Before Marring Occurs | |
| | |
| Species (Kiln Dried) | Pounds |
| | |
| Hickory, Pecan | 1,820 |
| | |
| Hard Maple | 1,450 |
| | |
| White Oak | 1,360 |
| | |
| White Ash | 1,320 |
| | |
| Beech | 1,300 |
| | |
| Red Oak | 1,290 |
| | |
| Yellow Birch | 1,260 |
| | |
| Green Ash | 1,200 |
| | |
| Black Walnut | 1,010 |
| | |
| Soft Maple | 950 |
| | |
| Cherry | 950 |
| | |
| Alder | 590 |
| | |
| Yellow Poplar | 540 |
| | |
| Basswood | 410 |
| | |
| Aspen | 350 |
| | |
| (Source: Wood Handbook- Wood as an Engineering Material, USDA, Washington, D.C.) | |
| | |
| | |
| Species | Dimensional Change |
| | |
| Ash | 10/64" |
| | |
| Basswood | 10/64" |
| | |
| Beech | 14/64" |
| | |
| Butternut | 8/64" |
| | |
| Cherry | 9/64" |
| | |
| Hard Maple | 12/64" |
| | |
| Hickory | 11/64" |
| | |
| Oak, Red and White - plain-sawn | 11/64" |
| | |
Oak, Red and White - quarter-sawn | 7/64" |
| | |
| Oak, Red and White - rift-sawn | 7/64" |
| | |
| Pecan | 11/64" |
| | |
| Soft Maple | 9/64" |
| | |
| Walnut | 10/64" |
| | |
| Yellow Birch | 12/64" |
| | |
| Yellow Poplar | 9/64" |
| | |
| (Source: Architectural Woodwork Institute, Architectural Woodwork Quality Standards, 6th Edition, p. 36) | |
| | |
Check the Moisture Content
Moisture content is the amount of moisture in wood, expressed as a percentage of its oven-dry weight. The proper moisture content for kiln-dried hardwood products varies in different regions of the country. When receiving a shipment of hardwood paneling, flooring, millwork or cabinetry, pull out several sample boards and use a hand-held moisture meter to measure their moisture content. The figure should closely match the one recommended for your part of the country. If it doesn't, take the following precautions:
Let Hardwoods Adjust to Their Surroundings
Sawmills dry and condition hardwood lumber to the moisture content expected in service. During transport and storage, hardwoods can accumulate moisture or become too dry. To avoid problems, let hardwood products adjust to the site before installation. Here's how:
-- Have hardwood products delivered after all windows and doors are installed, and masonry and plastering are complete.
-- With the home's HVAC system operating at a normal level, unbundle and store hardwood paneling, flooring and millwork for three to five days in the room where it will be installed. If delivered before the HVAC system is operational, store the material in a dry environment until you can follow the instructions above.
Plan for Natural Expansion and Contraction
Here are a few important installation tips for minimizing expansion and contraction of hardwood paneling, flooring and millwork during seasonal changes in relative humidity:
-- Install hardwood paneling so it moves across the grain. Use narrow widths when possible.
-- For large areas, such as paneling, leave an expansion gap to accommodate the natural expansion and contraction, based on changes in humidity specific to your region. Conceal the edge with baseboards or mouldings.
Solid Advice
-- Specify hardwood sawing methods based on appearance and cost. You can effectively manage how much hardwoods shrink and swell by letting them adjust to a new environment. Control moisture content through proper storage and care of hardwoods at the work site.
-- Plain-sawn hardwoods of any species cost significantly less than a quarter-sawn counterpart. Rift-sawn hardwoods are very expensive and have limited species availability.
-- For more information on maintaining hardwood products before and after installation, see Installing Hardwood Floors over Concrete Slabs and Hardwoods in the Bath: Finishing for Wet, Humid Environments.
Case #3: Custom Floors, Affordably
The Challenge
The Solution
What You Need To Know
Design Techniques
How They're Made--
The components then are joined with glue or urethane adhesive. When the inlay is dry, edges are routed to match the tongue and groove joints for the rest of the hardwood floor, and the inlay is set in place.
To create more dramatic inlays, hardwood components are sometimes saturated with aniline dyes to add color and contrast that remains even after resanding.
While stock inlays are becoming plentiful, it is also relatively easy to create customized designs with details as intricate as a family crest or map of a favorite vacation island.
Stenciling
Here's a step-by-step guide to creating a stenciled hardwood floor:
-- Clean the floor. Make sure it's smooth and in good condition.
-- Measure the floor and map out the stencil locations.
-- Set the stencils in place with masking tape or spray mount, then apply the stain or paint with a brush or spray.
-- With the paint still wet, carefully remove the stencil (being careful not to smear the design).
-- If stenciling a border, reposition the stencil by overlapping slightly with the previous application and continue until the border is complete.
-- When the floor is completely dry, remove any remaining tape and glue.
-- Wait at least 24 hours, then apply a protective coating, such as polyurethane or varnish.
Specialty Finishes and Stains
-- Specialty Finishes include bleaching, pickling, antiquing and coloring. Pre-finished floors are the best choice for these applications.
-- Stains darken hardwood but preserve the appearance of the grain.
-- Clear Finishes showcase the natural color and grain.
-- Varnishes and Shellacs provide a hard finish but are not waterproof (use is limited).
-- Lacquers are more water-resistant than varnishes and shellacs, but can be susceptible to cracking and peeling.
-- Moisture-Cure Urethanes provide the hardest finish but most are limited to a glossy appearance.
-- Acid-Curing Swedish Finishes are fast-drying and resist yellowing.
-- Penetrating Finishes preserve the appearance of the grain while soaking into hardwood pores. They are an effective way to "color" a hardwood's natural grain.
Solid Advice
-- Take notice -- bleaching or white-washing any hardwood floor can cause chemical damage to the surface weakening the floor's wood fibers.
-- For more information on stains and finishes, see Hardwood Flooring and Millwork Finishing Options: Pre-Finished or Site-Finished? and Bleaching, Pickling and Antiquing Hardwood Flooring and Millwork.
Case #4 - Smart Use of Materials: The Choices Are More Than Clear
The Challenge
The Solution
For the flooring, specify No. 1 Common, 3/4-inch strip flooring in a variety of species. This flooring grade costs less than Clear. The use of multiple species and character marks add visual interest to the floor.
Lower-grade hardwoods in the bookcase and floor reduce material costs and accommodate the client and his budget.
What You Need To Know
Nature instills wood with a variety of character marks -- knots, mineral streaks, pitch pockets -- that develop as a tree grows, forms branches and interacts with its environment. What's more, heartwood, the innermost portion of the tree, usually is darker in color than sapwood which is closer to the bark. Some architects and designers prefer to use sapwood with heartwood for contrast.
Boards featuring character marks are not premium grade, but they are preferred for many applications because they add character and visual interest. They're also a great choice for applications where wood will be painted or not be visible. Higher grades of lumber, which have few, if any, character marks, generally are preferred for applications such as fine tabletops and cabinet doors.
Lumber Grades
The NHLA grading system, which is used by sawmills and their customers, describes the amount of "usable" clear material in a board. The highest grade boards are long, wide, and free of character marks. They are graded FAS. Select boards may contain slight character marks such as pin holes or small tight knots. The range of NHLA grades, in descending order:
-- FAS
NOFMA standards prevail for grading oak and other species of flooring. These grades are appearance-based and are determined by the occurrence of character marks. NOFMA grades include:
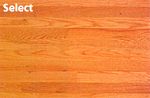
-- Clear
In addition, the Clear and Select grades are further identified by sawing method, see Case #2.
NOFMA also sets separate grading standards for pre-finished flooring:
-- Prime
Solid Advice
-- Know the systems and the species and their characteristics. Familiarity with NHLA and NOFMA grades can make specifying hardwoods easier and more effective.
-- For more information on hardwood grades and built-ins, see Hardwood Flooring Grades Offer Affordable Choices and Hardwood Built-In Installations.
� 1999 The Hardwood Council
Reprinted with permission from The Hardwood Council website.
Create distinct personalities for an adjoining kitchen, hallway and living room that all feature 3/4-inch red oak strip flooring.
Use a clear finish to create natural warmth in the kitchen, design a decorative inlay for the hallway or stencil a pattern in the living room.
Decorative Inlays
With the advent of laser technology, decorative inlays have become an affordable way to create hardwood floors with signature style. While many decorative inlays still are produced by highly skilled craftsmen, new laser-cutting techniques are stirring a revival in this classic "old world" design tradition.
Decorative inlays are most often constructed from a carefully designed combination of individual hardwood components. Once the design is created, components are laser-cut from hardwood flooring planks, usually 5/16-inch-thick.
Stenciling decorative designs onto hardwood floors is another low-cost way to achieve a one-of-a-kind look.
Finishes are the most commonly used tools for expanding design and decorating options with hardwood floors. Here's a quick primer on the types of stains and finishes available:
-- Spice up a hardwood floor design by featuring decorative inlays, stencils, specialty finishes and stains. Laser-cutting technologies make it easier to create customized designs, such as the logo of a favorite sports team. Stenciled borders can be applied in a large room for less than $100.
The client prefers Clear maple and cherry, but the budget doesn't justify all premium-grade materials for a desk, built-in bookcase and hardwood strip flooring in a contemporary home office.
Specify upper-grade hard maple and cherry (FAS) for visible areas, such as the desktop and cabinet doors. Build non-visible areas -- sides and interior shelves -- from a variety of species in No. 1 Common, a lower-cost, intermediate grade priced less than FAS.
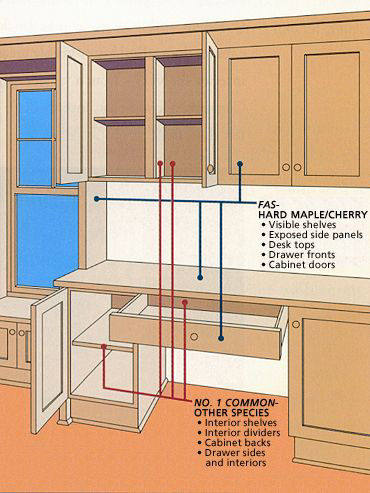
Specifying lower grades of lumber for non-visible areas, including drawers, interior shelves and non-exposed sides, reduced the material costs of this maple and cherry built-in.
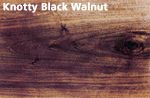
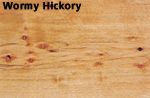
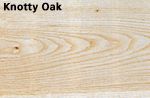
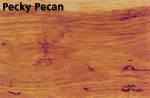
Character marks, such as knots or burls, give hardwoods added visual interest.
Hardwood lumber grades and grading rules have been established and are governed by the National Hardwood Lumber Association (NHLA). Flooring grades have been set and are maintained by the National Oak Flooring Manufacturers Association (NOFMA).
-- Select
-- No. 1 common
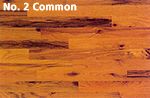
-- No. 2 common
-- No. 3 common

The NHLA grades are based on the amount of "usable" clear material in a board. The highest grade lumber, FAS, generally costs more than No. 1 Common.
-- Select
-- No. 1 common
-- No. 2 common
![]()

The standard grading system for flooring, NOFMA grades are appearance-based. NOFMA also has grading standards for pre-finished oak, maple, beech, birch and pecan flooring.
-- Standard
-- Tavern
-- Use the range of hardwood product grades and costs to your advantage. Top grade, clear material is not always necessary.