Reprinted with permission from Custom Woodworking Business.
You can create one of today’s most popular specialty finishes with a little experimentation and practice.
By Mac Simmons
I know of three different methods for "crackling" a finish. One is with a ready-to-use crackle coating sold by finishing and coatings manufacturers. There also are crackle mediums, which are sold in paint stores, home improvement centers and arts-and-crafts shops; they will produce either small or large crackles.
A third method is to use liquid hide glue, which is made from animal hides and bone renderings. Hide glues have been around at least 4,000 years, having been used by the ancient Egyptians. They are still used today for gluing furniture and are the only glues used and recommended by historic conservators and fine furniture restorers.
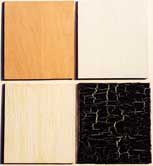
With each of these methods, the thicker the application, the larger the crackle, and the thinner the application, the smaller the cracks. Regardless of method, the actual crackling is an extremely random, erratic and unpredictable process, affected by temperature changes, moisture content, variations in materials and the differences in their applications. It is very difficult to achieve consistency with any crackle method, so one learns to accept the unique ways each crackle finish ends up. (I like to say that the final result is a combination of Mother Nature, physics and Murphy’s Law.)
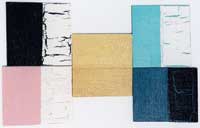
As readers of my columns know, I am a devoted believer in making up complete finish samples before I start working on my projects. I want to see exactly how the final finish will look on each type of wood I use. If I need to make any adjustments, I do them on my samples. They also can be used to get a customer’s approval signature and can become a portfolio of the finishes you can do.
Even though exact results are unpredictable, crackle finishes are no exception. Regardless of which of the three methods you use, I recommend that you make samples to have a good idea of the final look.
Ready-to-Use Materials
The ready-to-use coatings are the best for doing crackle finishes, in my opinion. They come in different colored basecoats and different colored crackle topcoats. There also is a ready-to-use water-clear crackle coating.
I suggest that you always buy the solvents and the crackle coating from the same company, since its reducers will be formulated specifically for its crackle coatings. Follow the directions on the product’s label and call the company if you have any questions or problems. These coatings are straightforward to use: you apply the base color coat, allow it to dry, then spray the colored crackle coat and allow it to dry overnight. Then you apply a compatible water-clear coating to preserve and protect the crackle finish. (Water-clear coatings do not yellow like amber color coatings.)
Crackle Mediums
Some companies sell a two-component crackle set — one part is the base and the other unit is the crackle medium. If you prefer small, fine cracks, ask for a small crackle medium. If you want an aged and seasoned look, use a larger crackle medium. These mediums are formulated for brushes or rollers and are compatible with latex paints or other water-base coatings.
After the small crackle medium is applied over a dried coating, it should be allowed to set up, which can take between 1 and 3 hours. (The actual set-up time will depend on the shop’s atmospheric conditions and the medium used.) The shop temperature should be 55° to 75°F.
Another factor in the set-up time is how thick you brush or roll on the crackle medium. It is important to apply all crackle mediums in a wet coat, and do not go back over the wet medium or you will pull it up. I suggest using a large flat brush, so fewer strokes are needed to cover your work. You also can use a poly sponge brush or a short nap roller.
The small type of crackle medium can be applied over stained, painted or sealed woods. Once it is applied, it will crackle on its own. It should be allowed to cure for a few hours; then a colored glazing stain is wiped and brushed out. Once the glaze is dry, it is clear-coated.
The large crackle medium must be used over a dry color coating. The crackle medium should be dry to the touch, but do not allow it to cure. Once it reaches that stage, it can be coated over with different colors of a flat latex paint. This coat activates the crackling and allows the base color to show the crackle pattern. Some crackle mediums are also compatible with some solvent coatings and glazes, as long as you allow these mediums to cure. (Read the instructions on the containers.)
I have found that a coat of clear shellac under the small crackle mediums improves the overall finish. Latex paints can also be sprayed; you could spray the base color coat and allow it to dry; then apply the crackle medium by brushing in one direction with a large brush. Then spray on your latex colored topcoat. Once dry, apply a coat or two of a water-clear water-base coating to protect and preserve the finish. Cleanup is done with soap and water.
Liquid Hide Glue
With hide glues, the liquid is applied over a dried base colored coating. The liquid hide glue can be thinned out with some hot water to reduce its viscosity for a better application. If you are working on larger pieces, a pinch of table salt (sodium chloride) can be added to the glue to retard the drying time. This will give you more time to apply the hide glue.
Set-up time is approximately 1 to 2 hours, depending on the shop conditions. Once the liquid hide glue is dry to the touch, but not cured, it can receive the color coat. After the colored topcoat is applied, crackles will appear gradually. The finish should dry overnight before you apply a water-clear coating to protect it.
I also use clear shellac under the hide glue — I allow the shellac to dry before I apply the hide glue. The key to success with this crackle is to catch the exact time when it is dry to the touch.
White and yellow glues also will crackle, as will mucilage. These are all mediums that can be brushed off a latex paint. They all can be reduced with water to make them workable and to reduce the size of their cracks. To produce large cracks, use them full strength. For smaller cracks, reduce glues 10 percent or mucilage about 50 percent. Allow about one-half to one hour for them to get tacky, then apply a coat of latex paint.
A big factor in getting any of the mediums to crackle is to apply the paint coat while the medium is tacky, but not set or dry. As with all new products and techniques, you should do some testing on samples to perfect your skills.
Color Combinations
There is no limit to the amount of colors you can make up for crackle finishes. You can select whatever you want to try for your base color and topcoat. You also can buy just a clear base or a white latex paint and some small tubes of acrylic or water colorants and make your own color combinations. Or you can add colorants into a clear base to make your own colored glazes and add highlighting, distressing, antique markings, faux and fantasy effects to the crackle finishes. If you add a little water to your own paints and make them into a glaze, it will make them more workable.
Success with crackle finishes really boils down to making up some samples and getting the feel of working with different materials. It takes some practice, patience and trial-and-error to get it right. When experimenting, take the process all the way from start to finish to make sure that you can work out any problems you encounter along the way.
Once you obtain the effect you want, make a record of your procedures. Also, be sure to keep your materials well mixed, so all ingredients are in solutions and you end up with the same colors, sheens and uniform finish every time.
Reprinted with permission from Custom Woodworking Business.